 |
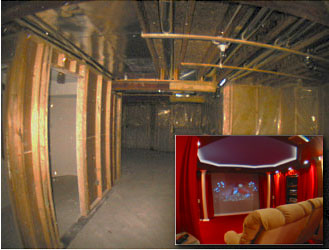
The basement
doesn't have to be just a place to store boxes with things you are
never going to use, but it can be used also as a great entertainment
hideout. A home theater in basement is a really good match. The lack of
sunlight and the isolation from outside life suddenly becomes an
important asset.
I always wanted to have dedicated room
for home theater for movies because I never watch TV. The whole idea to
adjust my own time to the TV time is for me totally upside down. It is
like getting a schedule from your doctor when you are allow to be sick.
After taking some measurements and
looking at the unfinished basement from every corner I decided to
divide it and build a whole new room.
|
 |
Being a computer
geek, of course a first thing I did was took all measurements and enter
it to a CAD system and then started building a "soft-version".
It is important to measure also all pipes or other construction
obstacles and build a room "around" them.
In my plans I created a rectangle
room. First half will be the squarish cinema room with one wall used
for a screen. The ceiling of this room will be inset hexagonal. This
will not only look interesting but the created overhead will in fact
cover all the furnaces and pipes in the basement ceiling. Also the
sides of hexagon will be used as a cool ceiling light. The second part
of the room will be used for archive of DVD's (and stack of chips...).
|
 |
At this phase I
also pick colors to see the whole feel of the room. I decided to go
with a red carpet, brown walls and blue hexagonal ceiling which will be
lighted by the sides of hexagon. I also picked places for other lights
and place for the projector and speakers.
The walls will be covered with a red
curtains not only for esthetic reasons, but also for pure acoustic.
A two columns will surround the
screen. This, together with the hexagonal ceiling will make the room
look a lot bigger and more theater-like. You know, I wont settle just
for a simple room.
|
 |
Designing a room
in a CAD system isn't just for the effect. Once the room is laid out I
can get measures of any parts of the design and prepare materials.
For example when I will go to build my
overhead for the ceiling I can simply measure the parts in software and
buy and cut them to the exact size.
|
 |
But I didn't stop
just designing the "big" things. I went as far as designing the
cabinets for overhead down to the wood pieces I need to use.
This is a big help for somebody like
me who has no great experience in carpentry. It certainly saves a lot
of material especially when you build something which doesn't have
right angles.
There are many CAD programs (many of
them are too complex) or home designer software (many of them are too
simple) which will help you in the designing.
In this illustrated guide I will show
you all the steps I had to go through building a home theater in spring
2002 and also many tips and tricks.
|


