MILKSHAPE SKELETON APPLICATION
In order for the game to animate your model, it needs to have the vertexes of
the mesh assigned to bones in the skeleton, because it's the skeleton that does
the animating.
This can be done in Milkshape and extremely easily aswell.
You will need a skeleton though and this is something that Milkshape doesn't
provide yet, so I have uploaded a Valve Standard Biped in Milkshape format
(ms3d), that you can download from here.
Now you need to load your model into Milkshape and then 'merge' the skeleton
file.
Go to Files and select 'Merge' like so:

...and find the 'valve_skeleton.ms3d' that you just downloaded.
If nothing appears to happen, ie: You can't see the skeleton, go to the 'Bones'
tab and make sure that 'Show Bones' is checked.

TAILORING YOUR MODEL TO FIT THE SKELETON
or...OOH! Suits you, Sir!
Now we can see that my mesh doesn't quite fit onto the skeleton, not only is the
whole thing a little distance behind the skeleton, but it also needs to have
it's arms and legs adjusted to fit over the skeleton. This is something to bear
in mind when you are making the model. Make it to fit the skeleton. It is not
yet possible to adjust the skeleton in Milkshape, and it would be pointless to
do so anyway unless you intended to adjust all of the 106 animation sequence
skeletons aswell.
To explain: Unlike Quake2 where the mesh is animated in every single frame, MDL
files have a series of skeleton animations. What we are making here is a
reference SMD. All the modelling and skinning and vertex assignment you are
doing is to make a reference file for studiomdl. So that it knows what your mesh
looks like, how it's skinned and which vertex in your model belongs to which
bone in the skeleton. That way, the skeleton animates and the mesh follows.
Baring in mind that the skeleton in the animation SMDs is the Gordon skeleton,
your reference mesh and skeleton will try to assume the rough size and shape of
the Gordon Skeleton when animated. this will almost certainly ruin your Model.
The point of all this being, that you have no choice but to make your model
roughly the same size, shape and proportions as the Gordon model.
So I need to now use the 'Move' tool under the 'Model' tab, and select
individual groups of vertexes and adjust them to fit over the skeleton.

Using the Select button, with the select option set to 'Vertex', I select the
vertexes I want and they should light up red.

Then click the 'Move' button and move the vertexes to wherever you want on the
screen. First I shall select the whole model and move it forward, then I shall
slect individual vertexes and adjust the limbs so that they fit properly over
the bones.

I select the vertexes I want to move by dragging a selection box around them.
Note the selected vertexes are red.
Then I move them to the left so that they are centred on the bone in the leg.
Repeat this until your model is positioned as closely as you can get it, over
the skeleton.
TIP:If you have the Auto Tool box checked, then Milkshape will automatically
switch between the currently selected tool and 'Select' every time you click the
left mouse button, which saves you clicking the buttons all the time.
TIP: If you wish to move the vertexes in one direction only then switch off the
unwanted directions in the Move Options dialogue.
For example, you can see three X,Y and Z buttons:

Now, if I switch off the Y (vertical) and Z (back and forth) buttons by clicking
on them, my selection will only move in the X direction (left and right).

ASSIGNING VERTEXES TO THE SKELETON
So now we see here, Our low poly man adjusted to fit the skeleton as neatly as
he'll go. Now we need to Assign his freshly tweaked vertexes to the skeleton we
merged earlier. This is so simple it makes me want to weep openly and beat my
breast with joy, but enough of that. Under the 'Model' tab, make sure 'Auto
Tool' is unchecked and 'Select' is activated.

Now go to the 'Bones' tab and you should see this rollout:

What we see here, is a list of all the bones in the skeleton. But which one is
which? Well, they are fairly clearly named so we can take an educated guess, but
then assumption is the mother of all screw-ups, right? So, I have drawn this
handy chart, naming the bones in the skeleton I have provided. I have only shown
one foot and one hand but I think you can probably figure out what their logical
counterparts are called.

What next? Well, this requires a little thought. You need to decide which
vertexes are going to be assigned to which bone.
Then select the vertexes you wish to assign by dragging a selection box around
them as usual, then select the bone you wish to assign them to in the list, by
clicking on it to highlight it, then click the 'Assign' button.
That's it. It really is that simple.

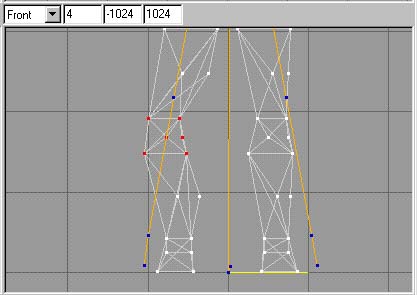
We see here, that I have selected vertexes in the model's right leg. I have also
selected the 'Bip01 R Calf' bone (which is the orange line running between the
knee and the ankle - terminated by blue dots). If I now click the 'Assign'
button, the selected (red) vertexes will be assigned to that bone.
You repeat this until all of your vertexes are assigned to bones.
TIP: To check to see if you have missed any vertexes, deselect any vertexes that
might currently be selected, then click the 'Select Unassigned' button. Any
vertexes that are not assigned to a bone wil light up red.
NOTE: ALL VERTEXES MUST BE ASSIGNED TO A BONE.
TIP: To check your vertex assignments, select a bone from the list and click the
'Select Assigned' button. Any vertexes assigned to that bone will light up red.
Once you are happy with your vertex assignment, and provided your model is fully
skinned, it's time to export your model.
Select File/Export and then select 'Half-Life SMD'.
Save the file and you are ready to compile your model. See the compiling
tutorial. Skip straight to the section entitled 'Editing the QC files'. The
First section only explains how to export to SMD in Studio MAX, which you have
just done.
Tutorial created by Scarecrow,
THANK YOU !!!
©
http://www.Planetfortress.com/TF2Models
TF2 is trademark of Valve
Software and of Sierra Online.
© 2000 TF2 MODELS - Hosted by Planetfortress
Web designer/Webmaster : IXNAY