Archive for the ‘How To’ Category

Quick guide to installing WordPress

Posted on November 11, 2010 by The Forge
Filed under: How To
Tags: , ,

WordPress has become one of the most popular content management systems available to site owners. With its powerful features, ease of use and thousands of themes on offer, more and more people are turning to WordPress to create and manage their websites.

This has led to a frequently asked question – How do I setup WordPress?

Fortunately, WordPress has one of the easiest setup processes; however, there are still a few things that need to be understood before you get to it. Some of the tasks you’ll be required to perform are:

  1. Organising a hosting account
  2. Setting up a database
  3. Updating files
  4. Using File Transfer Protocol (FTP)

Before you can do anything, you need to have a hosting account and domain name – The domain name is your http://www.yourname.com, which points to your hosting account where all your files are stored on the Internet. Hosting accounts are available through a number of service providers – we recommend Hetzner and their affordable package called “Basic”. Once you’ve arranged the hosting package, we’re ready to look at creating a database.

With most hosting companies, you will receive access to a Control Panel or Konsole, or some sort of administrative area which allows you to manage your hosting account. Inside the Control Panel will be a tool that allows you to create a MySQL database. When creating a database, make sure that you write down the host name, database name, username and password, as you’ll be using these again when installing WordPress.

Your next step is to download a copy of WordPress and you can do so by clicking here. Once you have downloaded WordPress, you will need to unzip the files and look for a file called wp-config-sample.php – This file needs to be opened, you can do this with Notepad (Win) or Textedit (Mac). Once the file is opened, the following lines need to be changed to match the host name, database name, username and password you wrote down in the previous step:

/** The name of the database for WordPress */

define(’DB_NAME’, ‘database_name_here’);

/** MySQL database username */

define(’DB_USER’, ‘username_here’);

/** MySQL database password */

define(’DB_PASSWORD’, ‘password_here’);

/** MySQL hostname */

define(’DB_HOST’, ‘localhost’);

Once you have made these changes, save the file, close it and rename it to wp-config.php.

The next step is to make use of an FTP program to upload your files to your host. A free FTP program called FileZilla can be downloaded here. If you aren’t sure on how to use an FTP client, click here to read a comprehensive guide about uploading your files to your host or have a watch of this video tutorial:

At this point, you should have uploaded all the WordPress files that came in the .zip file that you downloaded to your host.

All that is left now is to navigate to your domain, for example, http://www.yourname.com and follow the instructions given to you on screen.

If you get stuck, please click here and read a more comprehensive guide to installing WordPress.

Everyone is a-twitter about Twitter.

Posted on December 1, 2009 by The Forge
Filed under: How To
Tags: , ,

Twitter is the easiest, quickest way to find out what is happening in the world and around the corner from you, right now. Even more importantly, to the business person, it’s an excellent, instant way to communicate with your clientele.

Best of all, Twitter gives you access to instant news to what’s of interest to you – be it current events, the latest trend, your favourite celebrity or news from your industry.

Twitter is a free social networking and microblogging service that enables you to send and read messages known as Tweets. Tweets are short, 140-character long update messages that display on your Twitter profile page and on the pages of your followers or subscribers.

Your Twitter profile enables you to upload a profile picture, or company logo, and include a short, informative biography and your website URL.

Tweeting, as it’s called, is almost like being able to simultaneously send multiple text messages to your clients, audience and interested or interesting people. And best of all, it’s right on your computer, for free!

Are you running a promotion or want to let people know about your latest specials?

Tweet it!

Twitter has exploded across the globe and in an incredibly short time, changed the face of news and message delivery. Now, you can instantly find out what’s happened in the world, the moment it happens, from someone who is right there when it happens!  So, the best way to keep up with your friends, trends, news and just about everything, is now via Twitter.

Twitter lets you keep an eagle eye on your competition and keeps you truly up to date with the world beyond your business.

Twitter fills a crucial marketing role for organizations and businesses. Twitter enables companies to truly interact, in an instant way, with their target market and clients.

South African companies have taken to Twitter in a very real way. Protea Hotels (http://twitter.com/ProteaHotels) uses their Twitter stream to promote their accommodation specials; pass on compliments they’ve received on their service and interact with their clientele.

Kalahari.net (http://twitter.com/kalaharinet) uses their Twitter stream to keep their followers and clients up to date with specials and even keeps their audience up to date when problems occur in relation to service delivery.

If this still doesn’t make sense, here’s a video to help you understand:

And, at The Forge, we keep our followers up to date on our new project releases, new websites and latest developments via our Twitter stream. Follow us here http://twitter.com/theforgeweb

How to create an email signature – Part I

Posted on April 20, 2009 by The Forge
Filed under: How To
Tags: , , , , ,

Please note: This tutorial is based on Microsoft Outlook, part of the Microsoft Office 2003 suite.

An email siganture or signature block, is a block of text, which is appended to the end of an email. This block of text usually contains information about the sender or the sender’s company.

Adding a signature to your emails has many advantages, two of which are: branding and contact detail distribution. A signature allows you to send out a virtual business card each time you send an email.

Creating a signature is not tricky if you follow these simple steps:

STEP 1

The first step is to open up Microsoft Outlook, it should look like this..

tutorial-email-signature-screen1(click to enlarge the image)

STEP 2

Move your mouse to the top of Microsoft Outlook and select the ‘Tools’ menu by left-clicking, followed by left-clicking on ‘Options’.

tutorial-email-sig-screen-2STEP 3

At this point, a window will have popped up, which looks like the example below. At this point, you want to left-click on the ‘Mail Format’ tab, as indicated below:

tutorial-email-signature-screen3(click to enlarge the image)

STEP 4

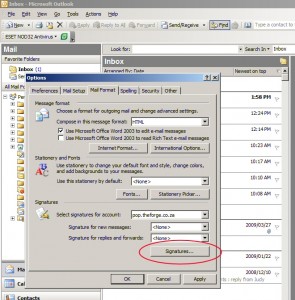
The last step before creating your new email signature is to select the ‘Signatures’ option, as highlighted below..

tutorial-email-signature-screen4(click to enlarge the image)

STEP 5

It’s time to create your signature. On the window which popped up after completing STEP 4, you need to left click on the ‘New’ button, as shown below. Once again, a window will pop up and you will be able to give your signature a name by replacing the highlighted ‘Untitled’ text. It would be suggested that you name is something along the lines of ‘Company Name ‘ Signature’, replacing ‘Company Nam’ with your companies name (Please don’t include the quotes). Once you have done this, left-click on the ‘Next >’ button.

tutorial-email-signature-screen5

tutorial-email-signature-screen6

Click here to continue..

How to create an email signature – Part II

Posted on by The Forge
Filed under: How To
Tags: , , , , ,

STEP 6

At this stage, you should have a pop up window on your screen, which allows you to type in your Signature text, as seen in the example below. Once you have typed in your signature text, please left click the ‘Finish’ button, followed by a left-click on the ‘OK’ button, which appears on the window after you’ve clicked the ‘Finish’ button.

tutorial-email-signature-screen7

STEP 7

The final step is assigning the signature to your emails. This can be done by using the drop down menus provided, please see the image below. Note: You can choose to include your signature in new emails as well as replies and forwards – This is your choice. Personally, I use both options. Once you have done this, left click the ‘Apply’ button followed by a left click on the ‘OK’ button“ you will now be back at STEP 1.

tutorial-email-signature-screen8

STEP 8

To test your signature, simple click on ‘New’ as you would usually do to write an email. You will now see your signature in your email.

tutorial-email-signature-screen9

It’s as simple as that, enjoy your new email signature!