Make a Snowman Cloche from a Soda Bottle (plus seven more snowman crafts)

We finally have snow today, so let’s build a snowman. Our little snowman craft is displayed under a cloche or glass dome, a hot, home decorating trend. But here’s our secret – the glass dome is actually a repurposed plastic soda bottle. I thank Kathleen George for this clever idea.

DIY cloche

How cute is this? And, the "cloche" is actually made from a two-liter plastic bottle. Brilliant!

I think kids would have a blast building the little scene under the cloche, and they can use a plastic knife to cut the STYROFOAM Brand Foam. Cutting through the plastic bottle requires a sharp knife, so be sure an adult is helping out on this project.

A snowy weekend is a good time to craft, so I’ve shared seven more snowman crafts that will warm your heart. No doubt there’s one you can make with craft supplies already in your stash, from paper and rope to felt and socks. Enjoy!

To make a Snowman Cloche, you’ll need:

  • STYROFOAM Brand Foam: 6” x 1” disc; two 2” balls; one each 3” & 1 ½” balls
  • 2-liter plastic soda bottle
  • Adhesive remover (such as GooGone)
  • Glitter, white
  • High-loft quilt batting, 8” square
  • Half-round beads, 5mm, black
  • Wooden skewers
  • Acrylic craft paint, orange
  • Sparkle texture paint, white
  • Micro marker, red
  • Twigs
  • Snowflake sequins
  • Clear nylon thread
  • Mod Podge
  • Low-temp glue gun
  • Optional: Blush, mini birds, bird seed, snow sequins & clear thread
  • Tools needed: Utility blade; sharp pencil; serrated knife & old candle; plastic knife; small paintbrush; knippers; shoe box lid or newspaper; scissors

NOTE: An adult should always handle the serrated knife, and should cut the plastic soda bottle. Kids can use the plastic picnic knife for making the snowman.

To make your Snowman Cloche:

Make your cloche:

1. Use adhesive remover to remove the label from the soda bottle. Thoroughly clean and dry the bottle.

snowman cloche

The foam ball on top should cover the threads on the neck of the plastic bottle.

2. Cut off the bottom of the plastic bottle with the utility knife. It’s o.k. if it’s a little uneven.

3. Place bottle in center of 6” foam disc and trace around it with the pencil. Remove bottle and trace around the circle again, making a deep groove. Position the bottle in the grooved circle and twist until it’s straight.

4. Using tip of serrated knife, cut a hole in the bottom of one 2″ ball so that it fits on the top of the bottle. Twist the ball onto the bottle until it completely covers the threads for the bottle top.

5. Set aside the foam ball and disc while you work on the project.

Make the snowman:

  1. Using the serrated knife cut a small slice from the bottom of the remaining foam balls. Cut a slice from the top of the 2” ball. Stack and glue the balls together, building your snowman.
  2. Insert a wood dowel into the bottom of the snowman and use it as a handle. Cover the snowman with Mod Podge. Working over a box lid or newspaper, sprinkle the wet snowman with white glitter. Gently press glitter into the Mod Podge. Place wood skewer in a jar while the snowman dries. Repeat, this time glittering the foam ball that fits on top of the cloche.
  3. Glue on beads for eyes. Paint end of wood skewer orange; let dry. Cut off orange end using knippers and insert carrot nose into snowman face. Draw on tiny mouth with red micro marker.
  4. Insert two small forked twigs into sides for arms.
snowman crafts

Let the kids build the snowman and then assemble a snowy scene.

Create the snowman scene:

  1. Cut quilt batting into a circle to fit inside the circle drawn on the foam disc. Glue batting to center of disc.
  2. Cover outer rim of disc with quilt batting, but be careful not to cover the groove.
  3. Insert a 2” wood skewer halfway into bottom of snowman. Position snowman on the disc, slightly off center. Test to be sure the cloche will fit over the snowman. Once you like the position of the snowman, glue him in place.
  4. Trim several twigs and insert through the quilt batting and into the foam disc.
  5. Optional: Glue birds to “trees.” Glue bird seed to snowman’s “hands” and on the ground.
  6. Glue glittered ball to top of cloche.
  7. Glue clear thread to snowflake sequins; glue other end to inside of cloche.
  8. Brush textured paint onto snowman’s head, the tree branches, and on the base around the snowman.
  9. Place the cloche in place and display.

Here are seven more sweet snowmen, and instructions for each one are on StyrofoamCrafts.com. The photos link to the tutorials, so just click on the photo for the instructions.

snowman crafts

These Scrunchy Felt Snowmen know how to bundle up!

snowman crafts

Yeehaw! The Sledding Snow Buddies are ready for some fun. Can you believe that they're crafted from socks and tights?!

Snowman Crafts

A square snowman? Why not! Textured paper and colorful buttons add to the fun.

snowman crafts

These no-melt cuties are made with Crayola Model Magic and are designed by Lorine Mason.

snowman crafts

Wrap 'em Up Snowman tips his hat.

snowman crafts

Brrr! The Washtub Snowbabies, created by Lorine Mason, enjoy a brisk bubble bath.

Snowman blocks

Debra Quartermain, who is a whiz at designing with fabrics, created this ensemble from felt and foam.

Which of our snowmen is your favorite? I’d love to hear what you think about today’s snowman round up.

And finally, we have a winner of our Solar System kit – Carol Ebbers, who is looking forward to crafting a Solar System with her grandson. Congratulations, Carol, and please contact me so I can arrange for the shipping.

Happy crafting!

Sharon

Posted in Craft Tutorial, Home Decor, Kid's Crafts, Recycle Crafts, Wintertime Crafts | Tagged , , | 10 Comments

Roses are red, get out the glue, here’s a Valentine’s Day craft for you

I’d like to play cupid today and introduce you to our first Valentine’s Day craft – a luscious, rose-covered heart. Roses and hearts are favorite symbols of Valentine’s Day (and chocolate, of course), and designer Diane Flowers combined them both when she made her rose-covered hearts. It’s an easy craft for Valentine’s Day, so make two – one for you and one for someone special.

Make a red rose heart

This heart would make a warm welcome on your front door.

Diane shares several versions of this sweet heart, and her first Red Rose Heart was made with a 6” heart of STYROFOAM brand foam. Diane used several dozen silk roses to cover the front, side and back of her heart. Now, that many silk roses can get expensive, so here are a few money saving hints:

  • Red Rose CraftsDiane covered the front and back of her heart, but if you’re hanging this where no one sees the back, just cover the front.
  • If you paint your heart red, you can probably use fewer roses as any exposed foam won’t be as visible.
  • You’ll find silk roses at your local dollar store or other discount chain, so shop around for a deal.

Next, Diane trimmed her rose stems to about 2”.  Trim them a little longer than you think you’ll need; you can always trim more but you can’t add more. Then, starting in the center, insert the roses into the foam heart till it’s covered and you like the arrangement. Once you’re done, if you’d like a little more “hold,” remove the stems, add a dab of glue in each hole, and reinsert the stems. Add a ribbon and hang this heart on a door, in a window, on a knob, just about anywhere. For step-by-step instructions, visit StyrofoamCrafts.com.

Framed Heart

Hang your heart from an empty frame for more impact.

Look what Diane did next – she framed her Valentine’s Day Red Rose Heart in an empty frame. When framed, the rose-covered heart has more impact, and will look beautiful on a wall. You’ll want to start with a heart that is several inches smaller than the frame. Here’s what Diane used:

  • 10” x 13” frame
  • 8” heart of STYROFOAM Brand Foam
  • 15 medium size roses

Diane could not find an 8” heart in the store, so savvy designer that she is, she cut her own from a 1” sheet of STYROFOAM Brand Foam. She drew her heart on the foam sheet, waxed a serrated knife with an old candle (a bar of soap will work, too), and then cut out her heart (yikes, that sounds gruesome!).

Diane’s next version is perfect for gift giving. Diane created sweet and sentimental tags for each heart using vintage papers and embellishments.

Add a tag

Add a tag and your rose heart becomes a Valentine's Day card.

I love the combination of red and pink roses. Imagine rose hearts made with white or cream flowers for a wedding. They would be beautiful hanging from the pews, or from the backs of the bride’s and groom’s chairs at the wedding reception. The bride and bridesmaids could even carry these as their bouquets.

Valentine's Day Hearts

Wouldn't these be pretty made with white, cream or even soft yellow roses?

And while we’re talking about love, I loved the many comments you all left about your New Year’s resolutions. I am so inspired by your enthusiasm for a fresh start and your creative goals and energy. It’s going to be a good year! And Szabina L. will definitely start it off right because she won the book Steampunk Chic! Congratulations, Szabina, and please contact me with your mailing address.

Now that I know that many of you follow steampunk, we’ll be sure to schedule another steampunk project and book giveaway later this year.

Speaking of giveaways, we still have a Solar System kit giveaway going on through Thursday, January 12.

Happy crafting!

Sharon

Posted in Bridal Showers, Craft Tutorial, Flower Designs, Gift Ideas, Home Decor, Paper Crafts, Valentine's Day Craft, Weddings | Tagged , | 9 Comments

Out-of-this-world kid’s craft: How to make a Solar System model (or maybe you’ll win one!)

Is there a school science fair in your future? Or maybe it’s January, Christmas is so two weeks ago, and the kids are B.O.R.E.D? If you’re living with a pack of space cadets, here’s how you can make your own Solar System model. And to start the New Year right, I’m giving away two Solar System kits. (Yes, it’s only January 6th and this is our second giveaway of the year! There’s still time to enter the first one.)

make a solar system

Follow the guidelines on StyrofoamCrafts.com to make your Solar System as accurate as possible.

The step-by-step instructions for making a Solar System are on StyrofoamCrafts.com, and we’ve included a chart so you can make it as scientifically accurate as possible. (Now, as one who had a Purple Planet Eater themed birthday party when I was little, I’m not so sure that you have to be perfectly and scientifically accurate. If you want to make this your own little world, go ahead and do so. Make your own galaxy the way you want to see it!)

solar system model

Make a Solar System poster for your next science fair or class assignment.

If you prefer making your Solar System model as a poster, here’s another suggestion. To make the poster, you can follow the information provided in the chart on StyrofoamCrafts.com, and use the sizes of balls, paints, and the distances listed. You’ll cut your balls in half first, and because you’re using half balls, you’ll have enough to make two posters.

how to make a martain

Once you've made your Solar System, make a few Martians to populate it.

One more idea for you – how about a few aliens to inhabit those planets? StyrofoamCrafts.com has instructions for these Little Green Men, too. You can use your leftover paints and other found objects in your stash to pull these together.

Solar system kit

I'm giving away two of our prepainted Solar System kits, which you can use to make the model Solar System pictured on the right.

I am giving away two of our Solar System kits today. These complete kits have everything you need to make your own model Solar System. If you’d like to win, leave a comment below and tell me who in your family would love to make a Solar System. I’ll announce today’s winner next Friday the 13th (yikes!). So, the cut-off for entering is end of day Thursday, January 12th.

I also want to announce the winners of our last giveaway from 2011. We partnered with Quayside Publishing & Quarry Books to give away two beautiful craft books and a collection of shapes of STYROFOAM Brand Foam. Denise R. of Wicked Crochet won the book Mixed-Media Doll Making: Redefining the Doll with Upcycled Materials on Quayside’s blog Craftside. The winner of The Complete Photo Guide to Ribbon Crafts giveaway on Crafts ‘n Coffee is Karen Whitney. Congratulations! Please contact me, Karen, with your mailing address.

Happy crafting!

Sharon

Posted in Craft Tutorial, Giveaways, Kid's Crafts | Tagged | 7 Comments

Make a steampunk style photo cube (& win the book Steampunk Chic)

Happy, happy New Year! Did you do anything fun last week? We enjoyed watching the movie Hugo, based on the book The Invention of Hugo Cabret by Brian Selznick. Have you seen it? It’s about a 12-year old boy who lives in a Paris train station and maintains its many clocks. It’s a wonderful story, full of tinkering and invention, and close-up views of the massive clocks and their whirling gears. In my mind, the movie has elements of steampunk style.

Hugo Cabret

12-year old Hugo lives in a Paris train station and maintains its many clocks. (Photo - Paramount Pictures)

What’s steampunk? It’s a melding of our modern day world with Victorian times. If you like Victorian or vintage style, and tinkering with old watches, gears, jewelry parts, keys, hardware, and other found items, then steampunk style is for you. And you’re in luck because authors & designers Jennifer & Kitty O’Neil are offering a copy of their new book Steampunk Chic for one of our Crafts ‘n Coffee readers.

steampunk chic

Authors & designers Jennifer & Kitty O'Neil are giving away a copy of this 64-page book to one of our readers.

Here’s what Jennifer & Kitty have to say about steampunk: “It’s watch faces, keys and gears spun together with crystals, silk and lace . . . Steampunk Chic is the union of antique technology with Victorian charm and elegance.”

You’ll find so much inspiration in this book, along with a dozen different projects with step-by-step instructions. The O’Neils, who are known for their flea market prowess, will show you how to mix and match gears, keys, postage stamps, buttons, and other ephemera to create your own funky, vintage yet modern home décor.

Steampunk Chic

Tussy Mussy's Corsage is one of 12 projects in the book Steampunk Chic.

And if you can’t wait to get started, we have a tutorial today, too, and you can make our Steampunk Photo Cube. Designer Kathleen George is also a fan of this style and she designed this project with beautiful vintage details – look closely to see the keys, hinges, buttons, nuts & bolts, and even a small figurine.

steampunk photo cube

Steampunk style is a celebration of mixed media elements.

steampunk crafts

Check out the details -- a key, a hinge, bolt feet, and even a small figurine.

To make a Steampunk Photo Cube, you will need:

  • STYROFOAM Brand Foam: 4” cube
  • 12” x 12” scrapbook paper in Victorian theme
  • Large bolts, four
  • Small fork
  • Metal objects* – brass hinges, coins, washers & bolts, keys, charms, upholstery tacks, silverware
  • Fabrics and notions – buttons, lace
  • Paper – embossed trims, paper filigree, scraps
  • Miscellaneous – watch faces, silk flowers, beads
  • Paper paste (we used Yes! Paste)
  • Low temp glue gun & glue sticks
  • Tools needed: Ruler; sharp pencil; scissors; 1” putty knife or similar tool; smooth pointed jewelry pliers; Exacto knife; 18-gauge wire; bone folder (optional)

(*Kathleen shares a hint for aging shiny, new metal: use a dry brush and apply a very thin glaze of grey acrylic paint to the surface to give the metal a tarnished looked.)

To make a Steampunk Photo Cube:

1. Cut a 4 ½” square of paper; score each side ¼” from the edge. Clip the corners. Spread a thin layer of paper paste on top of cube. Apply the paper square, smoothing it down with fingers. Fold edges down onto sides and glue in place.

2. Cut a 4” x 12” strip of the paper and score vertically every 4”. Spread think layer of paste onto sides of cube and glue the paper strip in place.

3. Cut a 4” x 4” paper square and glue to bottom of cube.

4. Use a sharp pencil to make small starter holes in each of the corners on the bottom of the cube. Twist large headed bolts into each corner to serve as feet.

5. Using jewelry pliers, gently bend back the top part of fork. Slightly bend forward every other tine so that the fork will hold a photo. Optional: Add decorative beads to tines.

5. Using Exacto knife, cut a small slit at the top, center of the cube. Push the end of the fork down into the cube at such an angle that a photo will stand straight.

6. Decorate cube with embellishments, using photo for inspiration. To attach heavy items, bend a small length of wire into a u-shape, use this u-pin to attach items, pushing ends through paper and into foam.

vintage photo

Clara models the latest in Parisian haberdashery in the 1900s.

Are you wondering about the beautiful lady in the photo? Kathleen shares that it’s her grandmother Clara and the photo was taken in the early 1900s. Clara had just finished her bachelor’s degree in home economics at the University of Kansas and was on her European tour. The photo was taken in Paris for Clara’s fiancé, who was finishing up his PhD in agriculture at the University of Rutgers. According to Kathleen, Clara’s father was scandalized by the price of this stunning Parisian hat! It’s no surprise that this Victorian lady was also voted homecoming queen at the University of Kansas.

So, we start the year with a little history, a steampunk craft and a giveaway! And now, we’ll take a look forward – if you’d like to win the book Steampunk Chic, please leave a comment below and share with us what you’re looking forward to in 2012. Let’s celebrate the New Year and new beginnings!

Please leave your comment by Monday, January 9. Thank you.

Happy New Year and happy crafting!

Sharon

Posted in Craft Tutorial, Giveaways, Home Decor, Mixed Media, Paper Crafts, Recycle Crafts | Tagged , , , , | 59 Comments

A round up of vintage Christmas crafts (and “thank you” gifts for 2011)

Yes, I’m a STYROFOAM Wonk, which explains why I have a collection of vintage craft books all about creating with STYROFOAM Brand Foam. One of my books is 50 years old, from a time when our modern-day craft industry was brand new. It’s fun to page through the books to see what’s changed – and sometimes, what’s not. As Christmas is all about memories and tradition, I thought it was a good time to share a few of the books.

retro christmas craft book

This 1960 project book doesn't look very flashy, but it has 30 pages packed with 20 projects.

Christmas STYROFOAM Projects was published in 1960 by Quality Publications. It’s dedicated to craft pioneer Aleene Jackson, inventor of Aleene’s Original Tacky Glue. The dedication states “Without her flair for tasteful design, and her talent for turning ordinary materials into sparkling, professional looking gifts or decorations, this book on STYROFOAM would never have been written.” Does anyone remember Aleene’s Creative Living television program?

vintage snowman crafts

Snowman Jump Up from the vintage craft book Christmas STYROFOAM Projects.

Inside the booklet, among angels, tin soldiers, and a church choir, I found this snowman – the pipe seems pretty politically incorrect for today’s time, don’t you think? Does anyone still make smoking snowmen?

jack-in-the-box snowmen

The Jack-in-the-Box Snowman on the left is from 1960; Debra Quartermain's updated version on the right is from 2010.

I had to compare it to this sweet Jack-in-the-Box Snowman created 50 years later by designer Debra Quartermain. Same idea, very different outcome. For one, Debra’s version is covered in fleece, a plastic-based fabric that no one could have dreamed of in 1960!

vintage Christmas crafts

Today's festooning or garland is more closely cropped than the product used in this 1960s project book.

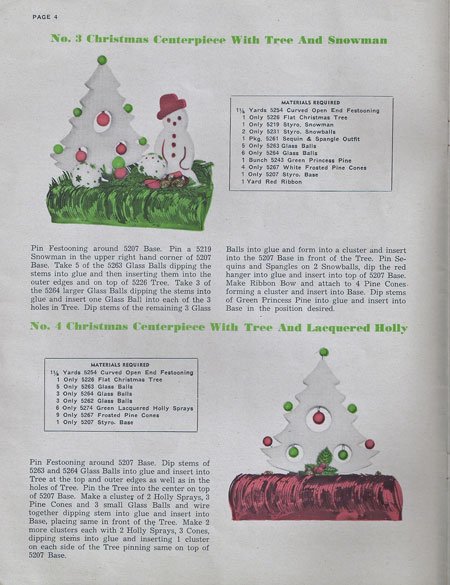
Next up, Christmas crafts made with “Festooning, Metallic Sequins and Spangles.” Festooning? I wasn’t sure what it was and so I googled it — it’s garland.

vintage Christmas Crafts

These foam shapes are no longer available, but festooning, or Christmas garlands, are still a classic for making Christmas crafts.

Festooning decorates the bases of the designs pictured above. While festooning is available today, the tree and snowman made from STYROFOAM Brand Foam aren’t carried by the large craft chains.

vintage craft books

There are so many possibilities for a Window Ball. What would you make out of it?

You’ll find more exotic shapes of STYROFOAM Brand Foam in the 1965 booklet 101 STYROFOAM and Trims Decorations. I’ve never seen a Window Ball, which is featured on the front cover.

vintage craft book

The STAK Tree shape is my favorite, and this 1974 project book has many creative uses for it.

Create a Wonderland with STAK Tree Shapes was published in 1974 and is all about one of my favorite shapes, the STAK Tree.  (Remember our Golden Noodle Christmas Topiary Tree made with a STAK Tree?)

Vintage Christmas crafts

STAK Tree Christmas crafts from 37 years ago!

The book includes a collection of Christmas projects, and really, some of them aren’t that different from what we might make today. The Ruffle Tree? I made an updated version in July, though mine is made with a cone and therefore, it’s not as full and fluffy. Santas are always timeless, and I think the red and green elf on the right is pretty cute.

Two ruffled trees

Then & now: The ruffle tree on the left is from 1974, and the two on the right are from 2011.

Do any of these crafts look familiar to you? Is there anything you would make today?

win a magazine

Three of our readers are winning a one year's subscription to Crafts 'n Things magazine.

Today’s post was really fun for me, and I’ve enjoyed sharing creative ideas with you this year. What I really love, however, is reading your comments and hearing from you. I sincerely appreciate each and every one of you and the feedback you provide. As a special “thank you” gift, I’m giving away three subscriptions to Crafts ‘n Things magazine to the Crafts ‘n Coffee readers who made the most comments this year – Katiria, Lisa M., and Patty S. Please contact me with your mailing address, and I’ll arrange for you to receive a one-year subscription to Crafts ‘n Things.

I wish you all the happiest of holidays and a wonderful new year. This is my last post for 2011, and I’ll see you in January!

Happy crafting!

Sharon

Posted in Christmas Crafts, Giveaways, Home Decor | Tagged | 23 Comments

Dazzling DIY Rock Candy Topiary Trees from Martha Stewart

Surprise! I wasn’t supposed to be here today, but when I see a sweet & sparkling (and easy) idea for STYROFOAM Brand Foam, I have a hard time not sharing it with you all. This morning, Kevin Sharkey appeared on The Martha Stewart Show and he demonstrated how to make a simply dazzling collection of topiary trees using rock candy. Just yesterday I featured a collection of edible topiaries, so this fits right in. Martha shares the tutorial on her web site, so is you missed her show, you can follow along and make a sweet forest of trees.

Rock Candy Topiaries

Kevin Sharkey demonstrated these dazzling Rock Candy Trees on The Martha Stewart Show.

These sparkling beauties can be displayed all winter long, and wouldn’t they be pretty at a winter wedding, too? 

That’s it for today. See you tomorrow for a little retro fun and maybe a surprise or two . . .

Happy Christmas crafting!

Sharon

Posted in Christmas Crafts, Entertaining, Topiaries, Weddings, Wintertime Crafts | Tagged | 1 Comment

It’s o.k. to play with your food to make these topiaries

I confess – I’m a little a lot behind this year. Tree? It’s purchased, but it’s not yet up and decorated . . . Cookies? Dough is made, but they’re not yet baked . . . Presents? Purchased, but not yet wrapped . . . So today we have fun, last-minute ideas that dress up your holiday entertaining and don’t take a lot of time. Chances are that fruits & veggies are on the menu already, so why not spruce them up. And a Candy Topiary? Yes, please!

Because mom always said that you have to eat dinner before you get dessert, we’ll start with the fruits & veggies. Prajakta (or PJ) from the blog Ginger & Garlic shares a tutorial for this mouthwatering Fruit Topiary Tree. The brilliant mix of strawberries and kiwi are beautiful, and PJ added whimsical melon slices cut out with mini cookie cutters. Isn’t this a fun way to get the kids to eat more fruit?

how to make a fruit topiary

This colorful & edible topiary is topped with a melon star.

Next course – veggies. Katrina from Wanna Green Bean shows how to “spruce” up your holiday table with a Veggie Topiary. There are more cute little cut-outs, too, as Katrina added a little cheese menagerie made with cheese slices & cookie cutters.

how to make a veggie topiary

Doesn't this Veggie Topiary look like a mini Christmas tree?

And the finale – the Candy Topiaries. Over the next few days, you can keep the kids busy for an hour or maybe even longer as they craft confectionary masterpieces. And how fun that their work can then double as a centerpiece. Better Homes & Gardens shares these Minty Peppermint Trees and offers a video tutorial to help you make them. 

how to make a candy topiary

Better Homes & Gardens shares a video tutorial for making these candy topiaries.

Martha Stewart made Peppermint Candy Topiaries too, and while she displays them in a wedding vignette, these would be beautiful front & center in your Christmas buffet.

Christmas candy topiaries

What a beautiful spread for a Christmas wedding. The Peppermint Topiaries would be pretty for any holiday occasion.

Here are a few more ideas made with candy, cookies and gum balls. These are all found on StyrofoamCrafts.com, and the links to the instructions are listed below.

how to make candy topiaries

It's a mouthwatering assortment!

For the project instructions, left to right:

Flowerful Fruit Roll-Up Topiary

Rainbow Mint Topiary

Veggie Topiary

Meringue Cookie Topiary

Colorful Gumball Topiary

Here’s another option – substitute a wreath ring for the cone and make a Gum Drop Wreath. (Sorry, no step-by-step instructions for this one, but you can follow any of the project instructions above and make substitutions.)

make a gumdrop wreath

Use a wreath ring instead of a cone to make a Gumdrop Wreath.

I have a little crafting retrospective planned for Friday, so I’ll see you then. In the meantime, good luck with your preparations and have a little fun in the kitchen, too.

Happy Christmas crafting!

Sharon

Posted in Christmas Crafts, Entertaining, Kid's Crafts, Topiaries | Tagged | 2 Comments

Here comes Santa Claus: Six Santa crafts celebrate . . . Santa!

I’ve made my list and I’ve checked it twice, and these six Santa crafts are definitely on the “nice” list. Each Santa Claus craft uses a different technique so there’s something for everyone and no one needs to pout. You can make a felt Santa, fabric Santa, paper Santa, air-dry clay Santa and even a birch bark Santa. Click on any of the photos for the project instructions.

One of my favorites is the all-white Crystal Santa by Debra Quartermain. Debra’s Crystal Santa is made from paper and is trimmed in feathers and snowflakes.

make a Santa craft

This sparkling, all-white Santa belongs in every Santa collection.

The Scandinavian Felt Santa & Elf have an old world charm and are designed by Kathleen George. Since they’re made with felt and glued rather than sewn, you really can make this Santa in an afternoon.

make a Scandinavian Santa

I think this pair would make a wonderful, handmade gift.

I feel calmer every time I look at the Birch Bark Father Christmas. Clad in birch bark and trimmed in moss, this woodland Santa could tame a deer – or soothe frantic Christmas spirits.

woodland Santa

Birch bark and velvet leaves decorate this beautifully understated Father Christmas.

Pull out your favorite paper crafting supplies to make Rebekah Meier’s Retro Santa Paper Collage. Holiday papers, brads, tags, and trims make a cute Santa who is perfect for perching on the mantel, window sill, small shelf, or even a tabletop.

make a paper Santa

You probably already have on hand most of the materials needed to make this Santa craft.

If you’re looking to craft an heirloom Santa, this Round & Jolly Folk Art Santa made with air-dry clay is one to treasure. I’ve seen similar Santas in catalogs for big bucks, so hang onto your cash and DIY this one!

make a folk art Santa

This Round & Jolly Folk Art Santa will be cherished for years.

Here is one more favorite of mine – Sleepy Santa by Debra Quartermain. I imagine this is how Santa looks after pulling an all-nighter delivering all those toys. He’s tired, clutching a cup of coffee, and dressed in his robe, striped PJs & reindeer slippers!

Santa crafts

Sleepy Santa is ready for a long winter's nap!

There are more Santa’s on StyrofoamCrafts.com, so if you’re still looking for that perfect Santa, be sure to check out the collection.

Thank you all for your enthusiastic response to our Golden Noodle Christmas Topiary Tree. I’m happy to announce that Colleen B. has won two STAK Trees and a craft apron. Please contact me with your mailing address, Colleen.

Happy Christmas crafting!

Sharon

Posted in Christmas Crafts, Craft Tutorial, Fabric Craft, Mixed Media, Paper Crafts | Tagged | 5 Comments

Christmas ribbon topiary trees & a ribbon craft book giveaway

Have you noticed a forest of topiary trees this holiday season? It seems that everyone is making topiary trees for Christmas decorating. Today we have Christmas topiary trees made with ribbons, trims, and chenille yarn. It’s fun to see how changing the colors and trims creates a completely different look. If you can wind a ball of yarn, you can make these topiary trees.

beaded ribbon topiary

The combination of gold ribbon, beads and wire is stunning!

First up is our elegant Jeweled Ribbon Topiary, designed by Ed Smith. Ed randomly wrapped ribbons, fibers and even wire around his cone of STYROFOAM Brand Foam, and then accented it with various gems. You can display this topiary directly on a tabletop without a pedestal, if you prefer.

How to make ribbon topiaries

Mix ribbons and sequin trim for this glitzy topiary duo.

The Criss-Cross Blue Ribbon Christmas Tree shows two different ways to wrap your cone –diagonally or horizontally. If you wrap your ribbons horizontally, you’ll need to make small snips in the ribbon and pin it down so that the ribbon hugs the cone.

make a ribbon topiary tree

Make several of these red & white ribbon topiaries for a festive Christmas display on your mantel or tabletop.

Next up is the Festooned & Beribboned Topiary Tree, made the same way as the flashy blue topiaries but in a more traditional Christmas scheme. Surely you have some Christmas ribbons in your stash that you could use?

make a yarn topiary

Thick, chenille yarn makes quick work of this topiary, and makes it cozy, too.

I love this cozy Peppermint Stripe Chenille Tree. The chenille yarn is bulky so it doesn’t take a lot of wrapping, and it has enough give that it hugs the cone snugly without clipping and pinning.

Christmas topiaries trees

Think how these will sparkle in the glow of your Christmas lights!

For our grand finale, we have our Snazzy Sequined Holiday Topiaries. For these dazzlers, the cone is first covered with fabric or paper, and then the sequin trim is wrapped around the cones, just like wrapping garland on your tree.

craft book giveaway

Please tell us what you would like us to feature next year and you might win The Complete Guide to Ribbon Crafts.

If you like ribbon crafting, here’s your chance to win a copy of the book The Complete Photo Guide to Ribbon Crafts: Over 700 Photos – Bows – Flowers – Embroidery – Weaving – Jewelry – Fashion – Décor – More by Elaine Schmidt. 700 photos? Amazing! Quayside Publishing & Quarry Books is providing a copy of this book just for our readers, and we’re going to pair it with an assortment of shapes of STYROFOAM Brand Foam. If you’d like to win this prize package, please leave a comment below and tell us what you’d like to see on Crafts ‘n Coffee in 2012. Would you like more home décor, more kid’s crafts, easy crafts, crafts for Easter, paper crafts, or??? I’d like your help planning for the New Year.

doll book giveaway

Win this collection from Quayside Publishing!

And that’s not all . . . In the spirit of the season, Quayside Publishing has a second giveaway! This prize package includes the book Mixed-Media Doll Making: Redefining the Doll with Upcycled Materials by Linda and Opie O’Brien, along with a collection of shapes of STYROFOAM Brand Foam. To win this package, visit Quayside’s blog Craftside and leave a comment. You might want to poke around while you’re there and take a look at the other arts and crafts books they have – inspiration galore!

(Coincidentally, the photographer for the O’Brien’s book, Dina Rossi at Studio Rossi, is the same photographer who shot our three Great Décor in a Flash – Without a Lot of Cash booklets. She’s an amazing photographer so I know this book is gorgeous!)

Be sure to leave your comments here on Crafts ‘n Coffee and on Craftside by midnight on Friday, December 23.

So we have an inspiring collection of ribbon topiaries today and two beautiful books to give away. Enjoy!

Happy Christmas crafting.

Sharon

Posted in Christmas Crafts, Giveaways, Great Decor in a Flash -- Without a Lot of Cash, Home Decor, Mixed Media | Tagged , | 24 Comments

More inspiring handmade ornaments (& it’s National Cupcake Day!)

I don’t usually blog on a Thursday, but I wanted to be sure you don’t miss out Stephanie Lynn’s magical Handmade Ornament Series this week. I’ve been inspired by the beautiful and creative ideas I’ve seen so far on Under the Table & Dreaming, and I think you will be, too. Stephanie Lynn’s team of bloggers transform paper, cardboard tubes, craft sticks, glitter, even spoons into sparkling gems for the tree.

I’m a guest on Stephanie Lynn’s blog Under the Table & Dreaming today, and I’ve shared with her readers our short-cut technique for making needlefelted ornaments. Stephanie Lynn includes the tutorial for Rebekah Meier’s Red & White Needlefelted Ornaments. (This is always a favorite color combo of mine.)

needle felted ornaments

You'll find the tutorial to make this cheerful needle felted trio on Under the Table & Dreaming.

Here are a few of the other needle felted ornaments Stephanie Lynn showcases today.

DIY ornaments

This beautiful collection was made using our short-cut needle felting technique.

You’ll find instructions for these on StyrofoamCrafts.com, and I’ve listed the links below (clockwise, from upper-left):

Feathered Felted Friends by Candie Cooper

Pom Pom Polka Dot Needle Felted Ornaments by Rebekah Meier

Felted Christmas Cheer Ornaments by Debra Quartermain

Santa Hat Ornaments by Debra Quartermain

Needlefelt & Ribbon Holiday Trees by Rebekah Meier

Glistening, Felted Snowman by Rebekah Meier

Colorful Needlefelt Ornaments by Rebekah Meier

And finally, I can’t sign off today without wishing you a happy National Cupcake Day! Who’s celebrating today? If you’ve been inspired by these beautiful, needle felted ornaments, we’re serving up a trio of no-cal Mouthwatering Needle Felted Cupcakes. Debra Quartermain baked this batch.

cupcake crafts

Can you resist Debra's sweet & easy needle felted cupcakes?

For treats of all kinds, make a stop at Under the Table & Dreaming this week and page through the Handmade Ornaments Series. Stephanie Lynn has once again recruited some of the best crafty bloggers you’ll find to share their beautiful Christmas crafts.

Happy Christmas crafting!

Sharon

Posted in Christmas Crafts, Christmas Ornaments, Craft Tutorial, Gift Ideas | Tagged | 6 Comments