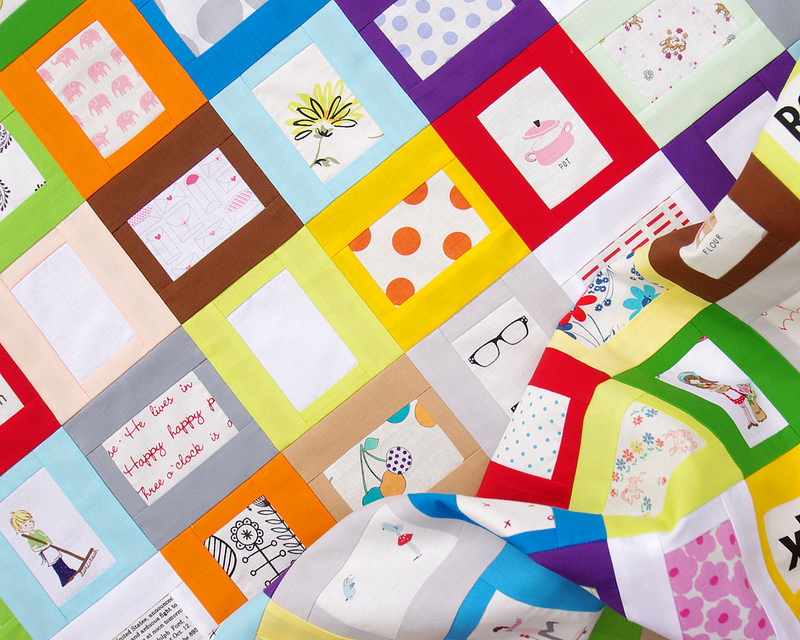
I am continuing on with a theme of rectangles this week. And squares. More specifically a rectangle inside a square. Not complicated and probably not an original combination, but definitely an eye catching result for such a simple concept.
I have been collecting novelty fabrics for a long time - or call them I-Spy fabrics - which are great when fussy cut as a feature fabric. These fabrics are also perfect for kids' quilts and make for a unique story quilt. Hence the name - A Story Quilt. (See also my Economy Block Quilt which another example of an I-Spy Quilt). For this quilt I have featured these novelty fabrics in blocks framed with solid fabric.
This one-block quilt is suitable for beginners and a great way to work through some stash so today I thought I would share with you a quick tutorial on how to make this easy block.
A STORY QUILT - TUTORIAL
FABRIC AND CUTTING INSTRUCTIONS FOR EACH BLOCK:
The above image shows the fabric requirements and cutting instructions for EACH block ~ a single rectangle which is framed with solid fabric (in pink) on all four sides. The center rectangle may be a fussy cut fabric featuring a novelty but this is not a requirement. You will notice that many of my block centers are dots, checks, and general floral prints that have not been fussy cut.
Step 1 Take a center rectangle and using a 1/4" seam allowance sew the two smaller solid fabric strips to the short sides of the rectangle as pictured below. Press seams together and away from the center rectangle as indicated by the arrows.
 |
| Unit measures 4 1/2 inches x 2 1/2 inches. |
Step 2 Take the remaining two solid fabric strips and again using a 1/4" seam allowance sew to the remaining sides of the rectangle. Press seam together and away from the center rectangle as indicated by the arrows below.
Each Story Block measures 4 1/2" x 4 1/2" (includes seam allowances)
To sew the blocks together into a quilt top lay out all your blocks and rotate blocks so that the center rectangle alternates: vertical - horizontal - vertical etc as pictured:
Sew blocks together in rows and press seams towards the block with the vertical (upright) rectangle as indicated by the arrows. This will ensure that all seams "nest" or lock together when piecing the quilt top.
For my quilt top I have made a total of 154 Story Blocks ~ 14 rows of 11 blocks. The quilt top measures 44 inches x 56 inches, which is a great size for a toddler and young child.
For my quilt top I have made a total of 154 Story Blocks ~ 14 rows of 11 blocks. The quilt top measures 44 inches x 56 inches, which is a great size for a toddler and young child.
All solid fabrics used are Robert Kaufman Kona Cottons.
Kona colors include:
Grasshopper, Cactus, Sour Apple, Honey Dew, Mulberry, Crocus,
Grellow, Buttercup, Orange, Tomato, Carnation, Wheat, Tan,
Chestnut, Malibu, Robin Egg, Silver, Titanium, and Kona White.
I love this quilt! It is such a fun quilt for kids and offers endless opportunity for imaginative play and stories as well as playful learning about colors, letters, numbers and shapes. I can also see this design working with all printed fabrics - a low volume center fabric framed with a contrast printed fabric - or even the reverse of what I have done - a solid center framed with a contrast printed fabric.
Now ready for basting and quilting!
Thank you for stopping by,
Rita
Please leave any questions you may have regarding the tutorial in the comments section and I will reply there as others may also benefit from further clarification.
RELEVANT LINKS:
The Finished Story Quilt
More Red Pepper Quilts Tutorials
More RPQ Quilts featuring Kona Cotton

Follow RPQ on:
Follow
COPYRIGHT: Do not copy or use any content or photos from my blog without my written permission.


