Wow! $800 in Disney gift cards?! Yep, you read that right! Chip & Co, Destinations in Florida, and some other awesome Disney bloggers are giving away some serious Disney cash!

Chip & Co
Couponing to Disney
Destinations in Florida
Adventures with Pixie Dust
Spreading the Magic of Travel
FastPass to Magic
My Favorite Finds
Disney Ways
and many more!!!! You'll find lots of great Disney sites to follow to help with your planning, park tips, travel arrangements, fun activities leading up to your trip, and more!
All you have to do is head over to Chip & Co and enter to win! There will be THREE WINNERS!
One $600 Gift Card
TWO $100 Gift Cards {two separate winners}
What would you spend your $800 on? I for sure would use it as a deposit on a trip. In fact, it could pay for a huge chunk of a Disney trip if you planned it right-the right discount at a Value Resort and you could have an awesome vacation!
Don't forget to check out Angela @ Destinations in Florida. She will help you with the Disney vacation that suits you best! You can get a quote from her by using the box on the side of your screen  .
.
Good luck!!!


Yay! We are back from vacation! Funny how I missed interacting with all of you, but if you followed along on Facebook, many of you were able to see some pics of our awesome Disney vacation! We also spent a week at Surfside Beach, SC with my whole family-my parents, sisters, and their families. On our way home, we picked up a box of peaches from a cute little South Carolina fruit stand....a box of peaches is A LOT of peaches, so there will be a few peach recipes coming your way this summer!

I'm super excited to be back and hanging out with Just Us Four and Atkinson Drive for Pinworthy Projects again! I was so thankful to have Wi Fi at the beach...that meant I could get a tan AND hang out on Pinterest! I even started a new Pinterest Board...dedicated to my daughter's birthday party theme. She wants a Fairy Party this year, and I am collecting ideas already! Don't forget to follow the Pinworthy Projects board we have! Now, here are the most viewed links from last week's party:

(more...)
Fourth of July is tomorrow! I'm so happy to be back here at My Favorite Finds to celebrate with you.
I just love this holiday. It's so much fun. I've been busy making red white and blue projects since Memorial Day. You can see some here and here. July 4th may just be my new favorite holiday. We go downtown every year to eat some yummy food, watch the fireworks over the river, then we come home and let the kids have fun with sparklers.
I decided to create some July 4th sparkler holders this year. These work great for parties because people don't have to dig through the sparkler box. Just slip a sparkler through a holder and your guests can grab them easily.
Fourth of July is one of my favorite holidays. I love getting together with family to BBQ, enjoy a dip in the pool, and watch the fireworks. I think it's super fun to create a simple dessert tray with some patriotic foods to enjoy. For the Fourth, I put together a dessert plate of "Sparklers" and Red, White, and Blue {Ice Cream} Sandwiches.

Hi everyone. It's Julie from White Lights on Wednesday. I can't believe in one short week I'll be 30. Like from today. Thirty. Yeah. I'm not having any kind of pseudo-mid-life crisis or anything, but it's the first milestone birthday since turning 21, and that one was all about getting drunk. So now I can be an adult about my party. I'm still going to a bar, but I'm having a fabulous dinner first and making myself a fancy cake. It's nice to take a day off from making dinner and get waited on.

If I were cooking for the family, I'd be making this brisket. It's a big hunk of meat, which I love, and makes me feel like I'm almost borderline stepping into BBQ land. I watch too many food shows and I've always been intimidated by the hard core grilling master competitions...but it looks SO good! Focus Julie.

Truth be told, I'm not a Guy Fieri fan. He's just not my fave TV chef, but his recipes always sound like they'd taste great. So I finally broke down and bought his cookbook. Our friend Scott was coming into town and I decided to make this brisket. It wasn't quite the magical flavor explosion my brain {for some reason} built it up to be. But the meat's tender, I liked the sauce, and if you like a good braised brisket, this is your recipe.

"Bring It On" Beef Brisket
Total Time 6 hours / Serves 6 to 8
Ingredients:
4 1/2 to 5 pounds beef brisket
1 tablespoon salt
2 tablespoons black pepper
2 yellow onions, cut into 1" rings
2 leeks, white and light green parts only, cleaned and cut into thirds
2 shallots, quartered
1 carrot, cut in half lengthwise, the into 1" chunks
4 celery stalks, cut into thirds
3/4 cup Chili Sauce {recipe below}
1/2 cup beef stock
1 - 12 ounce beer at room temp {Guy recommends a pale ale. I went with a medium bodied lager.}
Chili Sauce: {Makes 1 1/2 cups}
5 large roma tomatoes, quartered
1 onion, coarsely chopped
1 jalapeno, seeded and chopped
1/2 cup apple cider vinegar
2 tablespoons sugar
1/4 teaspoon salt
1/2 teaspoon red chili flakes
Directions:
Chili Sauce:
- Put all ingredients in a medium sauce pan and bring to a boil over medium-high heat. Reduce heat, and cook at a strong simmer for 25 to 30 minutes, stirring occasionally. Sauce will thicken and veggies will become tender.
- Transfer sauce to a blender and pulse until pureed. Return sauce to saucepan. Reduce heat slightly and cook sauce at a simmer for another 25 to 30 minutes, stirring occasionally.
- Sauce will keep for up to 3 weeks in the refrigerator in an air tight
Brisket
- Preheat oven to 350 degrees F.
- Rinse the brisket and pat dry. Season both sides with salt and pepper, then give your beef a good rub down to get the spices into the meat. Heat oil in an oven-safe Dutch oven over medium-high heat. Sear both sides of the brisket for about 3 to 4 minutes, starting with the fat side down first.
- Top brisket with onions, leeks, shallots, carrots, and celery. Mix the beef stock and 3/4 cup chili sauce together. Pour over veggies and brisket. Cover pot and roast in the oven for 2 hours, basting every 30 minutes.
- Add your beer, recover the pot, and continue cooking for another 1 1/2 hours. Keep basting that bad boy every 30 minutes.
- Remove pot from the oven, and let everything sit {as is} at room temperature for 1 hour.
- Carefully take the brisket out of the pot and transfer to a cutting board. Remove the fat cap with a fork and discard.
- Remove the veggies from the pot and put them in a blender or food processor, puree until smooth. Pour pan juices into a gravy separator and let sit for 3 to 5 minutes to allow the fat to separate. Pour the pan juice and pureed vegetables back into the pot and cook over low heat for 5 to 8 minutes until warmed through. Season with salt and pepper as needed.
- Slice the beef against the grain {diagonally} and top with pan sauce.
------------------------------------------
See more from Julie at
Blog | Pinterest | Instagram | Twitter | Google+ | Facebook
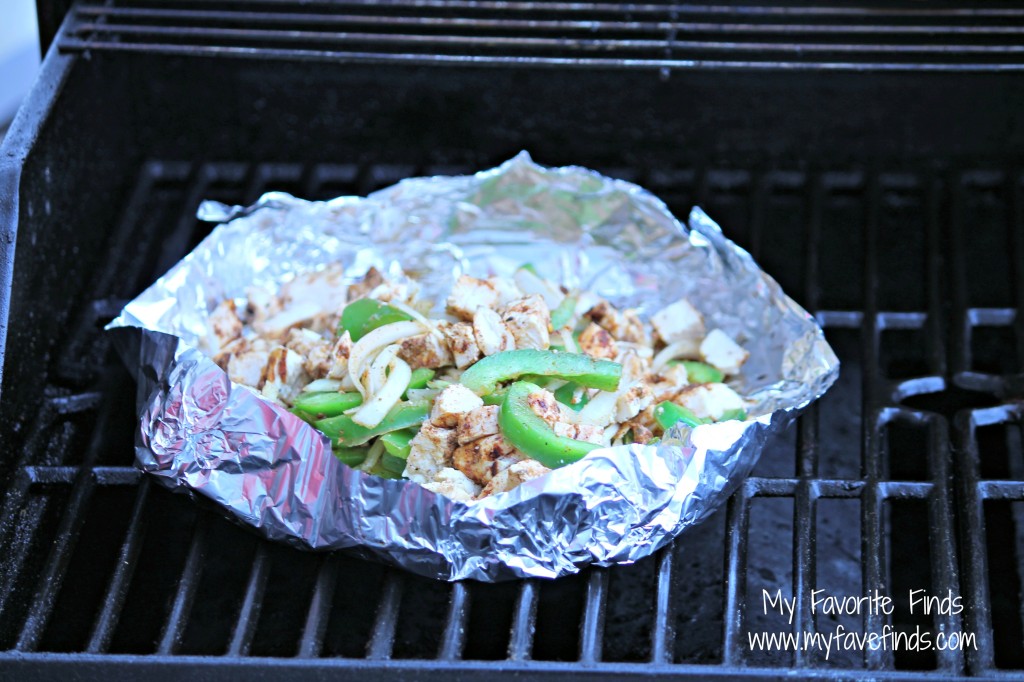
These Southwest Chicken Stuffed Peppers will be great for those hot summer nights, when you want something to grill....other than the typical burgers and chicken. We had these last week for dinner, and they were divine! I LOVE chicken fajitas in about any form....but in the grilled peppers, they were wonderful! My hubby and I are trying to cut back on the carbs, and finding recipes that are somewhat low carb, yet taste great, can take some work. I thought they wouldn't be very filling, so I prepared a whole pepper for myself-boy was I wrong. I made it through the first half of the pepper, and I was already feeling full! But they were soooo good, I of course ate the other half!

Southwest Chicken Stuffed Peppers:
Chicken Marinade:
1 teaspoon chili powder
1 teaspoon cumin
1/2 teaspoon oregano
1/4 teaspoon red pepper flakes
1/2 teaspoon garlic powder
Juice of one lime
1 teaspoon vegetable oil
Remaining Ingredients:
2 chicken breasts
2 bell peppers
1 onion, thinly sliced
1/2 yellow bell pepper, thinly sliced
Avocado, cilantro, shredded cheese, sour cream, etc.
Directions:
1. Combine marinade ingredients and pour over the chicken. Allow these to marinate for at least one hour.
2. Prepare a small foil "bowl", and add the thinly sliced onions and bell pepper. Drizzle with a little olive oil. Set the foil "bowl" on the grill, allowing the peppers and onions to cook.
3. Grill the chicken. Then, slice it or shred it, and add it to the onions and pepper, allowing all the flavors to blend together for a few minutes.
4. Slice your bell peppers in half, and lay them on the grill. Let them grill until the edges get a little soft and slightly brown.
5. Stuff the pepper halves with the chicken/pepper/onion mixture. Top with cheese, avocados, etc.
Seriously, these are so very awesome! I hope you will try them. They can't be easier, and we didn't feel any guilt eating them. The fresh avocado on top just totally made them even better!
Sharing HERE.
Hi, I'm Jen from Girl in the Garage. My blog is all about DIY furniture makeovers, home decor, and crafts. Sometimes I also share my thoughts or recent experiences. I want to thank Carrie for letting me share one of those experiences with you today!

In March my husband and I took a much needed mini vacation to Jamaica. It was our second trip to the Caribbean but the first time visiting that island. We stayed for three nights at the all-inclusive Braco Resort in Runaway Bay. Since we were only there a short time, we opted to stay at the resort and mostly relax - although some excursions were offered that sounded like fun!

We took turns lounging at the beach and by the pool, although we did take out one of the resort's kayaks into the ocean, and my husband played some beach volleyball.

We typically like to rotate our vacations between beach getaways and sightseeing/activity-type trips. We've also been to Maui, the Dominican Republic, France, and Italy. We're planning another trip this year but we're not sure where yet - somewhere to both relax and do some sightseeing!


If you'd like to know more about our trip to Jamaica, you can read more here. Thanks again Carrie for letting me share my experience!
You can also find me here: Girl in the Garage Blog / Facebook / Pinterest / Twitter
Jen
Hi everyone! I'm Shannah from Just Us Four and I am so happy to be here today. Carrie's mind is totally Disney focused right now so she figured her blog should reflect reality. So, I am here to share with you my countdown calendar that is super easy to make for any Disney you trip you might have planned.

(more...)
Has your family visited the World Showcase at EPCOT? If not, you REALLY need to! Why? Because it's 11 countries, all in one place. Food, candies, authentic decor....all with some Disney fun of course! A few years ago, our boys enjoyed the Kidcot Fun Stops. Basically, you stop in different parts of EPCOT to do a fun little activity, and get a stamp. There are also cast members {from their home country} in every shop or restaurant in World Showcase! I think it's so cool that Disney really goes the extra mile and hires cast members from each country represented in the World Showcase. So, I thought it was fitting to make each of our kids an EPCOT Passport. When we visit each country, they'll get a stamp from that country. And, I used a 4x6 photo album, so when we get home, I can put a picture of them from each country-in the page facing the stamp.

(more...)
Hi My Favorite Finds readers! Rachel from Architecture of a Mom here.
I’m posting something a little outside the norm for me here, but I think
you’re going to enjoy it!
Are you planning on going to Walt Disney World with your
family? I recently went to Walt Disney World with my family and my sister’s
family. Planning for Disney for 10 people is no joke…especially when 6 of them
are under 10. Here are some ideas to help you create the perfect trip!
You can save $$ by doing some things ahead of time.
There are so many ways to do your trip. Only you can make
the decisions that are right for your family! Regardless, there are many ways
to make your money go further in your trip to Disney World. Here are a few ways
to save money before you go to Disney:
- Plan a couple of meals to be eaten where you are staying. It may be a crockpot meal, or it may be peanut butter and jelly sandwiches and fruit. It will save you some serious dough, and everyone will be well rested by having an evening away from the crowds. Oh, and pack some snacks!
- Research what will work for you as far as accommodations. We stayed off property. VRBO is a great resource for finding a house or condo. Trust me, Orlando is overbuilt--you can find something cheaper than staying on property, even with dining deals. I know there is travel time to consider, but only you can decide if the convenience is worth not having space to spread out.
- Hit the consignment stores, sales, and thrift shops. I didn't have to do any extra shopping for my girls because I knew we were going to Disney before I hit the seasonal sales.I seriously could dress my eldest in disney tees for 2 weeks now, I think. But that's ok, because those are some of her favorite shirts, and her sisters will be in that size very soon!
Build Anticipation.
There are so many ways to build anticipation. Here are a few projects that we did to help with anticipation, as well as get ready to go!
Custom Shirts: I made a “I Heart Mickey Shirt” that I loved so much! After that, we made a plain Mickey silhouette shirt for each person that went. Yep, we were all matchy-matchy in the Magic Kingdom, which was great, since it was so easy to lose people there!
DIY Water Bottles: It is super important to stay hydrated at the parks. We made Mickey water bottles for all the kids with their initials on them using adhesive vinyl and dollar store bottles. Super simple, but the kids loved it!
- Make a countdown: We made a Cinderella Countdown. If you have a house full of
boys, maybe a Lightning McQueen countdown is more appropriate. Or Mickey, or...well, the possibilities are pretty much endless!
Customized Accessories: I made these cute Minnie Mouse clips for my girls’ hair out of buttons. Talk about a big hit. They love anything to do with Minnie.
Talk to people who have recently gone to Disney World. They
will know what worked for them, and what didn’t. If you’re curious about what we found out about what worked for our family, you can check out my post: Tips on Experiencing Disney World with Kids. But I'm not going to lie to you. There are oodles of blog posts and entire blogs with pointers on travel to Disney. Use them. I used Preschool Ears a bunch before I went, as well as looked through some of Carrie's pointers on Traveling to Disney.
Whatever you do, however you decide to travel to Disney
World, remember one important thing: have fun!! Don’t let anything get you down—it’s
the happiest place on earth! Things won't go as planned, but it will still be a trip that your whole family will talk about for years to come!


