With recent changes in Ubuntu I found myself suddenly swung back into the GNOME orbit. It’s been a long journey and my GNOME contributions had reduced over time bug it’s good to be back! Iain has written an excellent post about the challenges we face trying to balance the best possible experience for Ubuntu users while also having a mutually beneficial relationship with our upstreams.
After missing the last five GUADECs, I will be at Manchester this year. I hope to catch up with as many people as possible including many old friends I haven’t seen in person for quite some time. If you have any questions about Ubuntu please find me or others from our team, we’re excited to collaborate.
I’ll be spending a lot of my time this development cycle working on GNOME Software particularly around snap support. We’re already delivered some good changes to upstream GNOME like reviews and paid application support. GNOME Software has changed from being a stop-gap solution in Ubuntu to being our permanent software management solution (and has been working really well for us).
It is with some sadness that I say goodbye to the Unity desktop. In particular some things I will miss:
The performance and stability of Unity. After some early teething troubles Unity was rock solid and reliable.
Fullscreen window management. Unity was super efficient at making use of screen space and reducing distraction. I hope we can get a similar solution into GNOME Shell .
Convervenge. While we weren’t able to make a commercial success of it in Ubuntu I hope it will return in the future when the time is right.
The development experience of Ubuntu phone and clicks. I hope we can get that experience (and better) soon as next generation packaging systems start to take over. Luckily the click packages I worked on for the phone are being taken over by others in the community (as is the whole Unity 8 project). So I wish these projects success in the future.
Unfortunately we have decided it’s not possible to continue to use LightDM in the default Ubuntu install. This project has had wide support amongst many distributions and has a number of features that I will miss.
PASS sentence:Fibonacci functions:Testing a valid confirmation to exit The environment of definition of the variable just before to write a function:Validating lists with the append function which adds values to the list:A function with many parameters. It is tested some calls to the function parrot:It is clear that we must call the function with the parameters correctly (once):Integrated type are also part of the parameters in a function:Finally for this part, working on lists with arbitrary arguments:Dictionaries can deliver arguments named with the operator **:Lamba expressions
My favourite CAD software used to run on at least ten different platforms, including my trusty SGI Indy. There was even a Linux student version. Evidently the market spoke, and for nearly twenty years the software has been Windows-only.
Between IRIX and Linux, I’ve never had a need to allow Windows across the threshold (not least because I could get my fill by going to work). Six years ago I needed to run the CAD software at home again, so I bit the bullet, bought a Windows DVD and started dual-booting it on a desktop machine.
Sensing the completion of the work, the hard drive died, and I dismantled the computer. When I needed to reinstall the CAD software this year for some freelance work, I used the DVD to install Windows into Boxes on my laptop. In the spirit of the Bill Gates quote that never happened, I specified twice as much disk space as I could ever imagine needing. Naturally, the OS and app together consumed the alotted disk space to within a few kilobytes. I needed to resize.
The Red Hat and Fedora Guest Resizing pages were nearly what I wanted, but my libguestfs tools are too new, the first partition is already a good size, and my second partition isn’t a logical volume. Here’s what worked (as usual, if there’s a better way please set me straight):
Since the drive resizing I’ve been able to downgrade the CAD software to an earlier version, so 40 GB probably would have been plenty. I think I’ll leave it, though, because my laptop is relatively new and has all the disk space I could ever need.
The lesson might appear to be Windows’ disinclination to be contained, but a licensing issue with the CAD software took a few weeks to resolve. In the interim I continued to do remarkable things with FreeCAD. I’ll use the proprietary software for details related to transferring the files, but FreeCAD is very close to keeping my CAD experience Windows-free.
I have been involved in open source software for a long time, since before anyone coined the term "open source." My first introduction to Free software was GNU Emacs on our campus Unix system, when I was an undergraduate. Then I discovered other Free software tools. Through that exposure, I decided to installed Linux on my home computer in 1993. But as great as LInux was at the time, with few applications like word processors and spreadsheets, Linux was still limited—great for writing programs and analysis tools for my physics labs, but not (yet) for writing class papers or playing games.
So my primary system at the time was still MS-DOS. I loved DOS, and had since the 1980s. While the MS-DOS command line was under-powered compared to Unix, I found it very flexible. I wrote my own utilities and tools to expand the MS-DOS command line experience. And of course, I had a bunch of DOS applications and games. I was a DOS "power user." For me, DOS was a great mix of function and features, so that's what I used most of the time.
And while Microsoft Windows was also a thing in the 1990s, if you remember Windows 3.1, you should know that Windows wasn't a great system. Windows was ugly and difficult to use. I preferred to work at the DOS command line, rather than clicking around the primitive graphical user interface offered by Windows.
With this perspective, I was a little distraught to learn in 1994, through Microsoft's interviews with tech magazines, that the next version of Windows would do away with MS-DOS. It seemed MS-DOS was dead. Microsoft wanted everyone to move to Windows. But I thought "If Windows 3.2 or 4.0 is anything like Windows 3.1, I want nothing to do with that."
So in early 1994, I had an idea. Let's create our own version of DOS! And that's what I did.
On June 29, 1994, I made a little announcement to the comp.os.msdos.apps discussion group on Usenet. My post read, in part:
Announcing the first effort to produce a PD-DOS. I have written up a "manifest" describing the goals of such a project and an outline of the work, as well as a "task list" that shows exactly what needs to be written. I'll post those here, and let discussion follow.
That announcement of "PD-DOS" or "Public Domain DOS" later grew into the FreeDOS Project that you know today. And today, FreeDOS is now 23 years old!
All this month, we've asked people to share their FreeDOS stories about how they use FreeDOS. You can find them on the FreeDOS blog, including stories from longtime FreeDOS contributors and new users. In addition, we've highlighted several interesting moments in FreeDOS history, including a history of the FreeDOS logo, a timeline of all FreeDOS distributions, an evolution of the FreeDOS website, and more. You can read everything on our celebration page at our blog: Happy 23rd birthday to FreeDOS.
Since we've received so many "FreeDOS story" contributions, I plan to collect them into a free ebook, which we'll make available via the FreeDOS website. We are still collecting FreeDOS stories for the ebook! If you use FreeDOS, and would like to contribute to the ebook, send me your FreeDOS story by Tuesday, July 18.
In an animation film, obviously the design does not refer only to characters. There can be props design when applicable, and of course background design. As an example, the most interesting case is how we designed ZeMarmot’s home! At least the outside part of its burrow, since we never see the inside (unlike in the initial comics attempt).
You remember the first research trip? Back then, we found this nice hill, next to Saint-Véran village with just a single tree in the middle.
The tree on the hill: ZeMarmot movie reference
And obviously on the bottom of this tree, there was a marmot burrow hole.
Burrow hole in tree roots: ZeMarmot reference
We thought that was just too cool. Most burrow holes are just in the middle of the landmass, but this felt like a “special hole”. Our main character is not a special marmot, it’s not a hollywood leader, chief of the marmot clan or anything, but still… it’s our hero, right? It’s not just any marmot, its ZeMarmot! So we wanted to give him a special burrow. Therefore ZeMarmot now lives under a cool tree. Only difference is that we didn’t set it on a hill but in a plain, since plains are also very common setups for marmots in the alps.
Here is how the burrow entrance looks in our storyboard:
Storyboard: burrow entrance
Then with clean lines:
Drawing: burrow entrance
Finally adding some colors:
Colored ZeMarmot’s burrow entrance (WIP)
Note that this last image is still work-in-progress. Aryeom said she is not fully happy with it yet. I thought it was still nice to show you the progression from our research photos to storyboard sketchs, drawing and coloring, with all the thinking we made on why and what.
as you can guess, I’m a heavy user of GNOME Builder. I use it every day to build various things, most of which you guys know of already
Because I spend so much time on it, it is essential that Builder simply Just Works ®, and perfectly. Builder sometimes shows a rough edge here and there, but all in all, it’s a masterpiece. It’s awsome in many aspects! Christian Hergert really deserves our respect (and, why not?, many free beers too!)
However, it wasn’t enough.
I like to focus on my tasks, and I usually do it by making the window fullscreen. Even if Builder is already great, it doesn’t support fullscreen.
So that’s what I did.
Let the work speak for itself:
Thanks to Christian’s quick fingers, it is already in master. From now on, this will only get better.
Whenever I meet someone for the first time, after we get past the initial niceties typically involved when you meet someone for the first time, eventually the conversation shifts to work and what one does for a living. Inevitably I'm faced with what, at a first glance, may sound like a simple question and the conversation goes like this:
New acquaintance: "What do you do at Red Hat?"
Me: "I manage a team of quality engineers for a couple of different products."
New acquaintance: "Oh, you mean quality assurance, right? QA?"
Me: "No, quality engineers. QE."
What usually followed then was a lengthy monologue whereby I spent usually around ten to fifteen minutes explaining what the difference between QA and QE is and what, in my opinion, sets these two professions apart. Now, before I get too deep into this topic, I have to add a disclaimer here so not to give folks the impression that what I'm talking about is backed by any official definition or some type of professional trade organization! The following are my own definitions and conclusions, none of which were pulled out of thin air, but backed by (so far) 10 years of experience working on the field of delivering quality products. If there are formal definitions out there, and they match with my own, it is by pure coincidence.
Why the term 'Quality Engineer' is not well known I'm not sure, but I have a hunch that it may be related to something I noticed throughout the 10 years that I have spent on this field. In my personal experience, 'quality' is something that is not always considered as part of the creation of a new company, product or project. Furthermore, the term 'quality' is also not well defined or understood by those involved in actually attempting to 'get more' of it.
In my experience, folks usually forget about the word 'quality', whatever that may be, happily start planning and developing their new ideas/products and eventually ship it to their customers. If the customer complains that something is not working or performing as advertised or it doesn't meet their expectations, no problem. Someone will convey the feedback back to the developers, a fix will eventually be provided and off it goes to the customer. Have you ever seen this before? I have!
Eventually, assuming that the business is doing well and is attracting more paying customers, it is highly likely that support requests or requests for new features will increase. After all, who wants to pay for something that doesn't work as expected? Also, who doesn't want a new feature of their own either? Depending on the size of the company and the number of new requests going into their backlog, I'd expect that either one of the following events would then take place:
More tasks from the backlog would be added to individual's 'plates', or
New associates would be hired to handle the volume of tasks
I guess one could also stop accepting new requests for support or new features, but that would not make your customers happy, would it?
Regardless of the outcome, the influx of new tasks is dealt with and if things get out of control again, one could always try to get an intern or distribute tasks more evenly. Now, notice how the word 'quality' has not been mentioned yet? It is no accident that to solve an increase of more work, most often than not the number one solution used is to throw more resources at it. There's even a name for this type of 'solution': The Mythical Man-Month.
You see, sadly, 'quality' is something that usually only becomes important as an afterthought. It is the last piece added to the puzzle that comprises the machinery of delivering something to an end user. It is only when enough angry and unsatisfied paying customers make enough noise about the unreliability or usability of the product that folks start asking: "Was this even tested before being put on the market?"
If the pain being inflicted by customer feedback is sharp enough, a Quality Assurance (QA) team is hastily put together. Most of the time in my experience, this is a Team of One usually made up of one of the developers who after being dragged kicking and screaming from his cubicle, eventually is beat into accepting his new role as a button pusher, text field filler, testing guy. Issues are then assigned to him and a general sense of relief is experienced by all. Have you also seen this before? I have! I'm 2 for 2 so far!
The idea is that by creating a team of one to sit in the receiving end of the product release cycle, nothing would get shipped until some level of 'quality' is achieved. The fallacy with this statement, however, is that no matter how agile your team may be, the assurance of the quality for a product somehow is still part of a waterfall model. Wouldn't it be better if problems were caught as early as possible in the process instead of waiting until the very end? To me that is a no brainer but somehow the process of testing a product is still relegated to the very end, usually when the date for the release is just around the corner.
Why is the term Quality Engineer not well known then? I feel that the answer is comprised of several parts:
'Quality' doesn't come into the picture, if ever, until the very end of the game;
If there is a QA team, nobody outside of that team really knows what they do. It has something to do with testing...
Engineering is usually identified with skills related to writing code and designing algorithms, usually by a developer and not by QA;
No surprise that quality engineering is something foreign to most!
OK, so what is a Quality Engineer then? Glad you asked! The answer to that I shall provide in a subsequent post, as I still need to cover some more ground and talk about what 'quality' is, what someone in QA does and finally what is a QE!
My next article will continue this journey through the land of Quality and Engineering, and in the meantime, please let me know what you think about this subject.
In my previous post, I described ‘how’ I managed to port nekohayo and thiblahute’s work towards providing an interface for adding custom widgets for effects in Pitivi. In this, I’ll tell you ‘what’ it is that I have done in my first month of Google Summer of Code.
The initial design
How Pitivi auto-generates UI for effects is interesting. For every GStreamer effect in Pitivi, a GtkGrid with the right type of widgets for its properties are packed and to manage changes to these widgets and map back the changes to the effect properties, a DynamicWidget class is created and subclassed for different type of widgets. EffectsPropertiesManager provides and caches UIs for editing effects, while GstElementSettingsWidget is a container class for configuring the effects. It is sad that such a unique infrastructure leads to a rather uniform UI.
Porting nekohayo’s branch I ended up with a light-weight plugin like architecture for having custom widgets for effects. Now, when a GstElementSettingsWidget got created it searched a particular directory to see if there is ‘create_widget’ entry point in ‘foo_effect.py’ files and saved references to this entry point. GstElementSettingsWidget’s setElement method, which previously simply called add_widgets method to generate and show the GtkGrid, was changed
to call the ‘create_widget’ entry point if it existed.
Otherwise, check if we have a custom UI availabe as a glade file.
If all else fails, fallback to the auto-generation.
Both of these ways of having custom UI utilized the mapBuilder method of GstElementSettingsWidget to map the GStreamer element’s properties
to corresponding widgets and wrapping the widgets themself with the standardized DynamicWidget API to control them.
Problems with this design -
This ‘forced’ us to have different files for each custom widget.
References to the entry points were stored as a class attribute of GstElementSettingsWidget.
When Pitivi does have the ‘plugins’ feature, it should somehow, if required, be able to access this custom widget API, which this didn’t allow.
The current design
The solution we came up with was to add a ‘create_widget’ signal to EffectsPropertiesManager and connect a callback which would call the corresponding create_foo_widget method for a ‘foo’ effect. An accumulator stops emission of the signal when we receive a widget, again if all else fails then we fallback to the default handler of the signal which auto-generates the UI for the effect.
This removed rigidity in the API, giving the option of creating custom widgets in single or multiple files, it is left up to the one creating the widget. We are no more storing reference to the create_widget methods for individual widgets. Plugins can connect to the ‘create_widget’ signal to provide enhancements.
Another possible improvement
While making an example custom UI for the ‘alpha’ filter effect I noticed that within the custom widget for the effect, the widgets for individual properties can turn out to be same as the ones auto-generated. Having this additional feature of using a single custom widget for a particular property and auto-generating everything else would prove useful in such cases.
Although the current API for custom widgets is up and running with tests, we at Pitivi want to have stable 1.0 release, as result, the current decision is that Google Summer of Code projects will not be part of this release.
Feel free to ping me on #pitivi channel on freenode :) Until next time.
Ultimately, my aim was to provide an interface, at the code level, for developers (rather designers) to improve the GUI of video effects. GStreamer effects are very beautifully handled in Pitivi, the main focus was to use this existing underlying infrastructure on top of which a way of easily adding custom UI for effects had to be setup.
One of the ways of stopping ‘duplication of effort’ in Open Source projects is to document everything, even failed/blocked attempts. Thanks to nekohayo (previous maintainer at Pitivi) opening task T3263, his work from 2013 towards providing such an interface is now up and running again.
Unless you want to preserve commits, rebasing a very old feature branch, that is not yours, is pointless. I did not want to waste time resolving merge conflicts in then unfamiliar code. Following a bottom-up approach, I started working on top of the current Pitivi master integrating the old code into it, step-by-step, one function at a time. Compiling and understanding the errors and then fixing them. I found this approach to be rather systematic and I think it is much faster since you start porting the code as you read it.
After I had completed porting, it was a first time for me hitting a git-core bug regarding support for multiple authors on a single commit. I simply settled with the temporary solution of using
Co-authored-by: Some One <some.one@example.foo>
in my commit messages.
Finally, at the end of all this I was able to get an example interface for the alpha filter built using glade to work via the above mechanism.
The exact API will, most likely, undergo change. I will describe it in detail in my next post in a couple of weeks. You can checkout my work so far D1744 and D1745, feel free to ping me on #pitivi on freenode :)
From the last blog post the following are the improvements that I have done so far.
User experience improvements
Let the user choose between Avahi and Wormhole
Initially I displayed the Wormhole code alongside the security code for Avahi. Users were shown two codes but no clue as to which one was right to use.
Because of this now only one code at a time is displayed.
Adding a switch button the users can declare if they want to transfer the key in a local only mode (Avahi) or with Internet connection (Magic Wormhole).
Before
After
Inform users about slow or no connection
When a user chooses to use Magic Wormhole the program tries to reserve a channel and get a code contacting the Wormhole server.
Because the users may not have a working Internet connection, or a very slow one, I added an infobar after a timeout of 10 seconds that inform the users about a possible problem with the connection.
Every unnecessary UI element adds complexity
Trying to achieve an user-friendly UI we decided to remove the buttons “redo”, “ok” and “cancel” from the result page.
The users can still accomplish the same actions using only the “back” button in the top bar and we avoid to overwhelm the users with a lot of extra elements.
Before
After
Magic Wormhole error handling
Now if an user tries to download a gpg key with a wrong wormhole code the program will automatically stop offering the key and the user will be informed of this failed attempt.
There are also other errors displayed, for example if the connection attempt fails.
Automated unit tests
I started to write some automated unit tests that utilize the python module “nose”.
Right now they tests a wormhole transfer checking the key integrity after the download.
Today we have a very productive online meeting with @csoriano and @tmendes, these two guys from Brasil and Spain, helped me because I have cloned Polari with Flatpak – Builder on Fedora 25, but it did not run it at all, when I clicked on the PLAY or RUN button.First of all, I must highlight that everything is well-explained, step by step on the Newcomers wiki.
This journey started by showing to Carlos my “not running Polari” screenshot, even I had the SUCCESS label on Builder, it did not release Polari on flatpak:So I had to remove my project cloned and the cache of Builder with
1.- Download the Flatpak (it takes 2 or 3 minutes)2.- Choose a project, Flatpak on Builder only builds the apps that are listed so far: Polari (JS and C), Games(Vala), Maps(JS), Music(Python) and Todo(C), and check what link contains the code of the program. E.g. for Polari as follow3.- Click on CLONE and paste the link of the code of the project you have chosen to debug. This process might take another 9 or 12 minutes.4.- Running the project (2 to 4 minutes) when it is called to run for the very first time, it might take a while compiling…5.- Try to modified the code and run your changes, in this case I will edit the “About” label and put this one: “AboutGNOMEPeruChallenge” Some considerations that I learnt from today:
1.- Be sure that you are using the Builder version with GNOME 3.242.- Even if you are using ArchLinux, Fedora or another distro, just download the Flatpak from the Newcomers wiki and not from other sources that might not be updated. I have followed the steps from the Fedora wiki…
This is the proof that I had to uninstall the Builder from Fedora and install the code from the sdk.gnome.org source.3.- If you are trying to do compilations and building manually on terminal, it will be more difficult to do the changes to the code and test them while you are trying to fix a bug.
From our local group, I must congratulate the labor of @toto who did clone gnome-music, @alexandros and @varian for polari. Here, their successful work so far!
Into Cambridge for a meeting; worked in the station for
a bit; lunch on Kings Parade.
Interested to read an Ubuntu
Phone post mortem. I was predicting demise from the start of
the project having seen the Nokia/Maemo/Meego outcome - for economic
reasons, lots of people made really nice, different FLOSS operating systems,
and some pretty but proprietary ones eg. (Windows, Blackberry).
I'm glad Simon points as #1 to the lack of a "profitable niche" as the
ultimate problem. When Android has a zero (or probably negative) cost -
how can free fund building a compelling alternative ?
Recently I got Dell XPS 13 as my new work laptop and I use it with the TB16 dock. This dock doesn’t seem to fully work with Linux, only monitors work. But if you go to BIOS settings and set the Thunderbolt Security level to “No security”. Then suddenly almost everything is working.
However, it’s not an ideal solution, especially if you’re at least a bit paranoid. External Thunderbolt devices may connect to the machine via PCI-Express which means they can potencially read your system memory. That’s why Thunderbolt comes with a security system.
There are 4 security levels:
none (legacy mode): no security, everything gets enabled.
dponly: no PCIe tunneling, only USB and DisplayPort.
user: ask the user if it is ok to connect the device.
secure: as “user” but also create and use a random key that later can be used on subsequent connects of the same device to ensure its identity.
Intel is already working on a Linux implementation of TB security. But the user and secure levels need user’s action, so there will have to be some support for it in the desktop. I discussed that with designers and they don’t really like the idea of poping up dialogs asking users if they trust the device. “Do I trust this projector? I’m not really sure, but since I’m plugging it in, I guess I do”.
I also checked how it works in Windows 10. And it works exactly that way. I plugged in the dock and I got a bunch of dialogs asking about every single plugged-in device. The experience is pretty terrible. And I have to agree with the designers, I’m not sure how this improves security.
On the other hand, I don’t think it’s a good idea to leave the Thunderbolt port completely unprotected. There is one relevant use case: you leave your computer unattanded and even though you locked your screen, someone can access your system through an unsecured TB3 port.
I wonder if it could be solved by automatically switching to a “reject everything” mode once you lock your screen. You lock your screen, leave your computer, and any device plugged into the TB3 port would be rejected. Once you come back and unlock your screen, it’s your responsibility what you plug in and any plugged device would be accepted.
I wonder if there is any relevant use case which would not be covered well by this policy. Any ideas?
In my last article I talked about how we composed a lightweight "fibers" facility in Guile out of lower-level primitives. What we implemented there is enough to be useful, but it is missing an important aspect of concurrency: communication. Sure, being able to spawn off fibers is nice, but you have to be able to actually talk to them.
Fibers had just gotten to the state described above about a year ago as I caught a train from Geneva to Rome for Curry On 2016. Train rides are magnificent for organizing thoughts, and I was in dire need of clarity. I had tentatively settled on Go-style channels by the time I got there, but when I saw that Matthias Felleisen and Matthew Flatt there, I had to take advantage of the opportunity to ask them what they thought. Would they recommend Racket-like threads and channels? Had that been a good experience?
The answer that I got in return was a "yes, that's what you should do", but also a "you should look at Concurrent ML". Concurrent ML? What's that? I looked and was a bit skeptical. It seemed old and hoary and maybe channels were just as expressive. I looked more deeply into this issue and it seemed CML is a bit more expressive than just channels but damn, it looked complicated to implement.
I was wrong. This article shows that what you need to do to implement multi-core CML is actually the same as what you need to do to implement channels in a multi-core environment. By building CML first and channels and whatever later, you get more power for the same amount of work.
Note that this article has an associated talk! If video is your thing, see my Curry On 2017 talk here:
Let's first have a crack at implementing channels. Before we begin, we should be a bit more explicit about what a channel is. My first hack in this area did the wrong thing: I was used to asynchronous queues, and I thought that's what a channel was. Besides ignorance, apparently that's what Erlang does; a process's inbox is an unbounded queue of messages with only very slight back-pressure.
But an asynchronous queue is not a channel, at least in its classic sense. As they were originally formulated in "Communicating Sequential Processes" by Tony Hoare, adopted into David May's occam, and from there into many other languages, channels are meeting-places. Processes meet at a channel to exchange values; whichever party arrives first has to wait for the other party to show up. The message that is handed off in a channel send/receive operation is never "owned" by the channel; it is either owned by a sender who is waiting at the meeting point for a receiver, or it's accepted by a receiver. After the transaction is complete, both parties continue on.
You'd think this is a fine detail, but meeting-place channels are strictly more expressive than buffered channels. I was actually called out for this because my first implementation of channels for Fibers had effectively a minimum buffer size of 1. In Go, whose channels are unbuffered by default, you can use a channel for RPC:
package main

func double(ch chan int) {
  for { ch <- (<-ch * 2) }
}

func main() {
  ch := make(chan int)
  go double(ch)
  ch <- 2
  x := <-ch
  print(x)
}
Here you see that the main function sent a value on ch, then immediately read a response from the same channel. If the channel were buffered, then we'd probably read the value we sent instead of the doubled value supplied by the double goroutine. I say "probably" because it's not deterministic! Likewise the double routine could read its responses as its inputs.
Anyway, the channels we are looking to build are meeting-place channels. If you are interested in the broader design questions, you might enjoy the incomplete history of language facilities for concurrency article I wrote late last year.
With that prelude out of the way, here's a first draft at the implementation of the "receive" operation on a channel.
A channel is a record with two fields, its recvq and sendq. The receive queue (recvq) holds a FIFO queue of continuations that are waiting to receive values, and the send queue holds continuations that are waiting to send values, along with the value that they are sending. Both the recvq and the sendq are lockless queues.
To receive a value from a meeting-place channel, there are two possibilities: either there's a sender already there and waiting, or we have to wait for a sender. Those two cases are handled above, in that order. We use the suspend primitive from the last article to arrange for the fiber to wait; presumably the sender will resume us when they arrive later at the meeting-point.
an aside on lockless data structures
We'll go more deeply into the channel receive mechanics later, but first, a general question: what's the right way to implement a data structure that can be accessed and modified concurrently without locks? Though I am full of hubris, I don't have enough to answer this question definitively. I know many ways, but none that's optimal in all ways.
For what I needed in Fibers, I chose to err on the side of simplicity.
Some data in Fibers is never modified; this immutable data is safe to access concurrently from any code. This is the best, obviously :)
Some mutable data is only ever mutated from an "owner" core; it's safe to read without a lock from that owner core, and in Fibers we do not access this data from other cores. An example of this kind of data structure is the i/o map from file descriptors to continuations; it's core-local. I say "core-local" because in fibers we typically run one scheduler per core, with each core having a pinned POSIX thread; it's really thread-local but I don't want to use the word "thread" too much here as it's confusing.
Some mutable data needs to be read and written from many cores. An example of this is the recvq of a channel; many receivers and senders can be wanting to read and write there at once. The approach we take in Fibers is just to use immutable data stored inside an "atomic box". An atomic box holds a single value, and exposes operations to read, write, swap, and compare-and-swap (CAS) the value. To read a value, just fetch it from the box; you then have immutable data that you can analyze without locks. Having read a value, you can to compute a new state and use CAS on the atomic box to publish that change. If the CAS succeeds, then great; otherwise the state changed in the meantime, so you typically want to loop and try again.
Single-word CAS suffices for Guile when every value stored into an atomic box will be unique, a property that freshly-allocated objects have and of which GC ensures us an endless supply. Note that for this to work, the values can share structure internally but the outer reference has to be freshly allocated.
The combination of freshly-allocated data structures and atomic variables is a joy to use: no hassles about multi-word compare-and-swap or the ABA problem. Assuming your GC can keep up (Guile's does about 700 MB/s), it can be an effective strategy, and is certainly less error-prone than others.
back at the channel recv ranch
Now, the theme here is "growing a language": taking primitives and using them to compose more expressive abstractions. In that regard, sure, channel send and receive are nice, but what about select, which allows us to wait on any channel in a set of channels? How do we take what we have and built non-determinism on top?
I think we should begin by noting that select in Go for example isn't just about receiving messages. You can select on the first channel that can send, or between send and receive operations.
select {
case c <- x:
  x, y = y, x+y
case <-quit:
  return
}
As you can see, Go provides special syntax for select. Although in Guile we can of course provide macros, usually those macros expand out to a procedure call; the macro is sugar for a function. So we want select as a function. But because we need to be able to select over receiving and sending at the same time, the function needs to take some kind of annotation on what we are going to do with the channels:
(select (recv A) (send B v))
So what we do is to introduce the concept of an operation, which is simply data describing some event which may occur in the future. The arguments to select are now operations.
(select (recv-op A) (send-op B v))
Here recv-op is obviously a constructor for the channel-receive operation, and likewise for send-op. And actually, given that we've just made an abstraction over sending or receiving on a channel, we might as well make an abstraction over choosing the first available op among a set of operations. The implementation of select now creates such a choice-op, then performs it.
But what we're missing here is the ability to know which operation actually happened. In Go, select's special syntax associates a clause of code with each sub-operation. In Scheme a clause of code is just a function, and so what we want to do is to be able to annotate an operation with a function that will get run if the operation succeeds.
So we define a (wrap-op op k), which makes an operation that itself annotates op, associating it with k. If op occurs, its result values will be passed to k. For example, if we make a fiber that tries to perform this operation:
(perform
 (wrap-op
  (recv-op A)
  (lambda (v)
    (string-append "hello, " v))))
If we send the string "world" on the channel A, then the result of this perform invocation will be "hello, world". Providing "wrapped" operations to select allows us to handle the various cases in separate, appropriate ways.
we just made concurrent ml
Hey, we just reinvented Concurrent ML! In his PLDI 1988 paper "Synchronous operations as first-class values", John Reppy proposes just this abstraction. I like to compare it to the relationship between an expression (exp) and wrapping that expression in a lambda ((lambda () exp)); evaluating an expression gives its value, and the expression just goes away, whereas evaluating a lambda gives a procedure that you can call in the future to evaluate the expression. You can call the lambda many times, or no times. In the same way, a channel-receive operation is an abstraction over receiving a value from a channel. You can perform that operation many times, once, or not at all.
Reppy consolidated this work in his PLDI 1991 paper, "CML: A higher-order concurrent language". Note that he uses the term "event" instead of "operation". To me the name "event" to apply to this abstraction never felt quite right; I guess I wrote too much code in the past against event loops. I see "events" as single instances in time and not an abstraction over the possibility of a, well, of an event. Indeed I wish I could refer to an instantiation of an operation as an event, but better not to muddy the waters. Likewise Reppy uses "synchronize" where I use "perform". As you like, really, it's still Concurrent ML; I just prefer to explain to my users using terms that make sense to me.
what's an op?
Let's return to that channel recv implementation. It had basically two parts: an optimistic part, where the operation could complete immediately, and a pessimistic part, where we had to wait for the other party to arrive. However, there was a race condition, as I noted in the comment. If a sender and a receiver concurrently arrive at a channel, it could be that they concurrently do the optimistic check, don't notice that the other is there, then they both suspend, waiting for each other to arrive: deadlock. To fix this for recv, we have to recheck the sendq after publishing our presence to the recvq.
I'll get to the details in a bit for channels, but it turns out that this is a general pattern. All kinds of ops have optimistic and pessimistic behavior.
(define (perform op)
(match op
(($ $op try block wrap)
(define (do-op)
;; Return a thunk that has result values.
(or optimisticpessimistic)))
;; Return values, passed through wrap function.
((compose wrap do-op)))))
In the optimistic phase, the calling fiber will try to commit the operation directly. If that succeeds, then the calling fiber resumes any other fibers that are part of the transaction, and the calling fiber continues. In the pessimistic phase, we park the calling fiber, publish the fact that we're ready and waiting for the operation, then to resolve the race condition we have to try again to complete the operation. In either case we pass the result(s) through the wrap function.
Given that the pessimistic phase has to include a re-check for operation completability, the optimistic phase is purely an optimization. It's a good optimization that everyone will want to implement, but it's not strictly necessary. It's OK for a try function to always return #f.
As shown in the above function, an operation is a plain old data structure with three fields: a try, a block, and a wrap function. The optimistic behavior is implemented by the try function; the pessimistic side is partly implemented by perform, which handles the fiber suspension part, and by the operation's block function. The wrap function implements the wrap-op behavior described above, and is applied to the result(s) of a successful operation.
Now, it was about at this point that I was thinking "jeebs, this CML thing is complicated". I was both wrong and right -- there's some complication inherent in multicore lockless communication, yes, but I believe CML captures something close to the minimum, and certainly it's just as much work as with a direct implementation of channels. In that spirit, I continue on with the implementation of channel operations in Fibers.
channel receive operation
Here's an implementation of a try function for a channel.
In Fibers, a try function either succeeds and returns a thunk, or fails and returns #f. For channel receive, we only succeed if there is a sender already in the queue: the sender has arrived, suspended itself, and published its availability. The state variable is an atomic box that holds the operation state, which initially starts as W and when complete is S. More on that in a minute. If the CAS! compare-and-swap operation managed to change the state from W to S, then the optimistic phase suceeded -- yay! We resume the sender with no values, take the value that the sender gave us, and keep on trucking, returning that value wrapped in a thunk.
Additionally the sender's entry on the sendq is now stale, as the operation is already complete; we try to pop it off the queue at the line indicated with *, but that could fail due to concurrent queue modification. In that case, no biggie, someone else will do the collect our garbage for us.
The pessimistic case is a bit more involved. It's the last bit of code though; almost done here! I express the pessimistic phase as a function of the operation's block function.
(define (pessimistic block)
  ;; For consistency with optimistic phase, result of
  ;; pessimistic phase is a thunk that "perform" will
  ;; apply.
  (lambda ()
    ;; 1. Suspend the thread.  Expect to be resumed
    ;; with a thunk, which we arrange to invoke directly.
    ((suspend
       (lambda (k)
        (define (resume values-thunk)
          (schedule (lambda () (k values-thunk))))
        ;; 2. Make a fresh opstate.
        (define state (make-atomic-box 'W))
        ;; 3. Call op's block function.
        (block resume state))))))
So what about that state variable? Well basically, once we publish the fact that we're ready to perform an operation, fibers from other cores might concurrently try to complete our operation. We need for this perform invocation to complete at most once! So we introduce a state variable, the "opstate", held in an atomic box. It has three states:
W: "Waiting"; initial state
C: "Claimed"; temporary state
S: "Synched"; final state
There are four possible state transitions, of two kinds. Firstly there are the "local" transitions W->C, C->W, and C->S. These transitions may only ever occur as part of the "retry" phase a block function; notably, no remote fiber will cause these transitions on "our" state variable. Remote fibers can only make the W->S transition, committing an operation. The W->S transition can also be made locally of course.
Every time an operation is instantiated via the perform function, we make a new opstate. Operations themselves don't hold any state; only their instantiations do.
The need for the C state wasn't initially obvious to me, but after seeing the recv-opblock function below, it will be clear to you I hope.
block functions
The block function itself has two jobs to do. Recall that it's called after the calling fiber was suspended, and is passed two arguments: a procedure that can be called to resume the fiber with some number of values, and the fresh opstate for this instantiation. The block function has two jobs: it needs to publish the resume function and the opstate to the channel's recvq, and then it needs to try again to receive. That's the "retry" phase I was mentioning before.
Retrying the recv can have three possible results:
If the retry succeeds, we resume the sender. We also have to resume the calling fiber, as it has been suspended already. In general, whatever code manages to commit an operation has to resume any fibers that were waiting on it to complete.
If the operation was already in the S state, that means some other party concurrently completed our operation on our behalf. In that case there's nothing to do; the other party resumed us already.
Otherwise if the operation couldn't proceed, then when the other party or parties arrive, they will be responsible for completing the operation and ultimately resuming our fiber in the future.
With that long prelude out of the way, here's the gnarlies!
As we said, first we publish, then we retry. If there is a sender on the queue, we will try to complete their operation, but before we do that we have to prevent other fibers from completing ours; that's the purpose of going into the C state. If we manage to commit the sender's operation, then we commit ours too, going from C to S; otherwise we roll back to W. If the sender itself was in C then we had a conflict, and we spin to retry. We also try to GC off any completed operations from the sendq via unchecked CAS. If there's no sender on the queue, we just wait.
And that's it for the code! Thank you for suffering through this all. I only left off a few details: the try function can loop if sender is in the C state, and the block function needs to avoid a (choice-op (send-op A v) (recv-op A)) from sending v to itself. But because opstates are fresh allocations, we can know if a sender is actually ourself by comparing its opstate to ours (with eq?).
what about select?
I started about all this "op" business because I needed to annotate the arguments to select. Did I actually get anywhere? Good news, everyone: it turns out that select doesn't have to be a primitive!
Firstly, note that the choose-optry function just needs to run all try functions of sub-operations (possibly in random order), returning early if one succeeds. Pretty straightforward. And actually the story with the block function is the same: we just run the sub-operation block functions, knowing that the operation will commit at most one time. The only complication is plumbing through the respective wrap functions to all of the sub-operations, but of course that's the point of the wrap facility, so we pay the cost willingly.
There are optimizations possible, for example to randomize the order of visiting the sub-operations for more less deterministic behavior, but this is really all there is.
concurrent ml is inevitable
As far as I understand things, the protocol to implement CML-style operations on channels in a lock-free environment are exactly the same as what's needed if you wrote out the recv function by hand, without abstracting it to a recv-op.
You still need the ability to park a fiber in the block function, and you still need to retry the operation after parking. Although try is just an optimization, it's an optimization that you'll want.
So given that the cost of parallel CML is necessary, you might as well get what you pay for and have your language expose the more expressive CML interface in addition to the more "standard" channel operations.
concurrent ml between pthreads and fibers
One really cool aspect about implementing CML is that the bit that suspends the current thread is isolated in the perform function. Of course if you're in a fiber, you suspend the current fiber as we have described above. But what if you're not? What if you want to use CML to communicate between POSIX threads? You can do that, just create a mutex/cond pair and pass a procedure that will signal the cond as the resume argument to the block function. It just works! The channels implementation doesn't need to know anything about pthreads, or even fibers for that matter.
In fact, you can actually use CML operations to communicate between fibers and full pthreads. This can be really useful if you need to run some truly blocking operation in a side pthread, but you want most of your program to be in fibers.
a meta-note for a meta-language
This implementation was based on the Parallel CML paper from Reppy et al, describing the protocol implemented in Manticore. Since then there's been a lot of development there; you should check out Manticore! I also hear that Reppy has a new version of his "Concurrent Programming in ML" book coming out soon (not sure though).
This work is in Fibers, a concurrency facility for Guile Scheme, built as a library. Check out the manual for full details. Relative to the Parallel CML paper, this work has a couple differences beyond the superficial operation/perform event/sync name change.
Most significantly, Reppy's CML operations have three phases: poll, do, and block. Fibers uses just two, as in a concurrent context it doesn't make sense to check-then-do. There is no do, only try :)
Additionally the Fibers channel implementation is lockless, with an atomic sendq and recvq. In contrast, Manticore uses a spinlock and hence needs to mask/unmask interrupts at times.
On the other hand, the Parallel CML paper included some model checking work, which Fibers doesn't have. It would be nice to have some more confidence on correctness!
but what about perf
Performance! Does it scale? Let's poke it. Here I'm going to try to isolate my tests to measure the overhead of communication of channels as implemented in terms of Parallel CML ops. I have more real benchmarks for Fibers on a web server workload where it does well, but here I am really trying to focus on CML.
My test system is a 2 x E5-2620v3, which is two sockets each having 6 2.6GHz cores, hyperthreads off, performance governor on all cores. This is a system we use for Snabb testing, so the first core on each socket handles interrupts and all others are reserved; Linux won't schedule anything on them. When you run a fibers system, it will spawn a thread per available core, then set the thread's affinity to that core. In these tests, I'll give benchmarks progressively more cores and see how they do with the workload.
So this is a benchmark measuring total message sends per second on a chain of fibers communicating over channels. For 0 links, that means that there's just a sender and a receiver and no intermediate links. For 10 links, each message is relayed 10 times, for 11 total sends in the chain and 12 total fibers. For 0 links we expect pretty much no parallel speedup, and no slowdown, and that's what we see; but when we get to more links, we should expect more throughput. The fibers are allocated to cores at random (a randomized round-robin initial scheduling, then after that fibers have core affinity; though there is a limited work-stealing phase).
You would think that the 1-core case would be the same for all of them. Unfortunately it seems that currently there is a fixed cost for bouncing through epoll to pick up new I/O tasks, even though there are no I/O runnables in this test and the timeout is 0, so it will return immediately. It's definitely something to look into as it's a cost that all cores are paying.
Initially I expected a linear speedup but that's not what we're seeing. But then I thought about it and revised my expectations :) As we add more cores, we add more communication; we should see sublinear speedups as we have to do more cross-core wakeups and synchronizations. After all, we aren't measuring a nice parallelizable computational workload: we're measuring overhead.
On the other hand, the diminishing returns effect is pretty bad, and then we hit the NUMA cliff: as we cross from 6 to 7 cores, we start talking to the other CPU socket and everything goes to shit.
But here it's hard to isolate the test from three external factors, whose impact I don't understand: firstly, that Fibers itself has a significant wakeup cost for remote schedulers. I haven't measured contention on scheduler inboxes, but I suspect one issue is that when a remote scheduler has decided it has no runnables, it will sleep in epoll; and to wake it up we need to write on a socketpair. Guile can avoid that when there are lots of runnables and we see the remote scheduler isn't sleeping, but it's not perfect.
Secondly, Guile is a bytecode VM. I measured that Guile retires about 0.4 billion instructions per second per core on the test machine, whereas a 4 IPC native program will retire about 10 billion. There's overhead at various points, some of which will go away with native compilation in Guile but some might not for a while, given that Go (for example) has baked-in support for channels. So to what extent is it the protocol and to what extent the implementation overhead? I don't know.
Finally, and perhaps most importantly, we can't isolate this test from the garbage collector. Guile still uses the Boehm GC, which is just OK I think. It does have a nice parallel mark phase, but it uses POSIX signals to pause program threads instead of having those threads reach safepoints; and it's completely NUMA-unaware.
So, with all of those caveats mentioned, let's see a couple more graphs :) Firstly, similar to the previous one, here's total message send rate for N pairs of fibers that ping-pong their message back and forth. Core allocation was randomized round-robin.
My conclusion here is that when more fibers are runnable per scheduler turn, the overhead of the epoll phase is less.
Here's a test where there's one fiber producer, and N fibers competing to consume the messages sent. Ultimately we expect that the rate will be limited on the producer side, but there's still a nice speedup.
Next is a pretty weak-sauce benchmark where we're computing diagonal lengths on an N-dimensional cube; the squares of the dimensions happen in parallel fibers, then one fiber collects those lengths, sums and makes a square root.
The workload on that one is just very low, and the serial components become a bottleneck quickly. I think I need to rework that test case.
Finally, there's a false sieve of Erastothenes, in which every time we find a prime, we add another fiber onto the sieve chain that filters out multiples of that prime.
Even though the workload is really small, we still see speedups, which is somewhat satisfying. Still, on all of these, the NUMA cliff is something fierce.
For me what these benchmarks show is that there are still some bottlenecks to work on. We do OK in the handful-of-cores scenario, but the system as a whole doesn't really scale past that. On more real benchmarks with bigger workloads and proportionally much less communication, I get much more satisfactory results; but those tend to be I/O heavy anyway, so the bottleneck is elsewhere.
closing notes
There are other parts to CML events, namely guard functions and withNack functions. My understanding is that these are implementable in terms of this "primitive" CML as described here; that was a result of earlier work by Matthew Fluet. I haven't actually implemented these yet! A to-do item, truly.
There are other event types in CML systems of course! Besides being able to implement operations yourself, there are built-in condition variables (cvars), timeouts, thread join events, and so on. The Fibers manual mentions some of these, but it's an open set.
Finally and perhaps most significantly, Aaron Turon did some work a few years ago on "Reagents", a pattern library for composing parallel and concurrent operations, initially in Scala. It's claimed that Reagents generalizes CML. Is this the case? I am looking forward to finding out.
OK, that's it for this verrrrry long post :) I hope that you found that this made parallel CML seem a bit more approachable and interesting, whether as a language implementor, a library implementor, or a user. Comments and corrections welcome. Check out Fibers and give it a go!
Much of the initial work on rustifying GJS has been investigation, reading, planning. All in order to get the bindings to various libraries organised. I can’t do much without bindings so this is pretty much critical. The way Rust is able to use/link to C/C++ libraries is via FFI.
Rust FFI - Foreign Function Interface
Rust is designed to be interoperable with C interfaces. Currently it is not able to call C++ libraries directly.
Using FFI in Rust is a fairly simple affair, and functions rather similar to C; you declare in your Rust code with an extern "C" block the function signatures you want to use from the C code/library, and the same for C code calling Rust (which must be compiled as either a staticlib or a cdylib).
The caveat with this however is that calls from Rust to C code must be wrapped in unsafe blocks as the Rut compiler is unable to verify the safety of external calls - it is up to the devloper to guarantee the safety of such. This is particularly true of anything using a pointer.
More information can be found in the official documentation.
Onwards
The libraries I need to interact with using Rust are;
GLib
GObject
GIO
GIRepository
mozjs
As of now there are three options for generation of bindings for GNOME libraries: bindgen, grust-gen, and gir. These last two rely on the availability or ability to generate a Gnome IR.
bindgen
(bindgen)[https://github.com/servo/rust-bindgen] is a tool developed by the Mozilla Servo team, its summary is “Automatically generates Rust FFI bindings to C and C++ libraries”. It does this, and does it surprisingly well, in-fact it produced a near carbon copy of the bindings produced by grust-gen; just a lot less pretty. I also had issues with using bindgen in an experiment on generating GJS bindings - it dives very deep in to source code and follows headers pretty much everywhere; this also poses issues with Linux distribution packaging.
mozjs
The mozjs library (that is, the SpiderMonkey JS engine) is used in (servo)[https://servo.org/] - Mozilla’s next-gen browser - and since servo is largely written in Rust, it also needs bindings to the mozjs library. Which is where bindgen comes in to play. Work has already been done to use bindgen to generate the bindings required for mozjs but there was a small problem for me; I need mozjs-52, but the current work is based on mozjs HEAD and will continue to be so for a while.
No problem. I just forked and downgraded mozjs to the required version. This all does raise a few questions however, in regards to how Linux distributions and packaging are going to handle it. Servo isn’t ready, and won’t be for a long while yet so it may not be an issue at all, but some points to consider and what impact they have on rusting GJS are;
I will need to maintain a fork of mozjs at version 52
GJS relies on stable releases of mozjs, the upcoming stable release is v52
If my work produces meaningful and successful results then if it becomes mainstream;
It introduces a build chain dependency on some rust tooling, and rust crates related to the binding
Many distributions currently lack tooling to package rust written software and/or their dependencies (crates)
“mozjs is written in C++ though”, I hear you cry. Yes… Fortunately for me the binding ‘C’ glue has been written via the Servo project by some very ace people.
I will touch on some of these issues at a later date. Currently some fedora and Red Hat employees are working on a section of these issues.
grust-gen
grust-gen operates similar to bindgen but uses GIR files for input, rather than spelunking in source code. There are multiple parts to this project, to Rust, from Rust to GIR, and what looks like an introspection library. However, this project is old and unmaintained.
gir
gir is the new kid on the block and is part of the gtk-rs project. As with grust-gen, it uses GIR files to generate the bindings. It is also very active, and produces some rather nice code since it is built oriented towards GIR specifically.
The default mode for this tool is to generate all possible bindings from the specified gir file, and can also use an ignore list to bloke generating of things you may not need or aren’t stable. The other end of this is to specify only the gir objects you want to have generated. The tool also provides facilities to generate bindings using a custom object configuration (this feature may come in handy later).
One more feature of gir is the ability to label certain GObjects as send or sync, or both. What this means in Rust terms is that they gain an extra trait which marks them as thread safe. With regards to JS, this may likely become a valuable feature.
What about GJS?
bindgen and gir cover the mozjs and GNOME libraries, but what about GJS? For any Rust I write that needs to call functions within GJS, I’ll need to write my own bindings piecemeal as needed. Generating a GIR to use with gir is likely to introduce a cycle since to build the GJS library, the Rust code needs to be compiled, and to compile the Rust code, the GJS bindings are needed. So easiest and only option is to write the bindings as needed. Not too hard.
Issues
Not issues relating specifically to Rust (I will talk about those another time), but to do with mozjs. As most of you are aware (most) Linux distributions package only stable software and refrain from the use of git. For me this poses some challenges regarding GJS - because I had to fork the Mozilla servo provided fork of mozjs to downgrade it to the version required, I now have the burden of maintaining it. Maybe that won’t be an issue in future, but for now it means it is unlikely that any work I do on GJS using this fork will end up in the main trunk of GJS. If I had used the HEAD of the servo mozjs, that would definitely be ruled out.
Now I am looking at 3 things;
full conversion using the servo/mozjs
convert only functions which use no mozjs functions or structures, or
use what I learn from this process, and my knowledge of how Rust works to provide safety, to help make GJS a bit safer (for example, use of move semantics and unique_ptr can offer comparable features)
I’m unclear of what possible benefits converting the very slim amount of non-mozjs functions may give, as I had initially envisioned converting a function that creates/destroys memory, or is a hot function so that I could use some form of metrics. I’m going to continue on this path of course, as it could still provide useful insights or some benefits I haven’t thought of.
I will also continue with the full conversion as this is the only way to do meaningful comparisons and metrics - it is also entirely possible for it to end up being viable too.
And I will use what I learn to help improve the C/C++ code of GJS in the interim.
Next
My next post will hopefully have some insights and comparison between C++ and Rust, likely more to do with language structure, semantics, and a comparison of safety. Metrics would be nice, but that requires something to measure - we’ll see how that bit goes.
I just realized that I only tweeted about this a couple of months ago,
but never blogged about it. Shame on me!
I wrote an article, Legacy Systems as Old Cities for The
Recompiler magazine. Is GNOME, now at 20 years old, legacy software?
Is it different from mainframe software because "everyone" can change
it? Does long-lived software have the same patterns of change as
cities and physical artifacts? Can we learn from the building trades
and urbanism for maintaining software in the long term? Could we
turn legacy software into a good legacy?
Also, let me take this opportunity to recommend The Recompiler
magazine. It is the most enjoyable technical publication I read.
Their podcast is also excellent!
Features that the UI redesign depends on have landed in libdazzle. This includes animated widget transitions and more.
Builder’s Flatpak of Stable and Nightly channels now bundle OSTree 2017.7 and Flatpak 0.9.6 which should improve situations where we were failing to load summary files from the host.
A painful bug where Builder (Nightly Flatpak channel) would crash when launched from the Activities menu was fixed. This was a race condition that seemed to not happen when run from the command line. After some manual debugging the issue was fixed.
To simplify future debugging, we’ve added a “Bug Buddy” like feature. If you remember bug-buddy, you’re old like me. If Builder receives a SIGSEGV, we try to fork()/exec() an instance of gdb to inspect our process. It will dump a lot of useful information for us like where files are mapped in memory, instruction pointer addresses, and any callstack that can be discovered.
Libdazzle gained some new action muxer helpers to clean up action visibility.
The new editor (perspective, grid, columns, and view) design will help us drastically simplify some of Builder’s code. But this also needs forward-porting a bunch of plugins to the new design.
The new libdazzle based menu joiner landed to help us integrate contextual menus based on file content-type as GMenu does not support “conditionals” when displaying menus.
meson test should work again for running Builder’s unit tests under the Meson build system.
Anoop blogged about his work to add a code indexer to Builder here.
Lucie blogged about her work to make documentation easily accessible while you code here.
Umang blogged about his work to improve our word completion engine here.
After blogging about
casync
I realized I never blogged about the
mkosi tool that combines nicely
with it. mkosi has been around for a while already, and its time to
make it a bit better known. mkosi stands for Make Operating System
Image, and is a tool for precisely that: generating an OS tree or
image that can be booted.
Yes, there are many tools like mkosi, and a number of them are quite
well known and popular. But mkosi has a number of features that I
think make it interesting for a variety of use-cases that other tools
don't cover that well.
What is mkosi?
What are those use-cases, and what does mkosi precisely set apart?
mkosi is definitely a tool with a focus on developer's needs for
building OS images, for testing and debugging, but also for generating
production images with cryptographic protection. A typical use-case
would be to add a mkosi.default file to an existing project (for
example, one written in C or Python), and thus making it easy to
generate an OS image for it. mkosi will put together the image with
development headers and tools, compile your code in it, run your test
suite, then throw away the image again, and build a new one, this time
without development headers and tools, and install your build
artifacts in it. This final image is then "production-ready", and only
contains your built program and the minimal set of packages you
configured otherwise. Such an image could then be deployed with
casync (or any other tool of course) to be delivered to your set of
servers, or IoT devices or whatever you are building.
mkosi is supposed to be legacy-free: the focus is clearly on
today's technology, not yesteryear's. Specifically this means that
we'll generate GPT partition tables, not MBR/DOS ones. When you tell
mkosi to generate a bootable image for you, it will make it bootable
on EFI, not on legacy BIOS. The GPT images generated follow
specifications such as the Discoverable Partitions
Specification,
so that /etc/fstab can remain unpopulated and tools such as
systemd-nspawn can automatically dissect the image and boot from
them.
So, let's have a look on the specific images it can generate:
Raw GPT disk image, with ext4 as root
Raw GPT disk image, with btrfs as root
Raw GPT disk image, with a read-only squashfs as root
A plain directory on disk containing the OS tree directly (this is useful for creating generic container images)
A btrfs subvolume on disk, similar to the plain directory
A tarball of a plain directory
When any of the GPT choices above are selected, a couple of additional
options are available:
A swap partition may be added in
The system may be made bootable on EFI systems
Separate partitions for /home and /srv may be added in
The root, /home and /srv partitions may be optionally encrypted with LUKS
The root partition may be protected using dm-verity, thus making offline attacks on the generated system hard
If the image is made bootable, the dm-verity root hash is automatically added to the kernel command line, and the kernel together with its initial RAM disk and the kernel command line is optionally cryptographically signed for UEFI SecureBoot
Note that mkosi is distribution-agnostic. It currently can build
images based on the following Linux distributions:
Fedora
Debian
Ubuntu
ArchLinux
openSUSE
Note though that not all distributions are supported at the same
feature level currently. Also, as mkosi is based on dnf
--installroot, debootstrap, pacstrap and zypper, and those
packages are not packaged universally on all distributions, you might
not be able to build images for all those distributions on arbitrary
host distributions.
The GPT images are put together in a way that they aren't just
compatible with UEFI systems, but also with VM and container managers
(that is, at least the smart ones, i.e. VM managers that know UEFI,
and container managers that grok GPT disk images) to a large
degree. In fact, the idea is that you can use mkosi to build a
single GPT image that may be used to:
Boot on bare-metal boxes
Boot in a VM
Boot in a systemd-nspawn container
Directly run a systemd service off, using systemd's RootImage= unit file setting
Note that in all four cases the dm-verity data is automatically used
if available to ensure the image is not tampered with (yes, you read
that right, systemd-nspawn and systemd's RootImage= setting
automatically do dm-verity these days if the image has it.)
Mode of Operation
The simplest usage of mkosi is by simply invoking it without
parameters (as root):
# mkosi
Without any configuration this will create a GPT disk image for you,
will call it image.raw and drop it in the current directory. The
distribution used will be the same one as your host runs.
Of course in most cases you want more control about how the image is
put together, i.e. select package sets, select the distribution, size
partitions and so on. Most of that you can actually specify on the
command line, but it is recommended to instead create a couple of
mkosi.$SOMETHING files and directories in some directory. Then,
simply change to that directory and run mkosi without any further
arguments. The tool will then look in the current working directory
for these files and directories and make use of them (similar to how
make looks for a Makefile…). Every single file/directory is
optional, but if they exist they are honored. Here's a list of the
files/directories mkosi currently looks for:
mkosi.default — This is the main configuration file, here you
can configure what kind of image you want, which distribution, which
packages and so on.
mkosi.extra/ — If this directory exists, then mkosi will copy
everything inside it into the images built. You can place arbitrary
directory hierarchies in here, and they'll be copied over whatever is
already in the image, after it was put together by the distribution's
package manager. This is the best way to drop additional static files
into the image, or override distribution-supplied ones.
mkosi.build — This executable file is supposed to be a build
script. When it exists, mkosi will build two images, one after the
other in the mode already mentioned above: the first version is the
build image, and may include various build-time dependencies such as
a compiler or development headers. The build script is also copied
into it, and then run inside it. The script should then build
whatever shall be built and place the result in $DESTDIR (don't
worry, popular build tools such as Automake or Meson all honor
$DESTDIR anyway, so there's not much to do here explicitly). It may
also run a test suite, or anything else you like. After the script
finished, the build image is removed again, and a second image (the
final image) is built. This time, no development packages are
included, and the build script is not copied into the image again —
however, the build artifacts from the first run (i.e. those placed in
$DESTDIR) are copied into the image.
mkosi.postinst — If this executable script exists, it is invoked
inside the image (inside a systemd-nspawn invocation) and can
adjust the image as it likes at a very late point in the image
preparation. If mkosi.build exists, i.e. the dual-phased
development build process used, then this script will be invoked
twice: once inside the build image and once inside the final
image. The first parameter passed to the script clarifies which phase
it is run in.
mkosi.nspawn — If this file exists, it should contain a
container configuration file for systemd-nspawn (see
systemd.nspawn(5)
for details), which shall be shipped along with the final image and
shall be included in the check-sum calculations (see below).
mkosi.cache/ — If this directory exists, it is used as package
cache directory for the builds. This directory is effectively bind
mounted into the image at build time, in order to speed up building
images. The package installers of the various distributions will
place their package files here, so that subsequent runs can reuse
them.
mkosi.passphrase — If this file exists, it should contain a
pass-phrase to use for the LUKS encryption (if that's enabled for the
image built). This file should not be readable to other users.
mkosi.secure-boot.crt and mkosi.secure-boot.key should be an
X.509 key pair to use for signing the kernel and initrd for UEFI
SecureBoot, if that's enabled.
How to use it
So, let's come back to our most trivial example, without any of the
mkosi.$SOMETHING files around:
# mkosi
As mentioned, this will create a build file image.raw in the current
directory. How do we use it? Of course, we could dd it onto some USB
stick and boot it on a bare-metal device. However, it's much simpler
to first run it in a container for testing:
# systemd-nspawn -bi image.raw
And there you go: the image should boot up, and just work for you.
Now, let's make things more interesting. Let's still not use any of
the mkosi.$SOMETHING files around:
This is similar as the above, but we made three changes: it's no
longer GPT + ext4, but GPT + btrfs. Moreover, the system is made
bootable on UEFI systems, and finally, the output is now called
foobar.raw.
Because this system is bootable on UEFI systems, we can run it in KVM:
This will look very similar to the systemd-nspawn invocation, except
that this uses full VM virtualization rather than container
virtualization. (Note that the way to run a UEFI qemu/kvm instance
appears to change all the time and is different on the various
distributions. It's quite annoying, and I can't really tell you what
the right qemu command line is to make this work on your system.)
Of course, it's not all raw GPT disk images with mkosi. Let's try
a plain directory image:
In this mode we explicitly pick Fedora as the distribution to use, ask
mkosi to generate a compressed GPT image with a root squashfs,
compress the result with xz, and generate a SHA256SUMS file with
the hashes of the generated artifacts. The package will contain the
SSH client as well as everybody's favorite editor.
Now, let's make use of the various mkosi.$SOMETHING files. Let's
say we are working on some Automake-based project and want to make it
easy to generate a disk image off the development tree with the
version you are hacking on. Create a configuration file:
# cat > mkosi.default <<EOF
[Distribution]
Distribution=fedora
Release=24

[Output]
Format=raw_btrfs
Bootable=yes

[Packages]
# The packages to appear in both the build and the final image
Packages=openssh-clients httpd
# The packages to appear in the build image, but absent from the final image
BuildPackages=make gcc libcurl-devel
EOF
And let's add a build script:
# cat > mkosi.build <<EOF
#!/bin/sh
./autogen.sh
./configure --prefix=/usr
make -j `nproc`
make install
EOF
# chmod +x mkosi.build
And with all that in place we can now build our project into a disk image, simply by typing:
# mkosi
Let's try it out:
# systemd-nspawn -bi image.raw
Of course, if you do this you'll notice that building an image like
this can be quite slow. And slow build times are actively hurtful to
your productivity as a developer. Hence let's make things a bit
faster. First, let's make use of a package cache shared between runs:
# mkdir mkosi.cache
Building images now should already be substantially faster (and
generate less network traffic) as the packages will now be downloaded
only once and reused. However, you'll notice that unpacking all those
packages and the rest of the work is still quite slow. But mkosi can
help you with that. Simply use mkosi's incremental build feature. In
this mode mkosi will make a copy of the build and final images
immediately before dropping in your build sources or artifacts, so
that building an image becomes a lot quicker: instead of always
starting totally from scratch a build will now reuse everything it can
reuse from a previous run, and immediately begin with building your
sources rather than the build image to build your sources in. To
enable the incremental build feature use -i:
# mkosi -i
Note that if you use this option, the package list is not updated
anymore from your distribution's servers, as the cached copy is made
after all packages are installed, and hence until you actually delete
the cached copy the distribution's network servers aren't contacted
again and no RPMs or DEBs are downloaded. This means the distribution
you use becomes "frozen in time" this way. (Which might be a bad
thing, but also a good thing, as it makes things kinda reproducible.)
Of course, if you run mkosi a couple of times you'll notice that it
won't overwrite the generated image when it already exists. You can
either delete the file yourself first (rm image.raw) or let mkosi
do it for you right before building a new image, with mkosi -f. You
can also tell mkosi to not only remove any such pre-existing images,
but also remove any cached copies of the incremental feature, by using
-f twice.
I wrote mkosi originally in order to test systemd, and quickly
generate a disk image of various distributions with the most current
systemd version from git, without all that affecting my host system. I
regularly use mkosi for that today, in incremental mode. The two
commands I use most in that context are:
# mkosi -if && systemd-nspawn -bi image.raw
And sometimes:
# mkosi -iff && systemd-nspawn -bi image.raw
The latter I use only if I want to regenerate everything based on the
very newest set of RPMs provided by Fedora, instead of a cached
snapshot of it.
BTW, the mkosi files for systemd are included in the systemd git
tree:
mkosi.default
and
mkosi.build. This
way, any developer who wants to quickly test something with current
systemd git, or wants to prepare a patch based on it and test it can
check out the systemd repository and simply run mkosi in it and a
few minutes later he has a bootable image he can test in
systemd-nspawn or KVM. casync has similar files:
mkosi.default,
mkosi.build.
Random Interesting Features
As mentioned already, mkosi will generate dm-verity enabled
disk images if you ask for it. For that use the --verity switch on
the command line or Verity= setting in mkosi.default. Of course,
dm-verity implies that the root volume is read-only. In this mode
the top-level dm-verity hash will be placed along-side the output
disk image in a file named the same way, but with the .roothash
suffix. If the image is to be created bootable, the root hash is also
included on the kernel command line in the roothash= parameter,
which current systemd versions can use to both find and activate the
root partition in a dm-verity protected way. BTW: it's a good idea
to combine this dm-verity mode with the raw_squashfs image mode,
to generate a genuinely protected, compressed image suitable for
running in your IoT device.
As indicated above, mkosi can automatically create a check-sum
file SHA256SUMS for you (--checksum) covering all the files it
outputs (which could be the image file itself, a matching .nspawn
file using the mkosi.nspawn file mentioned above, as well as the
.roothash file for the dm-verity root hash.) It can then
optionally sign this with gpg (--sign). Note that systemd's
machinectl pull-tar and machinectl pull-raw command can download
these files and the SHA256SUMS file automatically and verify things
on download. With other words: what mkosi outputs is perfectly
ready for downloads using these two systemd commands.
As mentioned, mkosi is big on supporting UEFI SecureBoot. To
make use of that, place your X.509 key pair in two files
mkosi.secureboot.crt and mkosi.secureboot.key, and set
SecureBoot= or --secure-boot. If so, mkosi will sign the
kernel/initrd/kernel command line combination during the build. Of
course, if you use this mode, you should also use
Verity=/--verity=, otherwise the setup makes only partial
sense. Note that mkosi will not help you with actually enrolling
the keys you use in your UEFI BIOS.
mkosi has minimal support for GIT checkouts: when it recognizes
it is run in a git checkout and you use the mkosi.build script
stuff, the source tree will be copied into the build image, but will
all files excluded by .gitignore removed.
There's support for encryption in place. Use --encrypt= or
Encrypt=. Note that the UEFI ESP is never encrypted though, and the
root partition only if explicitly requested. The /home and /srv
partitions are unconditionally encrypted if that's enabled.
Images may be built with all documentation removed.
The password for the root user and additional kernel command line
arguments may be configured for the image to generate.
Minimum Requirements
Current mkosi requires Python 3.5, and has a number of dependencies,
listed in the
README. Most
notably you need a somewhat recent systemd version to make use of its
full feature set: systemd 233. Older versions are already packaged for
various distributions, but much of what I describe above is only
available in the most recent release mkosi 3.
The UEFI SecureBoot support requires sbsign which currently isn't
available in Fedora, but there's a
COPR.
Future
It is my intention to continue turning mkosi into a tool suitable
for:
Testing and debugging projects
Building images for secure devices
Building portable service images
Building images for secure VMs and containers
One of the biggest goals I have for the future is to teach mkosi and
systemd/sd-boot native support for A/B IoT style partition
setups. The idea is that the combination of systemd, casync and
mkosi provides generic building blocks for building secure,
auto-updating devices in a generic way from, even though all pieces
may be used individually, too.
FAQ
Why are you reinventing the wheel again? This is exactly like
$SOMEOTHERPROJECT! — Well, to my knowledge there's no tool that
integrates this nicely with your project's development tree, and can
do dm-verity and UEFI SecureBoot and all that stuff for you. So
nope, I don't think this exactly like $SOMEOTHERPROJECT, thank you
very much.
What about creating MBR/DOS partition images? — That's really
out of focus to me. This is an exercise in figuring out how generic
OSes and devices in the future should be built and an attempt to
commoditize OS image building. And no, the future doesn't speak MBR,
sorry. That said, I'd be quite interested in adding support for
booting on Raspberry Pi, possibly using a hybrid approach, i.e. using
a GPT disk label, but arranging things in a way that the Raspberry Pi
boot protocol (which is built around DOS partition tables), can still
work.
Is this portable? — Well, depends what you mean by
portable. No, this tool runs on Linux only, and as it uses
systemd-nspawn during the build process it doesn't run on
non-systemd systems either. But then again, you should be able to
create images for any architecture you like with it, but of course if
you want the image bootable on bare-metal systems only systems doing
UEFI are supported (but systemd-nspawn should still work fine on
them).
Where can I get this stuff? — Try
GitHub. And some distributions
carry packaged versions, but I think none of them the current v3
yet.
Is this a systemd project? — Yes, it's hosted under the
systemd GitHub umbrella. And yes,
during run-time systemd-nspawn in a current version is required. But
no, the code-bases are separate otherwise, already because systemd
is a C project, and mkosi Python.
Requiring systemd 233 is a pretty steep requirement, no? —
Yes, but the feature we need kind of matters (systemd-nspawn's
--overlay= switch), and again, this isn't supposed to be a tool for
legacy systems.
Can I run the resulting images in LXC or Docker? — Humm, I am
not an LXC nor Docker guy. If you select directory or subvolume
as image type, LXC should be able to boot the generated images just
fine, but I didn't try. Last time I looked, Docker doesn't permit
running proper init systems as PID 1 inside the container, as they
define their own run-time without intention to emulate a proper
system. Hence, no I don't think it will work, at least not with an
unpatched Docker version. That said, again, don't ask me questions
about Docker, it's not precisely my area of expertise, and quite
frankly I am not a fan. To my knowledge neither LXC nor Docker are
able to run containers directly off GPT disk images, hence the
various raw_xyz image types are definitely not compatible with
either. That means if you want to generate a single raw disk image
that can be booted unmodified both in a container and on bare-metal,
then systemd-nspawn is the container manager to go for
(specifically, its -i/--image= switch).
Should you care? Is this a tool for you?
Well, that's up to you really.
If you hack on some complex project and need a quick way to compile
and run your project on a specific current Linux distribution, then
mkosi is an excellent way to do that. Simply drop the mkosi.default
and mkosi.build files in your git tree and everything will be
easy. (And of course, as indicated above: if the project you are
hacking on happens to be called systemd or casync be aware that
those files are already part of the git tree — you can just use them.)
If you hack on some embedded or IoT device, then mkosi is a great
choice too, as it will make it reasonably easy to generate secure
images that are protected against offline modification, by using
dm-verity and UEFI SecureBoot.
If you are an administrator and need a nice way to build images for a
VM or systemd-nspawn container, or a portable service then mkosi
is an excellent choice too.
If you care about legacy computers, old distributions, non-systemd
init systems, old VM managers, Docker, … then no, mkosi is not for
you, but there are plenty of well-established alternatives around that
cover that nicely.
And never forget: mkosi is an Open Source project. We are happy to
accept your patches and other contributions.
Oh, and one unrelated last thing: don't forget to submit your talk
proposal
and/or buy a ticket for
All Systems Go! 2017 in Berlin — the
conference where things like systemd, casync and mkosi are
discussed, along with a variety of other Linux userspace projects used
for building systems.
It has been a wonderful GSoC season at coala. The projects have been really exciting and I have been handed the mentorship of the project to enhance cobot.
What is cobot?
cobot is a bot used by the coala community to serve various purposes:
It is a way for newcomers to be easily invited to the community.
It assists the maintainers with various tasks such as issue assignment and reviewing.
It helps to search some documentation.
It exposes some fun websites such as Wolfram and lmgtfy to generate easy links.
Since it’s introduction it has become an integral part of the community. Members use it very frequently across chatrooms to automate various arduous tasks such as opening issues and changing their tags.
What has been achieved in this Phase?
Even though cobot is so integral to the community it was kind of hacked together initially. It had no unit testing and quickly done up in a not so clean manner. So in this phase it was a target to get a functioning bot which was at par on the previous bot including all features and testing.
Here are some detailed updates by my extremely delightful and awesome student Meet:
He has successfully completed all targets set for this phase and now onwards to the next…
What next?
One most important thing that is a target for this project is the ability to search across documentation and this search should give back results that are most relevant to the query. After much discussion over topic modeling and designing a search index we have landed on the resolution of doing a smart manual index because the documentation is just not dense enough to create a reliable automated technique.
Today is effectively my last day at Mozilla, before I start at Impossible on Monday. I’ve been here for 6 years and a bit and it’s been quite an experience. I think it’s worth reflecting on, so here we go; Fair warning, if you have no interest in me or Mozilla, this is going to make pretty boring reading.
I started on June 6th 2011, several months before the (then new, since moved) London office opened. Although my skills lay (lie?) in user interface implementation, I was hired mainly for my graphics and systems knowledge. Mozilla was in the region of 500 or so employees then I think, and it was an interesting time. I’d been working on the code-base for several years prior at Intel, on a headless backend that we used to build a Clutter-based browser for Moblin netbooks. I wasn’t completely unfamiliar with the code-base, but it still took a long time to get to grips with. We’re talking several million lines of code with several years of legacy, in a language I still consider myself to be pretty novice at (C++).
I started on the mobile platform team, and I would consider this to be my most enjoyable time at the company. The mobile platform team was a multi-discipline team that did general low-level platform work for the mobile (Android and Meego) browser. When we started, the browser was based on XUL and was multi-process. Mobile was often the breeding ground for new technologies that would later go on to desktop. It wasn’t long before we started developing a new browser based on a native Android UI, removing XUL and relegating Gecko to page rendering. At the time this felt like a disappointing move. The reason the XUL-based browser wasn’t quite satisfactory was mainly due to performance issues, and as a platform guy, I wanted to see those issues fixed, rather than worked around. In retrospect, this was absolutely the right decision and lead to what I’d still consider to be one of Android’s best browsers.
Despite performance issues being one of the major driving forces for making this move, we did a lot of platform work at the time too. As well as being multi-process, the XUL browser had a compositor system for rendering the page, but this wasn’t easily portable. We ended up rewriting this, first almost entirely in Java (which was interesting), then with the rendering part of the compositor in native code. The input handling remained in Java for several years (pretty much until FirefoxOS, where we rewrote that part in native code, then later, switched Android over).
Most of my work during this period was based around improving performance (both perceived and real) and fluidity of the browser. Benoit Girard had written an excellent tiled rendering framework that I polished and got working with mobile. On top of that, I worked on progressive rendering and low precision rendering, which combined are probably the largest body of original work I’ve contributed to the Mozilla code-base. Neither of them are really active in the code-base at the moment, which shows how good a job I didn’t do maintaining them, I suppose.
Although most of my work was graphics-focused on the platform team, I also got to to do some layout work. I worked on some over-invalidation issues before Matt Woodrow’s DLBI work landed (which nullified that, but I think that work existed in at least one release). I also worked a lot on fixed position elements staying fixed to the correct positions during scrolling and zooming, another piece of work I was quite proud of (and probably my second-biggest contribution). There was also the opportunity for some UI work, when it intersected with platform. I implemented Firefox for Android’s dynamic toolbar, and made sure it interacted well with fixed position elements (some of this work has unfortunately been undone with the move from the partially Java-based input manager to the native one). During this period, I was also regularly attending and presenting at FOSDEM.
I would consider my time on the mobile platform team a pretty happy and productive time. Unfortunately for me, those of us with graphics specialities on the mobile platform team were taken off that team and put on the graphics team. I think this was the start in a steady decline in my engagement with the company. At the time this move was made, Mozilla was apparently trying to consolidate teams around products, and this was the exact opposite happening. The move was never really explained to me and I know I wasn’t the only one that wasn’t happy about it. The graphics team was very different to the mobile platform team and I don’t feel I fit in as well. It felt more boisterous and less democratic than the mobile platform team, and as someone that generally shies away from arguments and just wants to get work done, it was hard not to feel sidelined slightly. I was also quite disappointed that people didn’t seem particular familiar with the graphics work I had already been doing and that I was tasked, at least initially, with working on some very different (and very boring) desktop Linux work, rather than my speciality of mobile.
I think my time on the graphics team was pretty unproductive, with the exception of the work I did on b2g, improving tiled rendering and getting graphics memory-mapped tiles working. This was particularly hard as the interface was basically undocumented, and its implementation details could vary wildly depending on the graphics driver. Though I made a huge contribution to this work, you won’t see me credited in the tree unfortunately. I’m still a little bit sore about that. It wasn’t long after this that I requested to move to the FirefoxOS systems front-end team. I’d been doing some work there already and I’d long wanted to go back to doing UI. It felt like I either needed a dramatic change or I needed to leave. I’m glad I didn’t leave at this point.
Working on FirefoxOS was a blast. We had lots of new, very talented people, a clear and worthwhile mission, and a new code-base to work with. I worked mainly on the home-screen, first with performance improvements, then with added features (app-grouping being the major one), then with a hugely controversial and probably mismanaged (on my part, not my manager – who was excellent) rewrite. The rewrite was good and fixed many of the performance problems of what it was replacing, but unfortunately also removed features, at least initially. Turns out people really liked the app-grouping feature.
I really enjoyed my time working on FirefoxOS, and getting a nice clean break from platform work, but it was always bitter-sweet. Everyone working on the project was very enthusiastic to see it through and do a good job, but it never felt like upper management’s focus was in the correct place. We spent far too much time kowtowing to the desires of phone carriers and trying to copy Android and not nearly enough time on basic features and polish. Up until around v2.0 and maybe even 2.2, the experience of using FirefoxOS was very rough. Unfortunately, as soon as it started to show some promise and as soon as we had freedom from carriers to actually do what we set out to do in the first place, the project was cancelled, in favour of the whole Connected Devices IoT debacle.
If there was anything that killed morale for me more than my unfortunate time on the graphics team, and more than having FirefoxOS prematurely cancelled, it would have to be the Connected Devices experience. I appreciate it as an opportunity to work on random semi-interesting things for a year or so, and to get some entrepreneurship training, but the mismanagement of that whole situation was pretty epic. To take a group of hundreds of UI-focused engineers and tell them that, with very little help, they should organised themselves into small teams and create IoT products still strikes me as an idea so crazy that it definitely won’t work. Certainly not the way we did it anyway. The idea, I think, was that we’d be running several internal start-ups and we’d hopefully get some marketable products out of it. What business a not-for-profit company, based primarily on doing open-source, web-based engineering has making physical, commercial products is questionable, but it failed long before that could be considered.
The process involved coming up with an idea, presenting it and getting approval to run with it. You would then repeat this approval process at various stages during development. It was, however, very hard to get approval for enough resources (both time and people) to finesse an idea long enough to make it obviously a good or bad idea. That aside, I found it very demoralising to not have the opportunity to write code that people could use. I did manage itafewtimes, in spite of what was happening, but none of this work I would consider myself particularly proud of. Lots of very talented people left during this period, and then at the end of it, everyone else was laid off. Not a good time.
Luckily for me and the team I was on, we were moved under the umbrella of Emerging Technologies before the lay-offs happened, and this also allowed us to refocus away from trying to make an under-featured and pointless shopping-list assistant and back onto the underlying speech-recognition technology. This brings us almost to present day now.
The DeepSpeech speech recognition project is an extremely worthwhile project, with a clear mission, great promise and interesting underlying technology. So why would I leave? Well, I’ve practically ended up on this team by a series of accidents and random happenstance. It’s been very interesting so far, I’ve learnt a lot and I think I’ve made a reasonable contribution to the code-base. I also rewrote python_speech_features in C for a pretty large performance boost, which I’m pretty pleased with. But at the end of the day, it doesn’t feel like this team will miss me. I too often spend my time finding work to do, and to be honest, I’m just not interested enough in the subject matter to make that work long-term. Most of my time on this project has been spent pushing to open it up and make it more transparent to people outside of the company. I’ve added model exporting, better default behaviour, a client library, a native client, Python bindings (+ example client) and most recently, Node.js bindings (+ example client). We’re starting to get noticed and starting to get external contributions, but I worry that we still aren’t transparent enough and still aren’t truly treating this as the open-source project it is and should be. I hope the team can push further towards this direction without me. I think it’ll be one to watch.
Next week, I start working at a new job doing a new thing. It’s odd to say goodbye to Mozilla after 6 years. It’s not easy, but many of my peers and colleagues have already made the jump, so it feels like the right time. One of the big reasons I’m moving, and moving to Impossible specifically, is that I want to get back to doing impressive work again. This is the largest regret I have about my time at Mozilla. I used to blog regularly when I worked at OpenedHand and Intel, because I was excited about the work we were doing and I thought it was impressive. This wasn’t just youthful exuberance (he says, realising how ridiculous that sounds at 32), I still consider much of the work we did to be impressive, even now. I want to be doing things like that again, and it feels like Impossible is a great opportunity to make that happen. Wish me luck!
In part 1, I looked at the simpler features of Go, such as its general syntax, its basic type system, and its for loop. Here I mention its support for packages and object orientation. As before, I strongly suggest that you read the book to learn about this stuff properly. Again, I welcome any friendly corrections and clarifications.
Overall, I find Go’s syntax for object orientation a bit messy, inconsistent and frequently too implicit, and for most uses I prefer the obviousness of C++’s inheritance hierarchy. But after writing the explanations down, I think I understand it.
I’m purposefully trying not to mention the build system, distribution, or configuration, for now.
Packages
Go code is organized in packages, which are much like Java package names, and a bit like C++ namespaces. The package name is declared at the start of each file:
package foo
And files in other packages should import them like so:
package bar

import (
  "foo"
  "moo"
)

func somefunc() {
  foo.Yadda()
  var a moo.Thing
  ...
}
The package name should match the file’s directory name. This is how the import statements find the packages’ files. You can have multiple files in the same directory that are all part of the same package.
Your “main” package, with your main function, is an exception to this rule. Its directory doesn’t need to be named “main” because you won’t be importing the main package from anywhere.
Go doesn’t seem to allow nested packages, unlike C++ (foo::thing::Yadda) and Java (foo.thing.Yadda), though people seem to work around this by creating separate libraries, which seems awkward.
I don’t know how people should specify the API of a Go package without providing the implementation. C and C++ have header files for this purpose, separating declaration and implementation.
Structs
You can declare structs in go much as in C. For instance:
type Thing struct {
  // Member fields.
  // Notice the lack of the var keyword.
  a int
  B int // See below about symbol visibility
}

var foo Thing
foo.B = 3

var bar Thing = Thing{3}

var goo *Thing = new(Thing)
goo.B = 5
As usual, I have used the var form to demonstrate the actual type, but you would probably want to use the short := form.
Notice that we can create it as a value or as a pointer (using the built-in new() function), though in Go, unlike C or C++, this does not determine whether its actual memory will be on the stack or the heap. The compiler decides, generally based on whether the memory needs to outlive the function call.
Previously we’ve seen the built-in make() function used to instantiate slices and maps (and we’ll see it in part 3 with channels). make() is only for those built-in types. For our own types, we can use the new() function. I find the distinction a bit messy, but I generally dislike the whole distinction between built-in types and types that can be implemented using the language itself. I like how the C++ standard library is implemented in C++, with very little special support from the language itself when something is added to the library.
Go types often have “constructor” functions (not methods) which you should call to properly instantiate the type, but I don’t think there is any way to enforce correct initialization like a default constructor in C++ or Java. For instance:
type Thing struct {
  a int
  name string
  ...
}

func NewThing() *Thing {
  // 100 is a suitable default value for a in this type:
  f := Thing{100, nil}
  return &f
}

// Notice that different "constructors" must have different names,
// because go doesn't have function or method overloading.
func NewThingWithName(name string) *Thing {
  f := Thing{100, name}
  return &f
}
Embedding Structs
You can anonymously “embed” one struct within an other, like so:
type Person struct {
   Name string
}

type Employee struct {
  Person
  Position string
}

var a Employee
a.Name = "bob"
a.Position = "builder"
This feels a bit like inheritance in C++ and Java, but this is just containment. It doesn’t give us any real “is a” meaning and doesn’t give us real polymorphism. For instance, you can do this:
var e = new(Employee)

// Compilation error.
var p *Person = e

// This works instead.
// So if we thought of this as a cast (we probably shouldn't),
// this would mean that we have to explicitly cast to the base class.
var p *Person = e.Person

// This works.
e.methodOnPerson()

// And this works.
// Name is a field in the contained Person struct.
e.Name = 2

// These work too, but the extra qualification is unnecessary.
e.Person.methodOnPerson()
Interfaces, which we’ll see later, do give us some sense of an “is a” meaning.
Methods
Unlike C, but like C++ and Java classes, structs in Go can have methods – functions associated with the struct. But the syntax is a little different than in C++ or Java. Methods are declared outside of the struct declaration, and the association is made by specifying a “receiver” before the function name. For instance, this declares (and implements) a DoSomething method for the Thing struct:
func (t Thing) DoSomething() {
  ...
}
Notice that you have to specify a name for the receiver – there is no built-in “self” or “this” instance name. This feels like an unnecessary invitation to inconsistency.
You can use a pointer type instead, and you’ll have to if you want to change anything about the struct instance:
func (t *Thing) ChangeSomething() {
  t.a = 4
}
Because you should also want to keep your code consistent, you’d therefore want to use a pointer type for all method receivers. So I don’t know why the language lets it ever be a struct value type.
Unlike C++ or Java, this lets you check the instance for nil (Go’s null or nullptr), making it acceptable to call your method on a null instance. This reminds me of how Objective-C happily lets you call a method (“send a message to” in Objective-C terminology) on a nil instance, with no crash, even returning a nil or zero return value. I find that undisciplined in Objective-C, and it bothers me that Go allows this sometimes, but not consistently.
Unlike C++ or Java, you can even associate methods with non struct (non class) types. For instance:
type Meters int
type Feet int

func (Meters) convertToFeet() (Feet) {
  ...
}

Meters m = 10
f := p.convertToFeet()
No equality or comparison operator overloading
In C++, you can overload operator =, !=, <, >, etc, so you can use instances of your type with the regular operators, making your code look tidy:
MyType a = getSomething();
MyType b = getSomethingElse();
if (a == b) {
  ...
}
You can’t do that in Go (or Java, though it has the awkward Comparable interface and equals() method). Only some built-in types are comparable in Go – the numeric types, string, pointers, or channels, or structs or arrays made up of these types. This is an issue when dealing with interfaces, which we’ll see later.
Symbol Visibility: Uppercase or lowercase first letter
Symbols (types, functions, variables) that start with an uppercase letter are available from outside the package. Struct methods and member variables that start with an uppercase letter are available from outside the struct. Otherwise they are private to the package or struct.
For instance:
type Thing int // This type will be available outside of the package.
var Thingleton Thing// This variable will be available outside of the package.

type thing int // Not available outside of the package.
var thing1 thing // Not available outside of the package.
var thing2 Thing // Not available outside of the package.

// Available outside of the package.
func DoThing() {
  ...
}

// Not available outside of the package.
func doThing() {
  ...
}

type Stuff struct {
  Thing1 Thing // Available outside of the package.
  thing2 Thing // "private" to the struct.
}

// Available outside of the struct.
func (s Stuff) Foo() {
  ...
}

// Not available outside of the struct.
func (s Stuff) bar() {
  ...
}

// Not available outside of the package.
type localstuff struct {
...
}
I find this a bit strange. I prefer the explicit public and private keywords in C++ and Java.
Interfaces
Interfaces have methods
If two Go types satisfy an interface then they both have the methods of that interface. This is similar to Java interfaces. A Go interface is also a bit like a completely abstract class in C++ (having only pure virtual methods), but it’s also a lot like a C++ concept (not yet in C++, as of C++17). For instance:
type Shape interface {
  // The interface's methods.
  // Note the lack of the func keyword.
  SetPosition(x int, y int)
  GetPosition() (x int, y int)
  DrawOnSurface(s Surface)
}

type Rectangle struct {
  ...
}

// Methods to satisfy the Shape interface.
func (r *Rectangle) SetPosition(x int, y int) {
  ...
}

func (r *Rectangle) GetPosition() (x int, y int) {
  ...
}
func (r *Rectangle) DrawOnSurface(s Surface) {
   ...
}

// Other methods:
func (r *Rectangle) setCornerType(c CornerType) {
   ...
}
func (r *Rectangle) cornerType() (CornerType) {
   ...
}

type Circle struct {
  ...
}

// Methods to satisfy the Shape interface.
func (c *Circle) SetPosition(x int, y int) {
  ...
}

func (c *Circle) GetPosition() (x int, y int) {
  ...
}

func (c *Circle) DrawOnSurface(s Surface) {
  ...
}

// Other methods:
...
You can then use the interface type instead of the specific “concrete” type:
var someCircle *Circle = new(Circle)
var s Shape = someCircle
s.DrawOnSurface(someSurface)
Notice that we use a Shape, not a *Shape (pointer to Shape), even though we are casting from a *Circle (pointer to circle). “Interface values” seem to be implicitly pointer-like, which seems unnecessarily confusing. I guess it would feel more consistent if pointers to interfaces just had the same behaviour as these “interface values”, even if the language had to disallow interface types that weren’t pointers.
Types satisfy interfaces implicitly
However, there is no explicit declaration that a type should implement an interface.
In this way Go interfaces are like C++ concepts, though C++ concepts are instead a purely compile-time feature for use with generic (template) code. Your class can conform to a C++ concept without you declaring that it does. And therefore, like Go interfaces, you can, if you must, use an existing type without changing it.
The compiler still checks that types are compatible, but presumably by checking the types’ list of methods rather than checking a class hierarchy or list of implemented interfaces. For instance:
var a *Circle = new(Circle)
var b Shape = a // OK. The compiler can check that Circle has Shape's methods.
Like C++ with dynamic_cast, Go can also check at runtime. For instance, you can check if one interface value refers to an instance that also satisfies another interface:
// Sometimes the Shape (our interface type) is also a Drawable
// (another interface type), sometimes not.
var a Shape = Something.GetShape()

// Notice that we want to cast to a Drawable, not a *Drawable,
// because Drawable is an interface.
var b = a.(Drawable) // Panic (crash) if this fails.

var b, ok = a.(Drawable) // No panic.
if ok {
  b.DrawOnSurface(someSurface)
}
Or we can check that an interface value refers to a particular concrete type. For instance:
// Get Shape() returns an interface value.
// Shape is our interface.
var a Shape = Something.GetShape()

// Notice that we want to cast to a *Thing, not a Thing,
// because Thing is a concrete type, not an interface.
var b = a.(*Thing) // Panic (crash) if this fails.

var b, ok = a.(*Thing) // No panic.
if ok {
  b.DoSomething()
}
Runtime dispatch
Interface methods are also like C++ virtual methods (or any Java method), and interface variables are also like instances of polymorphic base classes. To actually call the interface’s method via an interface variable, the program needs to examine its actual type at runtime and call that type’s specific method. Maybe, as with C++, the compiler can sometimes optimize away that indirection.
This is obviously not as efficient as directly calling a method, identified at compile time, of a templated type in a C++ template. But it is obviously much simpler.
Comparing interfaces
Interface values can be compared sometimes, but this seems like a risky business. Interface values are:
Not equal if their types are different.
Not equal if their types are the same and only one is nil.
Equal if their types are the same, and the types are comparable (see above), and their values are equal.
But if the types are the same, yet those types are not comparable, Go will cause a “panic” at runtime.
Wishing for an implements keyword
In C++ you can, if you wish, explicitly declare that a class should conform to the concept, or you can explicitly derive from a base class, and in Java you must use the “implements” keyword. Not having this with Go would take some getting used to. I’d want these declarations to document my architecture, explicitly showing what’s expected of my”concrete” classes in terms of their general purpose instead of just expressing their that by how some other code happens to use them. Not having this feels fragile.
The book suggests putting this awkward code somewhere to check that a type really implements an interface. Note the use of _ to mean that we don’t need to keep a named variable for the result.
var _ MyInterface = (*MyType)(nil)
The compiler should complain that the conversion is impossible if the type does not satisfy the interface. I think it would be wise this as the very minimum of testing, particularly if your package is providing types that are not really used in the package itself. For me, this is a poor substitute for an obvious compile-time check, using a specific language construct, on the type itself.
Interface embedding
Embedding an interface in an interface
Go has no notion of inheritance hierarchies, but you can “embed” one interface in another, to indicate that a class that satisfies one interface also satisfies the other. For instance:
type Positionable interface {
  SetPosition(x int, y int)
  GetPosition() (x int, y int)
}

type Drawable interface {
  drawOnSurface(s Surface) }
}

type Shape interface {
  Positionable
  Drawable
}
To satisfy the Shape interface, any type must also satisfy the Drawable and Positionable interfaces. Therefore, any type that satisfies the Shape interface can be used with a method associated with the Drawable or Positionable interfaces. So it’s a bit like a Java interface extending another interface.
Embedding an interface-satisfying struct in a struct
We saw earlier how you can embed one struct in another anonymously. If the contained struct implements an interface, then the containing struct then also implements that interface, with no need for manually-implemented forwarding methods. For instance:
type Drawable interface {
 drawOnSurface(s Surface)
}

type Painter struct {
  ...
}

// Make Painter satisfy the Drawable interface.
func (p *Painter) drawOnSurface(s Surface) {
  ...
}

type Circle struct {
 // Make Circle satisfy the Drawable interface via Painter.
 Painter
 ...
}

func main() {
  ...
  var c *Circle = new(Circle)

  // This is OK.
  // Circle satisfies Drawable, via Painter
  c.drawOnSurface(someSurface)

  // This is also OK.
  // Circle can be used as an interface value of type Drawable, via Painter.
  var d Drawable = c
  d.drawOnSurface(someSurface)
}
This again feels a bit like inheritance.
I actually quite like how the (interfaces of the) anonymously contained structs affect the interface of the parent struct, even with Go’s curious interface system, though I wish the syntax was more obvious about what is happening. It might be nice to have something similar in C++. Encapsulation instead of inheritance (and the Decorator pattern) is a perfectly valid technique, and C++ generally tries to let you do things in multiple ways without having an opinion about what’s best, though that can itself be a source of complexity. But in C++ (and Java), you currently have to hand-code lots of forwarding methods to achieve this and you still need to inherit from something to tell the type system that you support the encapsulated type’s interface.
The announcement gives a high level overview of the changes (Soundfont support, multi threaded signal processing, new packaging, etc) and links to all the details like NEWS, tarballs, the binary package and shortlogs.
In this post, I’d like to extend a bit on where we’re going next. Beast has come a long way from its first lines of code drafted in 1996 and has seen long periods of inactivity due to numerous personal reasons on my part and also Stefan’s. I can’t begin to describe how much the Beast project owes to Stefan’s involvement, development really thrives whenever he manages to put some weight behind the project. He’s initiated major shifts in the project, contributed lots of demos, instruments and of course code.
Lately we were able to devote some time to Beast again, and with that reformulated its future directions. One important change was packaging, which already made it into the 0.11.0 release. This allows us to provide an easily installable binary package that extracts into /opt/. It’s available as a DEB for now, and we hope other package formats will follow.
Another major area of change that I’m working on behind the scenes is the UI technology. The current UI has huge deficits and lacks in workflow optimizations compared to other DAWs. Stefan has several big improvements planned for the workflow as do I, but in the past Gtk+ has not been helping with making those changes easy. Rapicorn was one attempt at fixing that, and while in theory it can provide a lot more flexibility in shaping the UI, based on concise declarations and use of SVG elements, it is still far away from reaching the degree of flexibility needed for our plans.
So far indeed, that I’ve had to seriously reconsider the approach and look for alternatives. Incidentally, the vast majority of feature needs and ideas I’ve had for the toolkit area appear to already be readily accessible through web technologies that have impressively advanced in the last few years.
Though we’re not planning to move Beast into an online application, we can still leverage these technologies through the electron project, which is an open source project providing HTML & CSS rendering plus Javascript on the desktop using libchromiumcontent from Google Chrome.
In my eyes it makes little sense to replicate much of the W3C specified features in desktop toolkits like Gtk+, Qt, Rapicorn which are much lesser staffed than the major browser projects, especially if we have a way to utilize recent browser improvements on the desktop.
So in effect I’ve changed plans for Beast’s future UI technology and started to construct a new interface based on web technologies running in electron. It’s interesting to change desktop UI development like this to say the least, and I’m curious about how long it takes to get up to par with current Gtk+ Beast functionality. I have some ideas how to address real time display of volume and frequency meters, but I’m still unsure how to best tackle large track view / clip view displays with wide scrolling and zooming ranges, given the choice between DOM elements and an HTML5 canvas.
Apart from the UI, we have several sound Library improvements pending integration. Stefan wants to finally complete Jack driver support, and as always there are some interesting plugin implementations in the queue that are awaiting completion.
If you want to help with any of the development steps outlined or just track Beast’s evolution, you can join our mailing list. Although the occasional face to face meeting helps us with setting development directions, we’re doing our best with keeping everything documented and open for discussions on the list.
Over the last 12 to 18 months, as we were preparing for the Guile 2.2 release, I was growing increasingly dissatisfied at not having a good concurrency story in Guile.
I wanted to be able to spawn a million threads on a core, to support highly-concurrent I/O servers, and Guile's POSIX threads are just not the answer. I needed something different, and this article is about the search for and the implementation of that thing.
on pthreads
It's worth being specific why POSIX threads are not a great abstraction. One is that they don't compose: two pieces of code that use mutexes won't necessarily compose together. A correct component A that takes locks might call a correct component B that takes locks, and the other way around, and if both happen concurrently you get the classic deadly-embrace deadlock.
POSIX threads are also terribly low-level. Asking someone to build a system with mutexes and cond vars is like building a house with exploding toothpicks.
I want to program network services in a straightforward way, and POSIX threads don't help me here either. I'd like to spawn a million "threads" (scare-quotes!), one for each client, each one just just looping reading a request, computing and writing the response, and so on. POSIX threads aren't the concrete implementation of this abstraction though, as in most systems you can't have more than a few thousand of them.
Finally as a Guile maintainer I have a duty to tell people the good ways to make their programs, but I can't in good conscience recommend POSIX threads to anyone. If someone is a responsible programmer, then yes we can discuss details of POSIX threads. But for a new Schemer? Never. Recommending POSIX threads is malpractice.
on scheme
In Scheme we claim to be minimalists. Whether we actually are that or not is another story, but it's true that we have a culture of trying to grow expressive systems from minimal primitives.
It's sometimes claimed that in Scheme, we don't need threads because we have call-with-current-continuation, an ultrapowerful primitive that lets us implement any kind of control structure we want. (The name screams for an abbreviation, so the alias call/cc is blessed; minimalism is whatever we say it is, right?) Unfortunately it turned out that while call/cc can implement any control abstraction, it can't implement any two. Abstractions built on call/cc don't compose!
Fortunately, there is a way to build powerful control abstractions that do compose. This article covers the first half of composing a concurrency facility out of a set of more basic primitives.
Just to be concrete, I have to start with a simple implementation of an event loop. We're going to build on it later, but for now, here we go:
This is a scheduler that is a record with two fields, inbox and i/o.
The inbox holds a queue of pending tasks, as thunks (procedure of no arguments). When something wants to enqueue a task, it posts a thunk to the inbox.
On the other hand, when a task needs to wait in some external input or output being available, it will register an event with i/o. Typically i/o will be a simple combination of an epollfd and a mapping of tasks to enqueue when a file descriptor becomes readable or writable. poll-for-tasks does the underlying epoll_wait call that pulls new I/O events from the kernel.
There are some details I'm leaving out, like when to have epoll_wait return directly, and when to have it wait for some time, and how to wake it up if it's sleeping while a task is posted to the scheduler's inbox, but ultimately this is the core of an event loop.
a long digression
Now you might think that I'm getting a little far afield from what my goal was, which was threads or fibers or something. But that's OK, let's go a little farther and talk about "prompts". The term "prompt" comes from the experience you get when you work on the command-line:
/home/wingo% ./prog
I don't know about you all, but I have the feeling that the /home/wingo% has a kind of solid reality, that my screen is not just an array of characters but there is a left-hand-side that belongs to the system, and a right-hand-side that's mine. The two parts are delimited by a prompt. Well prompts in Scheme allow you to provide this abstraction within your program: you can establish a program part that's a "system" facility, for whatever definition of "system" suits your purposes, and a part that's for the "user".
In a way, prompts generalize a pattern of system/user division that has special facilities in other programming languages, such as a try/catch block.
try {
  foo();
} catch (e) {
  bar();
}
Here again I put the "user" code in italics. Some other examples of control flow patterns that prompts generalize would be early exit of a subcomputation, coroutines, and nondeterminitic choice like SICP's amb operator. Coroutines is obviously where I'm headed here in the context of this article, but still there are some details to go over.
To make a prompt in Guile, you can use the % operator, which is pronounced "prompt":
The name for this operator comes from Dorai Sitaram's 1993 paper, Handling Control; it's actually a pun on the tcsh prompt, if you must know. Anyway the basic idea in this example is that we run expr, but if it aborts we run the lambda handler instead, which just returns #f.
Really % is just syntactic sugar for call-with-prompt though. The previous example desugars to something like this:
You see here that call-with-prompt is really the primitive. It will call the body thunk, but if an abort occurs within the body to the given prompt tag, then the body aborts and the handler is run instead.
So if you want to define a primitive that runs a function but allows early exit, we can do that:
(define-module (my-module)
  #:export (with-return))

(define-syntax-rule (with-return return body ...)
  (let ((t (make-prompt-tag)))
    (define (return . args)
      (apply abort-to-prompt t args))
    (call-with-prompt t
      (lambda () body ...)
      (lambda (k . rvals)
        (apply values rvals)))))
Here we define a module with a little with-return macro. We can use it like this:
As you can see, calling return within the body will abort the computation and cause the with-return expression to evaluate to the arguments passed to return.
But what's up with the handler? Let's look again at the form of the call-with-prompt invocations we've been making.
With the with-return macro, the handler took a first k argument, threw it away, and returned the remaining values. But the first argument to the handler is pretty cool: it is the continuation of the computation that was aborted, delimited by the prompt: meaning, it's the part of the computation between the abort-to-prompt and the call-with-prompt, packaged as a function that you can call.
If you call the k, the delimited continuation, you reinstate it:
Here, the abort-to-prompt invocation behaved simply like a "suspend" operation, returning the suspended computation k. Calling that continuation resumes it, supplying the value 1 to the saved continuation (+ 3 []), resulting in 4.
Basically, when a delimited continuation suspends, the first argument to the handler is a function that can resume the continuation.
tasks to fibers
And with that, we just built coroutines in terms of delimited continuations. We can turn our scheduler inside-out, giving the illusion that each task runs in its own isolated fiber.
(define tag (make-prompt-tag))

(define (call/susp thunk)
  (define (handler k on-suspend) (on-suspend k))
  (call-with-prompt tag thunk handler))

(define (suspend on-suspend)
  (abort-to-prompt tag on-suspend))

(define (schedule thunk)
  (match (current-scheduler)
    (($ $sched inbox i/o)
     (enqueue! inbox (lambda () (call/susp thunk))))))
So! Here we have a system that can run a thunk in a scheduler. Fine. No big deal. But if the thunk calls suspend, then it causes an abort back to a prompt. suspend takes a procedure as an argument, the on-suspend procedure, which will be called with one argument: the suspended continuation of the thunk. We've layered coroutines on top of the event loop.
Guile's virtual machine is a normal register virtual machine with a stack composed of function frames. It's not necessary to do full CPS conversion to implement delimited control, but if you don't, then your virtual machine needs primitive support for call-with-prompt, as Guile's VM does. In Guile then, a suspended continuation is an object composed of the slice of the stack captured between the prompt and the abort, and also the slice of the dynamic stack. (Guile keeps a parallel stack for dynamic bindings. Perhaps we should unify these; dunno.) This object is wrapped in a little procedure that uses VM primitives to push those stack frames back on, and continue.
I say all this just to give you a mental idea of what it costs to suspend a fiber. It will allocate storage proportional to the stack depth between the prompt and the abort. Usually this is a few dozen words, if there are 5 or 10 frames on the stack in the fiber.
We've gone from prompts to coroutines, and from here to fibers there's just a little farther to go. First, note that spawning a new fiber is simply scheduling a thunk:
(define (spawn-fiber thunk)
  (schedule thunk))
Many threading libraries provide a "yield" primitive, which simply suspends the current thread, allowing others to run. We can do this for fibers directly:
(define (yield)
  (suspend schedule))
Note that the on-suspend procedure here is just schedule, which re-schedules the continuation (but presumably at the back of the queue).
Similarly if we are reading on a non-blocking file descriptor and detect that we need more input before we can continue, but none is available, we can suspend and arrange for the epollfd to resume us later:
In Guile you can arrange to install this function as the "current read waiter", causing it to run whenever a port would block. The details are a little gnarly currently; see the Non-blocking I/O manual page for more.
Anyway the cool thing is that I can run any thunk within a spawn-fiber, without modification, and it will run as if in a new thread of some sort.
solid abstractions?
I admit that although I am very happy with Emacs, I never really took to using the shell from within Emacs. I always have a terminal open with a bunch of tabs. I think the reason for that is that I never quite understood why I could move the cursor over the bash prompt, or into previous expressions or results; it seemed like I was waking up groggily from some kind of dream where nothing was real. I like the terminal, where the only bit that's "mine" is the current command. All the rest is immutable text in the scrollback.
Similarly when you make a UI, you want to design things so that people perceive the screen as being composed of buttons and so on, not just lines. In essence you trick the user, a willing user who is ready to be tricked, into seeing buttons and text and not just weird pixels.
In the same way, with fibers we want to provide the illusion that fibers actually exist. To solidify this illusion, we're still missing a few elements.
One point relates to error handling. As it is, if an error happens in a fiber and the fiber doesn't handle it, the exception propagates out of the fiber, through the scheduler, and might cause the whole program to error out. So we need to wrap fibers in a catch-all.
Well, OK. Exceptions won't propagate out of fibers, yay. In fact in Guile we add another catch inside the print-exception, in case the print-exception throws an exception... Anyway. Cool.
Another point relates to fiber-local variables. In an operating system, each process has a number of variables that are local to it, notably in UNIX we have the umask, the current effective user, the current directory, the open files and what file descriptors they are associated with, and so on. In Scheme we have similar facilities in the form of parameters.
Now the usual way that parameters are used is to bind a new value within the extent of some call:
Here the parameterize invocation established p as the current output port during the call to thunk. Parameters already compose quite well with prompts; Guile, like Racket, implements the protocol described by Kiselyov, Shan, and Sabry in their Delimited Dynamic Binding paper (well worth a read!).
The one missing piece is that parameters in Scheme are mutable (by default). Normally if you call (current-input-port), you just get the current value of the current input port parameter. But if you pass an argument, like (current-input-port p), then you actually set the current input port to that new value. This value will be in place until we leave some parameterize invocation that parameterizes the current input port.
The problem here is that it could be that there's an interesting parameter which some piece of Scheme code will want to just mutate, so that all further Scheme code will use the new value. This is fine if you have no concurrency: there's just one thing running. But when you have many fibers, you want to avoid mutations in one fiber from affecting others. You want some isolation with regards to parameters. In Guile, we do this with the with-dynamic-state facility, which isolates changes to the dynamic state (parameters and so on) within the extent of the with-dynamic-state call.
Interestingly, with-dynamic-state solves another problem as well. You would like for newly spawned fibers to inherit the parameters from the point at which they were spawned.
(parameterize ((current-output-port p))
  (spawn-fiber
   ;; New fiber should inherit current-output-port
   ;; binding as "p"
   (lambda () ...)))
Capturing the (current-dynamic-state) outside the thunk does this for us.
When I made this change in Guile, making sure that with-dynamic-state did not impose a continuation barrier, I ran into a problem. In Guile we implemented exceptions in terms of delimited continuations and dynamic binding. The current stack of exception handlers was a list, and each element included the exceptions handled by that handler, and what prompt to which to abort before running the exception handler. See where the problem is? If we ship this exception handler stack over to a new fiber, then an exception propagating out of the new fiber would be looking up handlers from another fiber, for prompts that probably aren't even on the stack any more.
The problem here is that if you store a heap-allocated stack of current exception handlers in a dynamic variable, and that dynamic variable is captured somehow (say, by a delimited continuation), then you capture the whole stack of handlers, not (in the case of delimited continuations) the delimited set of handlers that were active within the prompt. To fix this, we had to change Guile's exceptions to instead make catch just rebind the exception handler parameter to hold the handler installed by the catch. If Guile needs to walk the chain of exception handlers, we introduced a new primitive fluid-ref* to do so, building the chain from the current stack of parameterizations instead of some representation of that stack on the heap. It's O(n), but life is that way sometimes. This way also, delimited continuations capture the right set of exception handlers.
Finally, Guile also supports asynchronous interrupts. We can arrange to interrupt a Guile process (or POSIX thread) every so often, as measured in wall-clock or process time. It used to be that interrupt handlers caused a continuation barrier, but this is no longer the case, so now we can add pre-emption to a fibers using interrupts.
summary and reflections
In Guile we were able to create a solid-seeming abstraction for fibers by composing other basic building blocks from the Scheme toolkit. Guile users can take an abstraction that's implemented in terms of an event loop (any event loop) and layer fibers on top in a way that feels "real". We were able to do this because we have prompts (delimited continuation) and parameters (dynamic binding), and we were able to compose the two. Actually getting it all to work required fixing a few bugs.
In Fibers, we just use delimited continuations to implement coroutines, and then our fibers are coroutines. If we had coroutines as a primitive, that would work just as well. As it is, each suspension of a fiber will allocate a new continuation. Perhaps this is unimportant, given the average continuation size, but it would be comforting in a way to be able to re-use the allocation from the previous suspension (if any). Other languages with coroutine primitives might have an advantage here, though delimited dynamic binding is still relatively uncommon.
Another point is that because we use prompts to suspend fiberss, we effectively are always unwinding and rewinding the dynamic state. In practice this should be transparent to the user and the implementor should make this transparent from a performance perspective, with the exception of dynamic-wind. Basically any fiber suspension will be run the "out" guard of any enclosing dynamic-wind, and resumption will run the "in" guard. In practice we find that we defer "finalization" issues to with-throw-handler / catch, which unlike dynamic-wind don't run on every entry or exit of a dynamic extent and rather just run on exceptional exits. We will see over time if this situation is acceptable. It's certainly another nail in the coffin of dynamic-wind though.
This article started with pthreads malaise, and although we've solved the problem of having a million fibers, we haven't solved the communications problem. How should fibers communicate with each other? This is the topic for my next article. Until then, happy hacking :)
Almost all actions in GNOME Disks rely on the UDisks system service. That way the authorization policy is handled by PolKit and Disks does not have to spawn any root processes. Because format and mount jobs are registered there to the device objects it is possible to initiate them from command line via gio mount, udisksctl or another D-Bus client such that Disks can still show these ongoing operations in the UI.
There are cases where D-Bus services are not possible (e.g. in an OS installer) and therefore libblockdev is a new library with similar functionality. The last UDisks release offloads many tasks to it instead of spawning utility binaries itself. In libblockdev the preference is to reuse libraries like libparted if possible and otherwise spawn utility binaries.
To have resize and repair support in Disks I had to introduce querying for installed support of an action and the action itself in UDisks and thus in libblockdev. The advantages are only small changes in Disks and Cockpit will also benefit. Now there are PRs pending for a generic repair and check function, a partition resize function and query functions for repair, resize and consistency check support of filesystem types in libblockdev. Then the PRs pending for UDisks can make use of them to expose the following API methos:
The resize mode flags indicate if online or offline shrinking/growing is supported. The size argument for partitions should guarantee that content of this size will fit in and alignment might only make it bigger. The progress percentage property of the running job is not yet set because this needs parsing stdout in libblockdev, so just a spinner in Disks for now. It’s possible to test them from d-feet, e.g. to see if the F2FS format is available and what utility is missing if not:
On the command line it would be gdbus, mdbus2 or dbus-send or the D-Bus library of your choice (e.g. in Python3 from gi.repository import Gio). Here assuming an almost empty unmounted ext4 partition 1 on a loop device:
After Disks 3.25.2 was released there were only small changes in master. The standby menu entry was fixed to be usable again after the action took effect. Mitchell took care of large file support on 32-bit systems, an interesting topic. The biggest current change is the new format dialog. The new UDisks API must be integrated now in the UI. It would be nice to get NTFS (and progress) support in libblockdev and finally the Disks UI mockups done as well.
This week I started reading On Writing: A Memoir of the Craft by Stephen King, a book that has been mentioned a few times by people I usually interview for my weekly podcast as something that is both inspiring and has had a major impact on their lives and careers. After the third or forth time someone mentioned I finally broke down and got myself a copy at the local bookstore.
I have to say that, so far, I am completely blown away by this book! I can totally see why everyone else recommended it as something that people should add to their BTR (Books To Read) list! First of all, the first section of the book, which Stephen King calls his 'C.V.' (and not his memories or auto biography), covers his early life as a child, his experiences and struggles (there are quite a few passages that will most likely get you to laugh out loud) growing up with his mom and older brother, Dan. This section, roughly speaking around 100 pages or so, are so easy to relate to that you can probably be done with them in about 2 hours no matter what your reading pace is. I am always captivated to learn how someone 'came to be', the real 'behind the scenes' if you will, of how someone started out their lives and the paths they took to get to where they are now.
The next sections talk about what any aspiring writer should add to their 'toolbox' and it covers many interesting topics and suggestions which, if you really think about it, makes a ton of sense. This is where I am in the book right now, and though it isn't as captivating as the first section, it should still appeal to anyone looking for solid advice on how to become a better writer in my humble opinion.
Though I one day do aspire to become a published writer (fiction most likely), and I am enjoying this book that I'm having a real hard time putting it down, the reason why I chose to write about it is related to a piece of advice that Stephen King shares with the reader about the habit of reading.
Stephen King claims that, to become a better writer one must at least obey the following rules:
Read every day!
Write every day!
It is by reading a lot (something that should come naturally to anyone who reads every day) that one learns new vocabulary words, different styles of prose, how to structure ideas into paragraphs and rhythm. He says that it doesn't matter if you read in 'tiny sips' or in huge 'swallows', but as long as you continue to read every day, you'll develop a great and, in his opinion, required habit for becoming a better writer. Obviously, based on his two rules you'd need to write every day too, and if you're one of us who is toying with the idea of becoming a writer one day (or want to become a better writer), I too highly recommend that you give this book a shot! I know, I know, I have not finished it yet but still... I highly recommend it!
Back to the habit of reading and the purpose of this post, I remember back in 2008 my own 'struggle' to 'find the time' to read non technical books. You know, reading for fun? Back then I was doing a lot of reading, but mostly it consisted of blog posts and articles recommended by my RSS feeds, and since I was very much involved with a lot of different open source projects, I mostly read about GNOME, KDE, Ubuntu and Python. Just the thought of reading a book that did not cover any of these topics gave me a feeling of uneasiness and I couldn't picture myself dedicating time, precious time, to reading 'for fun.' But eventually I realized that I needed to add a bit more variety to my reading experience and that sitting in front of my computer during my lunch break would not help me with this at all. There were too many distractions to lure me away from any book I may be trying to read.
I started out by picking up a book that everyone around me had mentioned many times as being 'wicked cool' and 'couldn't put it down' kind of book. Back then I worked at a startup and most of the engineers around me were much younger than me and at one point or another most of them were into 'the new Harry Potter' book. I confess that I felt judgmental and couldn't fathom the idea of reading a 'kid book' but since I was trying to create a new habit and since my previous attempts had failed miserably, I figured that something drastic was just what the doctor would have recommended. One day after work, before driving back home, I stopped by the public library and picked up Harry Potter and the Sorcerer's Stone.
Next day at work when I took my lunch break, I locked my laptop and went downstairs to a quiet corner of the building's lobby. I picked a nice, comfortable seat with a lot of natural sun light and view of the main entrance and started reading... or at least I thought I did. Whenever I started to read a paragraph, someone would open the door at the main entrance to the building either on their way in or out, and with them went my focus and my mind would start wandering. Eventually I'd catch myself and back to the book my eyes went, only to be disrupted by the next person opening the door. Needless to say, experiment 'Get More Reading Done' was an utter failure!
So this year i’m a GSoC student again :), but this time not on Polari, but on gnome-shell.
Even though the projects are different, they still rely on the same technology (GJS) so it’s definitely easier for me to understand the code at first sight than it was last year.
The first thing i’m working on is this bug and i can happily say that it’s nearly done :). A few minor adjustments and it will look just like in the picture.
There are still some questions about adding transitions (but nothing sure so far) and that’s about it. I’m going to write another post soon, when the search results will look exactly like the mockup!
Most Unix users are accustomed to using SSH from the command line. On Windows and other platforms GUI tools are popular and they can do some nice tricks such as opening graphical file transfer windows and initiate port forwardings to an existing connection. You can do all the same things with the command line client but you have to specify all things you want to use when first opening the connection.
This got me curious. How many lines of code would one need to build a GUI client that does all that on Linux. The answer turned out to be around 1500 lines of code whose job is mostly to glue together the libvte terminal emulator widget and the libssh network library. This is what it looks like:
Port forwardings can be opened at any time. This allows you to e.g. forward http traffic through your own proxy server to go around draconian firewalls.
File transfers also work.
A lot of things do not work, such as reverse port forwards or changing the remote directory in file transfers. Some key combinations that have ctrl/alt/etc modifiers can't be sent over the terminal. I don't really know why, but it seems the vte terminal does some internal state tracking to know which modifiers are active. There does not seem to be a way to smuggle corresponding raw keycodes out, it seems to send them directly to the terminal it usually controls. I also did not find an easy way of getting full keyboard status from raw GTK+ events.
Before I considered applying for SoC this summer, I talked to potential mentors and mentioned that my studies finish on June 15th, and they said it was no problem. Although my initial schedule did consider first two weeks, where it mentioned that during that period, code should be analysed and it should be discussed what should be done. I tried to stick to the schedule as much as possible, but in the end, it did not work as I planned. So, starting at June 16th, I started to become more involved with the discussion, as well as some coding. That covers "why you didn't blog earlier?" question someone might ask.
During the coding period, I discovered that MetaDisplay, main GObject of Mutter had a lot of X11 specific fields, so I had to move them into something else, which we (mentors and myself) decided to call MetaX11Display. A lot of code had to be modified, and that had to be carefully approached, so nothing got broken in the process. The "coding" I had done was just moving stuff around, between files, adjusting for new structure fields, and so on. It was, I might say, a rather boring experience. But, someone had to do it, as it is a requisite for all of my future work. Note that even at the moment of writing, all of X11 specifics have not been ironed out. While trying to efficiently split MetaDisplay, I stumbled upon MetaScreen, a structure which previously used to contain reference to X Screen it was managing. The comments in the code pointed out that, while Mutter used to contain more than one X Screen, nowadays it manages only one. So, again, we realized that structure needs to be split somehow, since it contains (as expected) lot of X11 specifics, but also some code that can be used for Wayland environment. The decision was made to move the fields into MetaDisplay and MetaX11Display, depending in which environment it might be useful. Sadly, I did not get around to start disassembling the screen management code in this period. So, that's what my next adventure will be all about. All of the work that was done is available on my Github repository [1].
This covers the work of past, say, 10 days or so(?), given that I started working very late. I sure hope this would not pose a problem for evaluation, which has already started (yay, I'm late!). For some reason, this blog has not been added to Planet GNOME, so this blog post won't appear on there.
I went to Guizhou and Hunan in China for my after-graduation trip last week. I walked on the glass skywalk in Zhangjiajie, visited Huangguoshu waterfallss and Fenghuang Ancient City, ate a lot of delicious food at the night market in Guiyang and so on. I had a wonderful time there, welcome to China to experience these! (GNOME Asia, hold in Chongqing, in October is a good choice, Chongqing is a big city which has a lot of hot food and hot girls.)
The main work I did these days for GSoC is carding and detailing the work about establishing the environment for Plinth in Fedora. I realize it by some crude way before, such as using some packages in Debian directly, but now I will make these steps more clear, organize the useful information and write them into INSTALL file.
But my mentor and I had a problem when I tried to run firstboot, I don’t know which packages are needed when I want to debug JS in Fedora, in other words, I want to find which packages in Fedora has the same function with the libjs-bootstrap, libjs-jquery and libjs-modernizr in Debian. If you know how to deal with it, please tell me, I’d be grateful.
I’m reading “The Go Programming Language” by Brian Kernighan and Alan Donovan. It is a perfect programming language introduction, clearly written and perfectly structured, with nicely chosen examples. It contains no hand-waving – it’s aware of other languages and briefly acknowledges the choices made in the language design without lengthy discussion.
As an enthusiastic C++ developer, and a Java developer, I’m not a big fan of the overall language. It seems like an incremental improvement on C, and I’d rather use it than C, but I still yearn for the expressiveness of C++. I also suspect that Go cannot achieve the raw performance of C or C++ due to its safety features, though that maybe depends on compiler optimization. But it’s perfectly valid to knowingly choose safety over performance, particularly if you get more safety and more performance than with Java.
I would choose Go over C++ for a simple proof of concept program using concurrency and networking. Goroutines and channels, which I’ll mention in a later post, are convenient abstractions, and Go has standard API for HTTP requests. Concurrency is hard, and it’s particularly easy to choose safety over performance when writing network code.
Here are some of my superficial observations about the simpler features, which mostly seem like straightforward improvements on C. In part 2 I’ll mention the higher-level features and I’ll hopefully do a part 3 about concurrency. I strongly recommend that you read the book to understand these issues properly.
I welcome friendly corrections and clarifications. There are surely several mistakes here, hopefully none major.
No semicolons at the end of lines
Let’s start with the most superficial thing. Unlike C, C++, or Java, Go doesn’t need semicolons at the end of lines of code. So this is normal:
a = b
c = d
This is nicer for people learning their first programming language. It can take a while for those semicolons to become a natural habit.
No () parentheses with if and for
Here’s another superficial difference. Unlike C or Java, Go doesn’t put its conditions inside parentheses with if and for. That’s another small change that feels arbitrary and makes C coders feel less comfortable.
For instance, in Go we might write this:
for i := 0; i < 100; i++ {
  ...
}

if a == 2 {
  ...
}
Which in C would look like this:
for (int i = 0; i < 100; i++) {
  ...
}

if (a == 2) {
  ...
}
Type inference
Go has type inference, from literal values or from function return values, so you don’t need to restate types that the compiler should know about. This is a bit like C++’s auto keyword (since C++11). For instance:
var a = 1 // An int.
var b = 1.0 // A float64.
var c = getThing()
There’s also a := syntax that avoids the need for var, though I don’t see the need for both in the language:
a := 1 // An int.
b := 1.0 // A float64
d := getThing()
I love type inference via auto in modern C++, and find it really painful to use any language that doesn’t have this. Java feels increasingly verbose in comparison, but maybe Java will get there. I don’t see why C can’t have this. After all, they eventually allowed variables to be declared not just at the start of functions, so change is possible.
Types after names
Go has types after the variable/parameter/function names, which feels rather arbitrary, though I guess there are reasons, and personally I can adapt. So, in C you’d have
Foo foo = 2;
but in Go you’d have
var foo Foo = 2
Keeping a more C-like syntax would have eased C developers into the language. These are often not people who embrace even small changes in the language.
No implicit conversions
Go doesn’t have implicit conversions between types, such as int and uint, or floats and int. This also applies to comparison via == and !=.
So, these won’t compile:
var a int = -2
var b uint = a
var c int = b

var d float64 = 1.345
var e int = c
C compiler warnings can catch some of these, but a) People generally don’t turn on all these warnings, and they don’t turn on warnings as errors, and b) the warnings are not this strict.
Notice that Go has the type after the variable (or parameter, or function) name, not before.
Notice that, unlike Java, Go still has unsigned integers. Unlike C++’s standard library, Go uses signed integers for sizes and lengths. Hopefully C++ will get do that too one day.
No implicit conversions because of underlying types
Go doesn’t even allow implicit conversions between types that, in C, would just be typedefs. So, this won’t compile
type Meters int
type Feet int
var a Meters = 100
var b Feet = a
I think I’d like to see this as a warning in C and C++ compilers when using typedef.
However, you are allowed to implicitly assign a literal (untyped) value, which looks like the underlying type, to a typed variable, but you can’t assign from an actual typed variable of the underlying type:
type Meters int
var a Meters = 100 // No problem.

var i int = 100
var b Meters = i // Will not compile.
No enums
Go has no enums. You should instead use const values with the iota keyword. So, while C++ code might have this:
enum class Continent {
  NORTH_AMERICA,
  SOUTH_AMERICA,
  EUROPE,
  AFRICA,
  ...
};

Continent c = Continent::EUROPE;
Continent d = 2; // Will not compile
in Go, you’d have this:
type continent int

const (
  CONTINENT_NORTH_AMERICA continent = iota
  CONTINENT_SOUTH_AMERICA // Also a continent, with the next value via iota.
  CONTINENT_EUROPE // Also a continent, with the next value via iota.
  CONTINENT_AFRICA // Also a continent, with the next value via iota.
)

var c continent = CONTINENT_EUROPE
var d continent = 2 // But this works too.
Notice how, compared to C++ enums, particularly C++11 scoped enums, each value’s name must have an explicit prefix, and the compiler won’t stop you from assigning a literal number to a variable of the enum type. Also, the Go compiler doesn’t treat these as a group of associated values, so it can’t warn you, for instance, if you forget to mention one in a switch/case block.
Switch/Case: No fallthrough by default
In C and C++, you almost always need a break statement at the end of each case block. Otherwise, the code in the following case block will run too. This can be useful, particularly when you want the same code to run in response to multiple values, but it’s not the common case. In Go, you have to add an explicit fallthrough keyword to get this behaviour, so the code is more concise in the general case.
Switch/Case: Not just basic types
In Go, unlike in C and C++, you can switch on any comparable value, not just values known at compile time, such as ints, enums, or other constexpr values. So you can switch on strings, for instance:
switch str {
  case "foo":
  doFoo()
case "bar":
  doBar()
}
This is convenient and I guess that it is still compiled to efficient machine code when it uses compile-time values. C++ seems to have resisted this convenience because it couldn’t always be as efficient as a standard switch/case, but I think that unnecessarily ties the switch/case syntax to its original meaning in C when people expected to be more aware of the mapping from C code to machine code.
Pointers, but no ->, and no pointer arithmetic
Go has normal types and pointer types, and uses * and & as in C and C++. For instance:
var a thing = getThing();
var p *thing = &a;
var b thing = *p; // Copy a by value, via the p pointer
As in C++, the new keyword returns a pointer to a new instance:
var a *thing = new(thing)
var a thing = new(thing) // Compilation error
This is like C++, but unlike Java, in which any non-fundamental types (not ints or booleans, for instance) are effectively used via a reference (it just looks like a value), which can confuse people at first by allowing inadvertent sharing.
Unlike C++, you can call a method on a value or a pointer using the same dot operator:
var a *Thing = new(Thing) // You wouldn't normally specify the type.
var b Thing = *a
a.foo();
b.foo();
I like this. After all, the compiler knows whether the type is a pointer or a value, so why should it bother me with complaints about a . where there should be a -> or vice-versa? However, along with type inference, this can slightly obscure whether your code is dealing with a pointer (maybe sharing the value with other code) or a value. I’d like to see this in C++, though it would be awkward with smart pointers.
You cannot do pointer arithmetic in Go. For instance, if you have an array, you can’t step through that array by repeatedly adding 1 to a pointer value and dereferencing it. You have to access the array elements by index, which I think involves bounds checking. This avoids some mistakes that can happen in C and C++ code, leading to security vulnerabilities when your code accesses unexpected parts of your application’s memory.
Go functions can take parameters by value or by pointer. This is like C++, but unlike Java, which always takes non-fundamental types by (non const) reference, though it can look to beginner programmers as if they are being copied by value. I’d rather have both options with the code showing clearly what is happening via the function signature, as in C++ or Go.
Like Java, Go has no notion of const pointers or const references. So if your function takes a parameter as a pointer, for efficiency, your compiler can’t stop you from changing the value that it points to. In Java, this is often done by creating an immutable type, and many Java types, such as String, are immutable, so you can’t change them even if you want to. But I prefer language support for constness as in C++, for pointer/reference parameters and for values initialized at runtime. Which leads us to const in Go.
References, sometimes
Go does seem to have references (roughly, pointers that look like values), but only for the built-in slice, map, and channel types. (See below about slices and maps.) So, for instance, this function can change its input slide parameter, and that change will be visible to the caller, even though the parameter is not declared as a pointer:
I’m not sure if this is a fundamental feature of the language or just something about how those types are implemented. It seems confusing for just some types to act differently, and I find the explanation a bit hand-wavy. Convenience is nice, but so is consistency.
const
Go’s const keyword is not like const in C (rarely useful) or C++, where it indicates that a variable’s value should not be changed after initialization. It is more like C++’s constexpr keyword (since C++11), which defines values at compile time. So it’s a bit like a replacement for macros via #define in C, but with type safety. For instance:
const pi = 3.14
Notice that we don’t specify a type for the const value, so the value can be used with various types depending on the syntax of the value, a bit like a C macro #define. But we can restrict it by specifying a type:
const pi float64 = 3.14
Unlike constexpr in C++, there is no concept of constexpr functions or types that can be evaluated at compile time, so you can’t do this:
const pi = calculate_pi()
and you can’t do this
type Point struct {
  X int
  Y int
}

const point = Point{1, 2}
though you can do this with a simple type whose underlying type can be const:
type Yards int
const length Yards = 100
Only for loops
All loops in Go are for loops – there are no while or do-while loops. This simplifies the language in one way compared, for instance, to C, C++, or Java, though there are now multiple forms of for loop.
For instance:
for i := 0; i < 100; i++ {
  ...
}
or, like a while loop in C:
for keepGoing {
  ...
}
And for loops have a range-based syntax for containers such as string, slices or maps, which I’ll mention later:
for i, c := range things {
  ...
}
C++ has range-based for loops too, since C++11, but I like that Go can (optionally) give you the index as well as the value. (It gives you the index, or the index and the value, letting you ignore the index with the _ variable name.)
A native (Unicode) String type
Go has a built-in string type, and built in comparison operators such as ==, !=, and < (as does Java). Like Java, Strings are immutable, so you can’t change them after you’ve created them, though you can create new Strings by concatenating other Strings with the built in operator +. For instance:
str1 := "foo"
str2 := str1 + "bar"
Go source code is always UTF-8 encoded and string literals may contain non-ASCII utf-8 code points. Go calls Unicode code points “runes”.
Although the built-in len() function returns the number of bytes, and the built in operator [] for strings operates on bytes, there is a utf8 package for dealing with strings as runes (Unicode code points). For instance:
str := "foo"
l := utf8.RuneCountInString(str)
And the range-based for loop deals in runes, not bytes:
str := "foo"
for _, r := range str {
  fmt.Println("rune: %q", r)
}
C++ still has no standard equivalent.
Slices
Go’s slices are a bit like dynamically-allocated arrays in C, though they are really views of an underlying array, and two slices can be views into different parts of the same underlying array. They feel a bit like std::string_view from C++17, or GSL::span, but they can be resized easily, like std::vector in C++17 or ArrayList in Java.
We can declare a span like so, and append to it:
a := []int{5, 4, 3, 2, 1} // A slice
a = append(a, 0)
Arrays (whose size cannot change, unlike slices) have a very similar syntax:
a := [...]int{5, 4, 3, 2, 1} // An array.
b := [5]int{5, 4, 3, 2, 1} // Another array.
You must be careful to pass arrays to functions by pointer, or they will be (deep) copied by value.
Slices are not (deep) comparable, or copyable, unlike std::array or std::vector in C++, which feels rather inconvenient.
Slices don’t grow beyond their capacity (which can be more than their current length) when you append values. To do that you must manually create a new slice and copy the old slice’s elements into it. You can keep a pointer to an element in a slice (really to the element in the underlying array). So, as with maps (below), the lack of resizing is probably to remove any possibility of an pointer becoming invalid.
The built in append() function may allocate a bigger underlying array if it would need more than the existing capacity (which can be more than the current length). So you should always assign the result of append() like so:
a = append(a, 123)
I don’t think you can keep a pointer to an element in a slice. If you could, the garbage collection system would need to keep the previous underlying array around until you had stopped using that pointer.
Unlike C or C++ arrays, and unlike operator [] with std::vector, attempting to access an invalid index of a slice will result in a panic (effectively a crash) rather than just undefined behaviour. I prefer this, though I imagine that the bounds checking has some small performance cost.
Maps
Go has a built-in map type. This is roughly equivalent to C++’s std::map (balanced binary trees), or std::unordered_map (hash tables). Go maps are apparently hash tables but I don’t know if they are separate-chaining hash tables (like std::unordered_map) or open-addressing hash tables (like nothing in standard C++ yet, unfortunately).
Obviously, keys in hash tables have to be hashable and comparable. The book mentions comparability, but so few things are comparable that they would all be easily hashable too. Only basic types (int, float64, string, etc, but not slices) or structs made up only of basic types are comparable, so that’s all you can use as a key. You can get around this by using a basic type (such as an int or string) that is (or can be made into) a hash of your value. I prefer C++’s need for a std::hash<> specialization, though I wish it was easier to write one.
Unlike C++’, you can’t keep a pointer to an element in a map, so changing one part of the value means copying the whole value back into the map, presumably with another lookup. Go apparently does this to completely avoid the problem of invalid pointers when the map has to grow. C++ instead lets you take the risk, specifying when your pointer could become invalid.
Go maps are clearly a big advantage over C, where you otherwise have to use some third-party data structure or write your own, typically with very little type safety.
They look like this:
m := make(map[int]string)
m[3] = "three"
m[4] = "four"
Multiple return values
Functions in Go can have multiple return types, which I find more obvious then output parameters. For instance:
func getThings() (int, Foo) {
  return 2, getFoo()
}

a, b := getThings()
This is a bit like returning tuples in modern C++, particularly with structured bindings in C++17:
Like Java, Go has automatic memory management, so you can trust that instances will not be released until you have finished using them, and you don’t need to explicitly release them. So you can happily do this, without worrying about releasing the instance later:
func getThing() *Thing {
  a := new(Thing)
  ...
  return a
}

b := getThing()
b.foo()
And you can even do this, not caring, and not easily even knowing, whether the instance was created on the stack or the heap:
func getThing() *Thing {
  var a Thing
  ...
  return &a
}

b := getThing()
b.foo()
I don’t know how Go avoids circular references or unwanted “leak” references, as Java or C++ would with weak references.
I wonder how, or if, Go avoids Java’s problem with intermittent slowdowns due to garbage collection. Go seems to be aimed at system-level code, so I guess it must do better somehow.
However, also like Java, and probably like all garbage collection, this is only useful for managing memory, not resources in general. The programmer is usually happy to have memory released some time after the code has finished using it, not necessarily immediately. But other resources, such as file descriptors and database connections, need to be released immediately. Some things, such as mutex locks, often need to be released at the end of an obvious scope. Destructors make this possible. For instance, in C++:
Go can’t do this, so it has defer() instead, letting you specify something to happen whenever a function ends. It’s a annoying that defer is associated with functions, not to scopes in general.
func something() {
  doSomethingHarmless()

  ourMutex.Lock()
  defer ourMutex.Unlock()
  changeSomeSharedState()

  // The mutex has not been released yet when this remaining code runs,
  // so you'd want to restrict the use of the resource (a mutex here) to
  // another small function, and just call it in this function.
  doSomethingElseHarmless()
}
I would prefer to see a language that somehow gives me all of scoped resource management (with destructors), reference-counting (like std::shared_ptr<>) and garbage collection, in a concise syntax, so I can have predictable, obvious, but reliable, resource releasing when necessary, and garbage collection when I don’t care.
Of course, I’m not pretending that memory management is easy in C++. When it’s difficult it can be very difficult. So I do understand the choice of garbage collection. I just expect a system level language to offer more.
Things I don’t like in Go
As well as the minor syntactic annoyances mentioned above, and the lack of simple generic resource (not just memory) management, I have a couple of other frustrations with the language.
(I’m not loving the support for object orientation either, but I’ll mention that in a later article when I’ve studied it more.)
No generics
Go’s focus on type safety, particularly for numeric types, makes the lack of generics surprising. I can remember how frustrating it was to use Java before generics, and this feels almost that awkward. Without generics I soon find myself having to choose between lack of type safety or repeatedly reimplementing code for each type, feeling like I’m fighting the language.
I understand that generics are difficult to implement, and they’d have to make a choice about how far to take them (probably further than Java, but not as far as C++), and I understand that Go would then be much more than a better C. But I think generics are inevitable once, like Go, you pursue static type safety.
Somehow go’s slice and map containers are generic, probably because they are built-in types.
Lack of standard containers
Go has no queue or stack in its standard library. In C++, I use std::queue and std::stack regularly. I think these would need generics. People can use go’s slice (a dynamically-allocated array) to achieve the same things, and you can wrap that up in your own type, but your type, can only contain specific types, so you’ll be reimplementing this for every type. Or your container can hold interface{} types (apparently a bit like a Java Object or a C++ void*), giving up (static) type safety.
In the last post with title Enabling Python support in Libpeas, it was shown how why it is not possible to implement a plugin system using Libpeas in Python based applications. I also published a link to a very simple example of how to write plugin manager in a Python program. I am using that patch in my branch of Pitivi to implement a plugin system. Actually, I started this adventure before starting the Google Summer of Code starts, but I needed to polish my code, to improve design and… some other things I realized during the process.
Pitivi Plugin Manager. PluginB is buggy, so if you try to enable it, you will get a message on the infobar.
Althought my first idea before GSoC started was to use the PeasGtkPluginManager, Alexandru Băluț told me to embed the plugin manager in the Pitivi Preferences Dialog. I did it but to be honest and as told him, it didn’t look good. Then, I remembered the design of GNOME Builder. I did what you can see in the screenshot of above. I have had to handle cases like enabling a plugin with dependencies, disabling a plugin when a dependant plugin is enabled or like when a buggy plugin is loaded. I could have used libdazzle, but there is a strong dependency on GSettings and Pitivi uses ConfigParser. Now that I think this is finished, I will wait that my previous patches were pushed to master to upload these new ones. I am working now on finishing to integrate the Pitivi Developer Console with Pitivi where I have to integrate its preferences in the Pitivi Preferences Dialog.
Goal of Code Search for GNOME Builder is to provide ability to search all symbols in project fuzzily and jump to definition from reference of a symbol in GNOME Builder. For implementing these we need to have a database of declarations. So I created a plugin called ‘Indexer’ in Builder which will extract information regarding declarations and store them in a database.
What information needs to extracted from source code and how?
Since we need to search symbols by their names, names of all declarations needs to be extracted. And we also need to jump to definition of a symbol from a reference of that one, so keys of all global declarations also needs to be extracted. Note that keys of local declarations needs not to be extracted because whenever we want to jump to local definition of a symbol from its reference, that definition will be in current file and it can be easily found by AST of current file. AST is tree representation of source code in which all constructs are represents by tree nodes. We can traverse through that tree and analyse source code. For extracting names and keys of all declarations of a source file, first an AST of source code will be created, next we will traverse through that tree and extract keys and names of all declaration nodes in that tree.
How to store keys and names of declarations?
First I thought of implementing a database which will store keys and names together. After various change of plans currently I am using DzlFuzzyIndex in libdazzle for storing names. And for storing keys I implemented a database IdeSimpleTable that will store strings and an array of integers associated with it. So there will be 2 indexes one for storing names and other for storing keys of declarations.
Indexing Tool
I implemented a helper tool for indexing which will take input a set of files to index, cflags for those files and destination folder in which index files needs to be stored. This will take each file from input, extract names and declarations by traversing AST of that source file and store that in DzlFuzzyIndexand IdeSimpleTable indexes respectively. After indexing this will create 2 files one to store names and other to store keys in destination directory.
Indexer Plugin
For indexing I implemented a plugin which will create index of source code using above tool and store that in cache folder. This will maintain a separate index for every directory. The reason behind this is if we have a single index for whole project whenever there is single change in project then entire source code needs to be reindexed. This plugin will browse through working directory and indexes a directory only if either index is not there for that directory or index is older than files in that directory. For indexing a directory, it will give list of files in that directory, cflags of those files and destination folder to store index to above tool. After indexing of project is done plugin will load all indexes and be ready for taking queries and process them.
Here is the current implementation of both indexing tool and indexer plugin. Next I will use this index to implement Global Search and Jump to definition.
Currently, Builder uses word completion from GtkSourceCompletionWords from the GtkSource* module. The idea is to mimick the word completion technique as in Vim Ctrl-p and Ctrl-n from the insertion cursor.
Scanning entities : Current buffer, open buffers and #includes
Basic scan steps:
Find the insertion position in the current buffer. Scan the buffer looking for prefix matches till the end and wrap around.
After wrapping around to the start_iter of the buffer, if you hit relevant #includes, resolve the relative path and scan them.
The above process has to be made incremental. In layman terms, we cannot keep scanning the buffers all at once; we need to return back the results in an incremental manner and display them. Otherwise, this might stall the completion window drawing which would be waiting for all the proposals to get in first. In this regard, I learnt more about GdkFrameClock which is a better way to place our bids against the GTK+ drawing cycle.
GdkFrameClock can help us to update and paint every frame i.e. avoid frame drops. Every new frame will get up-to-date results as somewhat opposed to timeouts used. But still we can use timeouts right now along with making the process “incremental”, which would just work fine. Although, going ahead with this, we still need to keep in mind that GdkFrameClock is still a better way to do this.
A bit more verbose model of incremental process:
staticgbooleanscan_buffer_incrementally(GtkSourceBuffer*buffer,guint64clock){../* get insert cursor GtkTextIter and bounds of current buffer */insert_mark=gtk_text_buffer_get_insert(GTK_TEXT_BUFFER(buffer));gtk_text_buffer_get_iter_at_mark(GTK_TEXT_BUFFER(buffer),&insert_iter,insert_mark);gtk_text_buffer_get_bounds(GTK_TEXT_BUFFER(buffer),&start,&end);...while(TRUE){if(g_get_monotonic_time()<clock)/* keep scanning the buffers */else/* time slab over */break;}/* adjust scan regions and iters to the next scan chunk */}staticgbooleanscan_buffer(GtkSourceBuffer*buffer){...clock=g_get_monotonic_time()+5000;scan_buffer_incrementally(buffer,clock);}staticvoidfile_loaded(GObject*object,GAsyncResult*res,gpointerdata){...g_timeout_add_full(G_PRIORITY_DEFAULT,50,(GSourceFunc)scan_buffer,buffer,NULL);}
Thank you Christian Hergert (hergertme) for overall guidance till now. Also thanks to Matthias Clasen (mclasen) for explaining me GTK+ drawing model and Debarshi Ray (rishi) for GdkFrameClock.
More posts follow soon. Lot of things under experimentation.
Stay tuned. Happy Hacking. :)
Last time we spoke the documentation was temporarily implemented using the GtkTooltip, making it simple to show the snippet of the documentation but imposible to make it interactive. That’s where the GtkPopover came in.
This widget provides options to mimic the behavior of the tool tip yet provides interface to customize the content to accommodate all the planned features. Now we can add more information from the documentation without taking up the entire screen.
The design aspect of the card is still bit lacking since I have still not committed to how the XML file with the documentation is going to be parsed. Balancing the fact that there is no need to analyze the entire file, yet some more knowledge of the structure would help with better ability to style the text.
The current implementation of documentation can be found here. Any feedback will be appreciated.
If the card doesn’t want to show up, you might want to check the right panel if you actually have the documentation. I haven’t found a centralized system for all the documentation but if you install a package *-doc the specific library it will be automatically added to your Builder through Devhelp, for instance:
First up, I’d like to apologize for my last post on Planet GNOME. It was published on my blog months ago, where I use a ‘magic’ kind of theme. Well, for everyone’s convenience I’d try my best to to write normal as possible from now on, even though I’m crazy.
Unfortunately, due to my prolonged end examinations, I had a late start to the coding period. However, I managed to complete the first few planned tasks successfully. Newly added (to gnome-games) desmume libretro core is working perfectly fine with Nintendo DS games. But don’t get me wrong, this is just merely runs the game roms. Users couldn’t actually play the games. This is because Nintendo DS has a touch screen and libretro core required to have touch support in order for any game to be playable. Since I was lacking a touch screen for testing, adding support for touch screens was held up a bit. Then as a start, mouse touch support has been added. This means, instead a touch screen, a mouse can be used to play the game. Basically this was done by attaching a mouse widget to the libretro core which translate itself as a touch screen handler.
Sounded like a simple solution right? True, but does this work up to expectations? Well the following screen capture will tell you why it doesn’t.
Even though the inputs are detected, it is extremely hard to control the pointer. and mouse pointer is not gonna be in the same position as the touch pointer. This makes the game practically unplayable. Therefore, it would be better to handle the mouse to touch conversion ourselves, so that the user don’t have to handle a secondary pointer handled by the core. For that, mouse events that come from the widget should be converted into libretro touch events. With this implemented, mouse pointer will really represent the finger or the touch pointer.
However, this is a bit of a complex task. Initial steps have been already taken and some modifications for retro-gtk parts have also been done. Hoping to finish this up within a couple of days. Stay tuned for the updates
In this blog post, I am going to elaborate upon the event compression feature in GNOME Logs as implemented by me during last three weeks. It’s been exciting three weeks for me to hack on Logs code base and bring this crucial usability feature to life. First, let me speak in pictures about how this implemented feature looks like.
A GNOME Logs window showing compressed events looks like below:
The rows which indicate numbers along side the event messages represent a group of compressed events which have been hidden in the events list. I would like to call such rows “header rows”.
Clicking on a header row, toggles the visibility of the compressed event rows represented by it in the events list:
Here, a header row representing seven compressed events is expanded. The header row stores the details of one of these compressed events to be shown in the events list while it hides them. This compressed event, whose details are to be shown in in the header row, is selected such that it maintains the timestamp sorting order specified by “sort-order” GSettings key.
To keep things simple initially, only adjacent events w.r.t timestamp are checked for the compression/similarity criteria. The compression/similarity criteria for grouping these adjacent events under a header row is as follows:
Events containing messages whose first word is same (includes exact duplicates)
Events which have been generated by the same process.
This can be extended in future to compress non-adjacent events in specific batch sizes and accordingly group them under a common header row.
When we click on any row (including the expanded compressed events) except the header row, the detailed information regarding the event is shown in a fixed size popover:
Longer detail fields like “Message” are wrapped over multiple lines so that they do not exceed the width of the popover. All the detail fields which were available in the previous detailed event view are available in the new popover as well.
Well , what about event rows containing super long messages like coredumps or stacktraces ? Such event details are handled gracefully in the popover using a GtkScrolledWindow.
For example,
I will now try to explain in simple words about what exactly is going on behind the scenes. While fetching the events from the journal using sd-journal API in the model array (backend), we count the number of adjacent events satisfying the earlier mentioned compression/similarity criteria. If the detected number of compressed entries in a group is 2 or exceeds 2, then a dummy event representing these compressed entries is added to the model array. This dummy event is nothing but our “header row”. This information is then parsed in the frontend and accordingly the events marked as compressed in the model array are hidden in the events list. You can follow progress on merging of this enhancement here.
Moreover, I have now started working on my next task which is writing a shell search provider for GNOME Logs. During previous year, I came out with patches containing a very basic implementation of shell search provider. I will now be improving on those patches according to review given by David. Currently, I am researching on various possible approaches to fetch the events from the model in the shell search provider. Further progress regarding this can be tracked here.
I am very happy to tell you that I will be attending GUADEC 2017 in Manchester. Many thanks to the GNOME Foundation for sponsoring travel as well as accommodation for me. I look forward to meeting all of you at GUADEC 2017
I needed to install a server multiple times recently. Fully remotely, via the network. In this case, the machines stood at Hetzner, a relatively large German hoster with competitive prices. Once you buy a machine, they boot it into a rescue image that they deliver via PXE. You can log in and start an installer or do whatever you want with the machine.
The installation itself can be as easy as clicking a button in their Web interface. The manual install with their installer is almost as easily performed. You will get a minimal (Ubuntu) installation with the SSH keys or password of your choice deployed.
While having such an easy way to (re-)install the system is great, I’d rather want to have as much of my data encrypted as possible. I came up with a series of commands to execute in order to have an encrypted system at the end. I have put the “full” in the title in quotes, because I dislike the term “full disk encryption”. Mainly because it makes you believe that the disk will be fully encrypted, but it is not. Currently, you have to leave parts unencrypted in order to decrypt the rest. We probably don’t care so much about the confidentiality there, but we would like the contents of our boot partition to be somewhat integrity protected. Anyway, the following shows how I managed to install an Ubuntu with the root partition on LUKS and RAID.
Note: This procedure will disable your machine from booting on its own, because someone will need to unlock the root partition.
shred --size=1M  /dev/sda* /dev/sdb*
installimage -n bitbox -r yes  -l 1 -p swap:swap:48G,/boot:ext3:1G,/mnt/disk:btrfs:128G,/:btrfs:all  -K /root/.ssh/robot_user_keys   -i /root/.oldroot/nfs/install/../images/Ubuntu-1604-xenial-64-minimal.tar.gz


## For some weird reason, Hetzner puts swap space in the RAID.
#mdadm --stop /dev/md0
#mdadm --remove /dev/md0
#mkswap /dev/sda1
#mkswap /dev/sdb1

mount /dev/md3 /mnt
btrfs subvolume snapshot -r /mnt/ /mnt/@root-initial-snapshot-ro

mkdir /tmp/disk
mount /dev/md2 /tmp/disk
btrfs send /mnt/@root-initial-snapshot-ro | btrfs receive -v /tmp/disk/
umount /mnt/

luksformat -t btrfs  /dev/md3
cryptsetup luksOpen /dev/md3 cryptedmd3

mount /dev/mapper/cryptedmd3  /mnt/

btrfs send /tmp/disk/@root-initial-snapshot-ro | btrfs receive -v /mnt/
btrfs subvolume snapshot /mnt/@root-initial-snapshot-ro /mnt/@

btrfs subvolume create /mnt/@home
btrfs subvolume create /mnt/@var
btrfs subvolume create /mnt/@images


blkid -o export /dev/mapper/cryptedmd3  | grep UUID=
sed -i  's,.*md/3.*,,'   /mnt/@/etc/fstab
echo  /dev/mapper/cryptedmd3   /     btrfs defaults,subvol=@,noatime,compress=lzo  0  0  | tee -a /mnt/@/etc/fstab
echo  /dev/mapper/cryptedmd3   /home btrfs defaults,subvol=@home,compress=lzo,relatime,nodiratime  0  0  | tee -a /mnt/@/etc/fstab

umount /mnt/
mount /dev/mapper/cryptedmd3 -osubvol=@ /mnt/

mount /dev/md1 /mnt/boot

mv /mnt//run/lock /tmp/
chroot-prepare /mnt/; chroot /mnt


passwd

echo  "termcapinfo xterm* ti@:te@" | tee -a /etc/screenrc
sed "s/UMASK[[:space:]]\+022/UMASK   027/" -i /etc/login.defs
#echo   install floppy /bin/false  | tee -a    /etc/modprobe.d/blacklist
#echo "blacklist floppy" | tee /etc/modprobe.d/blacklist-floppy.conf

# Hrm. for some reason, even with crypttab present, update-initramfs does not include cryptsetup in the initrd except when we force it:
# https://bugs.launchpad.net/ubuntu/+source/cryptsetup/+bug/1256730
# echo "export CRYPTSETUP=y" | tee /usr/share/initramfs-tools/conf-hooks.d/forcecryptsetup


echo   cryptedmd3 $(blkid -o export /dev/md3  | grep UUID=) none luks     | tee  -a  /etc/crypttab
# echo   swap   /dev/md0   /dev/urandom   swap,cipher=aes-cbc-essiv:sha256  | tee  -a  /etc/crypttab


apt-get update
apt-get install -y cryptsetup
apt-get install -y busybox dropbear


mkdir -p /etc/initramfs-tools/root/.ssh/
chmod ug=rwX,o=   /etc/initramfs-tools/root/.ssh/
dropbearkey -t rsa -f /etc/initramfs-tools/root/.ssh/id_rsa.dropbear

/usr/lib/dropbear/dropbearconvert dropbear openssh \
        /etc/initramfs-tools/root/.ssh/id_rsa.dropbear \
        /etc/initramfs-tools/root/.ssh/id_rsa

dropbearkey -y -f /etc/initramfs-tools/root/.ssh/id_rsa.dropbear | \
        grep "^ssh-rsa " > /etc/initramfs-tools/root/.ssh/id_rsa.pub


cat /etc/initramfs-tools/root/.ssh/id_rsa.pub >> /etc/initramfs-tools/root/.ssh/authorized_keys

cat /etc/initramfs-tools/root/.ssh/id_rsa


update-initramfs -u -k all
update-grub2

exit

umount -l /mnt
mount /dev/mapper/cryptedmd3 /mnt/
btrfs subvolume snapshot -r /mnt/@ /mnt/@root-after-install

umount -l /mnt
Let’s walk through it.
shred --size=1M /dev/sda* /dev/sdb*
I was under the impression that results are a bit more deterministic if I blow away the partition table before starting. This is probably optional.
This is Hetzner’s install script. You can look at the script here. It’s setting up some hostname, a level 1 RAID, some partitions (btrfs), and SSH keys. Note that my intention is to use dm-raid here and not btrfs raid, mainly because I trust the former more. Also, last time I checked, btrfs’ raid would not perform well, because it used the PID to determine which disk to hit.
If you don’t want your swap space to be in the RAID, remove the array and reformat the partitions. I was told that there are instances in which it makes sense to have a raided swap. I guess it depends on what you want to achieve…
mount /dev/md3 /mnt

btrfs subvolume snapshot -r /mnt/ /mnt/@root-initial-snapshot-ro
Now we first snapshot the freshly installed image not only in case anything breaks and we need to restore, but also we need to copy our data off, set LUKS up, and copy the data back. We could also try some in-place trickery, but it would require more scripts and magic dust.
Here we set the newly encrypted drive up. Remember your passphrase. You will need it as often as you want to reboot the machine. You could think of using pwgen (or similar) to produce a very very long password and save it encryptedly on a machine that you will use when babysitting the boot of the server.
Do not, I repeat, do NOT use btrfs add because the btrfs driver had a bug. The rescue image may use a fixed driver now, but be warned. Unfortunately, I forgot the details, but it involved the superblock being confused about the number of devices used for the array. I needed to re-set the number of devices before systemd would be happy about booting the machine.
We create some volumes at our discretion. It’s up to you how you want to partition your device. My intention is to be able to backup the home directories without also backing up the system files. The images subvolume might become a non-COW storage for virtual machine images.
blkid -o export /dev/mapper/cryptedmd3  | grep UUID=

sed -i  's,.*md/3.*,,'   /mnt/@/etc/fstab

echo  /dev/mapper/cryptedmd3   /     btrfs defaults,subvol=@,noatime,compress=lzo  0  0  | tee -a /mnt/@/etc/fstab

echo  /dev/mapper/cryptedmd3   /home btrfs defaults,subvol=@home,compress=lzo,relatime,nodiratime  0  0  | tee -a /mnt/@/etc/fstab
We need to tell the system where to find our root partition. You should probably use the UUID= notation for identifying the device, but I used the device path here, because I wanted to eliminate a certain class of errors when trying to make it work. Because of the btrfs bug mentioned above I had to find out why systemd wouldn’t mount the root partition. It was a painful process with very little help from debugging or logging output. Anyway, I wanted to make sure that systemd attempts to take exactly that device and not something that might have changed.
Let me state the problem again: The initrd successfully mounted the root partition and handed control over to systemd. Systemd then wanted to ensure that the root partition is mounted. Due to the bug mentioned above it thought the root partition was not ready so it was stuck on mounting the root partition. Despite systemd itself being loaded from that very partition. Very confusing. And I found it surprising to be unable to tell systemd to start openssh as early as possible. There are a few discussions on the Internet but I couldn’t find any satisfying solution. Is it that uncommon to want the emergency mode to spawn an SSHd in order to be able to investigate the situation?
umount /mnt/

mount /dev/mapper/cryptedmd3 -osubvol=@ /mnt/
Now we mount the actual root partition of our new system and enter its environment. We need to move the /run/lock directory out of the way to make chroot-prepare happy.
passwd
We start by creating a password for the root user, just in case.
echo  "termcapinfo xterm* ti@:te@" | tee -a /etc/screenrc

sed "s/UMASK[[:space:]]\+022/UMASK   027/" -i /etc/login.defs

#echo   install floppy /bin/false  | tee -a    /etc/modprobe.d/blacklist

#echo "blacklist floppy" | tee /etc/modprobe.d/blacklist-floppy.conf
Adjust some of the configuration to your liking. I want to be able to scroll in my screen sessions and I think having a more restrictive umask by default is good.
echo "export CRYPTSETUP=y" | tee /usr/share/initramfs-tools/conf-hooks.d/forcecryptsetup
Unless bug 1256730 is resolved, you might want to make sure that mkinitramfs includes everything that is needed in order to decrypt your partition. Please scroll down a little bit to check how to find out whether cryptsetup is indeed in your initramdisk.
echo   cryptedmd3 $(blkid -o export /dev/md3  | grep UUID=) none luks     | tee  -a  /etc/crypttab

# echo   swap   /dev/md0   /dev/urandom   swap,cipher=aes-cbc-essiv:sha256  | tee  -a  /etc/crypttab
In order for the initramdisk to know where to find which devices, we populate /etc/crypttab with the name of our desired mapping, its source, and some options.
Now, in order for the boot process to be able to decrypt our encrypted disk, we need to have the cryptsetup package installed. We also install busybox and dropbear to be able to log into the boot process via SSH. The installation should print you some warnings or hints as to how to further proceed in order to be able to decrypt your disk during the boot process. You will probably find some more information in /usr/share/doc/cryptsetup/README.remote.gz.
Essentially, we generate a SSH keypair, convert it for use with openssh, leave the public portion in the initramdisk so that we can authenticate, and print out the private part which you better save on the machine that you want to use to unlock the server.
update-initramfs -u -k all

update-grub2
Now we need to regenerate the initramdisk so that it includes all the tools and scripts to be able decrypt the device. We also need to update the boot loader so that includes the necessary Linux parameters for finding the root partition.
we leave the chroot and take a snapshot of the modified system just in case… You might now think about whether you want your boot and swap parition to be in a RAID and act accordingly. Then you can try to reboot your system. You should be able to SSH into the machine with the private key you hopefully saved. Maybe you use a small script like this:
If there is no cryptsetup binary, something went wrong. Double check the paragraph above about forcing mkinitramfs to include cryptsetup.
With these instructions, I was able to install a new machine with an encrypted root partition within a few minutes. I hope you will be able to as well. Let me know if you think anything needs to be adapted to make it work with more modern version of either Ubuntu or the Hetzner install script.
This afternoon, I felt an urge to hear some classical music. Perhaps because I’m overworking a lot these days, I wanted to grab a good hot tea, and listen to relaxing music, and rest for a few minutes.
It was taking 15~20 seconds just to show the albums. That’s unacceptable!
The Investigation
Thanks to Christian Hergert we have a beautiful and super useful Sysprof app! After running Music under Sysprof, I got this:
Sysprof result of GNOME Music
Clearly, there’s an area where Music hits the CPU (the area that is selected in the picture above). And, check it out, in this area, the biggest offenders were libjpeg, libpixman and libavcodec. After digging the code, there it was.
The performance issue was caused by the Album Art loading code.
The Solution
Looking at the code, I made a simple experiement: tried to see how many parallel lookups (i.e. asynchronous calls) Music was performing.
The number is shocking: Music was running almost 1200 asynchronous operations in parallel.
These operations would be fired almost at the same time, would load Zeus knows how many album covers, and return almost at the same time. Precisely when these lookups finished, Music had that performance hit.
The solution, however, was quite simple: limit the number of active lookups, and queue them if needed. But, limit to what? 64 parallel lookups? Or perhaps 32?
I needed data.
The Research
DISCLAIMER: I know very well that the information below is not scientific data, nor a robust benchmark. It’s just a simple comparison.
I decided to try out a few lookup limits, and see what works best. I have a huge collection, big enough to squeeze Music. I’m on an i7 with 8GB of RAM, 7200RPM spinning hard drive.
It was measured (i) the time it took for the album list to show, (ii) the time for all album covers to be loaded, and (iii) a quick score I made up on the fly. All of them are of the type lower is better. I ran each limit 10 times, and used the average of the results.
Comparison of various lookup limits
The “No Limits” columns represent what Music does now. It takes a long time to show up, but the album covers are visible almost immediately after.
First conclusion: limiting the number of lookups always performs better than not. That said, the problem was just a matter of finding the optimal value.
After some trial and error, I found that 24 is an excellent limit.
The Result
In general, the initial loading of albums with the performance improvement is around 73% faster than without it. That’s quite a gain!
But words cannot express the satisfaction of seeing this:


 The tree on the hill: ZeMarmot movie reference
 Burrow hole in tree roots: ZeMarmot reference
 Storyboard: burrow entrance
 Drawing: burrow entrance
 Colored ZeMarmot’s burrow entrance (WIP)


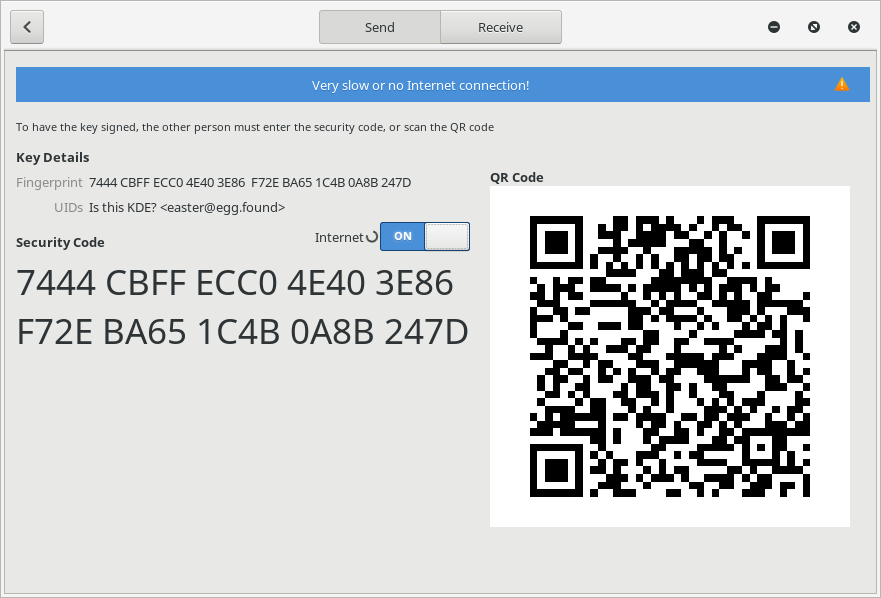


 Sysprof result of GNOME Music
 Comparison of various lookup limits