I’ve had some success with Etsy over the years, and I keep finding more things I want to do with that platform. Most recently, I’ve been collecting and curating some of my favourite vintage artwork and making it available in a new shop, which I’m calling “Aunty Maude’s Vintage Curiosities“.
At Aunty Maude’s you’ll find a growing array of vintage public domain works that I have collected, curated and retouched to make available as fine art giclee prints in sizes up to 17×22″. Prices are the same as in my other shops (Canada Stamp Art, USA Stamp Art, and the photography at Parchment Moon Prints), and shipping is currently free within North America.
I hope you’ll take a look and let me know what you think!
If you were wondering, Aunty Maude is a real person to whom I am actually related. Unfortunately, she passed away before I was able to meet her, but my Mom always assured me that we would have been fast friends. It’s a little odd to miss someone you never met, but here we are.
If you follow me on Twitter or Facebook, you know that I’ve (finally) been experimenting with some new printmaking methods. After some trials and frustrations and utter failures, I’ve finally produced a few prints I’m actually happy enough with to list in my Etsy shop!
The first of these is titled “Folds” and is a print made from a collagraph plate I constructed using nothing but glue and folded paper. It’s a small piece — 4×4″ image on 6×6″ paper, printed on 300g (lovely and heavy) watercolour paper with a non-toxic oil-based etching ink.
“Folds” is a very limited edition of 10 signed and numbered prints, which I’m selling for $39.99 USD (+ shipping), you can purchase it on my Parchment Moon Etsy shop.
In basements across this great continent, there are thousands, nay…hundreds of thousands, of old National Geographic magazines. I’ve seen them. I wrangled oh so many of them when helping clean out my parents’ house. I have flipped fondly through them before finally bundling them into the recycling bin.
And now I…want them.
Or at least I want a part of them.
I want your Nat Geo maps!
I am looking for as many old National Geographic map inserts as I can get my hands on. I want to use them for art, and if I can get enough of them, I want them for an extensive continuing art project that could go on for years.
It doesn’t matter how old they are, what shape they’re in, or what the inserts are about. Migration patterns! History! Political maps! Farm land usage! Whatever!
Donate and get free art!
If you have some old maps that you would like to donate to my project, please email me at deb.richardson@gmail.com, or contact me on Twitter or Facebook.
I will pay shipping costs if they’re a problem, and everyone who donates will get free art!
I found myself in need of candied ginger the other day, so instead of driving all the way into town (bleah) I decided to make my own. Turns out it’s really easy and inexpensive, and you end up with extra bonus gingery sugar lumps. Win win win!
There are a bunch of step-by-step photos at the end of the post!
Candied Ginger
There are only three ingredients and the process is really simple, but it does require some patience while you wait for the magical part at the end where the sugar syrup recrystalizes.
Ingredients
1 lb fresh, peeled ginger root
5 cups water
1 lb granulated white sugar
Method
Put a cooling rack over a cookie sheet. This is where you will spread the ginger out to cool. Alton Brown suggests spraying the rack with non-stick spray, but it’s not really necessary.
Peel the ginger root and slice into 1/8″ rounds. As with many things, your knife work here doesn’t have to be super fancy — I ended up with some thinner pieces, some thicker pieces, some weird little chunky end bits, etc. Doesn’t really matter — it all works out in the end.
Dump the ginger into a mediumish sized pot with the water, bring to a boil, then reduce to a high simmer for 30-40 minutes. The ginger will end up a bit more tender, but won’t fall apart. Your house will smell amazing.
Reserve 1/3 cup of the now-deeply-ginger-infused cooking liquid. Drain the ginger and dump it back into the pot. Add the sugar and the reserved cooking liquid.
Bring this a boil over medium-high heat, then reduce to medium/medium-low. This is the part where you need to have some patience. Cook the ginger & sugar syrup, stirring frequently, while the syrup continues to reduce and reduce. For me, this part took maybe 30-40 minutes.
Then magic will happen! At some point the syrup will lose enough water that it will start to recrystallize. Keep stirring and let it get clumpy, then take it off the heat.
Spread the sugary gingery bits out on the cooling rack, separating them so they don’t clump together.
Let cool, then store in an airtight container. Rescue all the extra sugary bits that fell through the cooling rack, and store those in a separate container. Those are now magical ginger sugar lumps, and are good for baking or tea or ice cream or whatever.
Tips
If you examine the ingredients list carefully, you’ll note that the recipe calls for the same weight of sugar as peeled ginger. You can scale this recipe down! Or up! Whatever you need!
All sliced up. Nothing fancy here, just lots and lots of fresh ginger.Into the pot! Water just to cover (the recipe says 5 cups, I used about 4.5).Burbling away. Your house will smell incredible. Super gingery.Sugar! Just use equivalent amounts of sugar and peeled ginger if you don’t want a whole pound’s worth.All stirred up and back in the pot.Candying! This part goes on for a while.Continuing to burble away. The syrup is reduced by about half here. Keep going! Magic is coming!Magic! The sugar syrup is reduced to the point of recrystallization. Science!Spread out to cool. Bonus lumpy sugar bits.Et voila! Candied ginger (after I’ve eaten really too much of it), and a half pint of ginger sugar lumps.
As I mentioned earlier, I am on a quest to preserve as much of my unexpectedly-abundant zucchini harvest as I can. Inspired by a friend’s off-hand comment, I decided to try my hand at making Zucchini Apple Ginger Chutney for the first time.
For those of you who are unfamiliar with chutney, there are roughly a billion different types and recipes, ranging from mild herby yogurt chutneys through crazy pickley spicy chutneys. The zucchini-apple-ginger chutney I made this weekend is a rich, sweet, jammy, tangy, and heavily spiced (also hot-spicy) fruit and vegetable-based relish. It will be an amazing accompaniment for a zillion things — meats, curries, cheese, savoury pastries, etc etc. I expect we’ll have it first with roast pork or curried beef. And we’ll definitely bust it out for Thanksgiving and Christmas, as it will go insanely well with grill-roasted turkey.
Zucchini Apple Ginger Chutney
This recipe made exactly eight half-pint jars, which I processed for 20 minutes in a water bath. If you have no idea what water bath canning is, here’s a straightforward introduction. It’s easier than it sounds, I promise.
1 tsp ground cayenne pepper (this is spicy, adjust as needed)
Method
Toast and grind your spices if that’s the sort of beautiful genius you are. Bonus points for making your own garam masala.
Dump everything into a good-sized pot, bring to a boil, then reduce to a low simmer. Stir occasionally (every 20 mins or so).
Let this simmer down for 2 hours or so…it will cook down considerably and thicken as it goes (see photos below)
Following standard water bath canning procedures, pack the chutney into clean, sterilized jars, leaving a half-inch of headspace. Wipe the rims, cap with lids and rings, then process at a roiling boil for 20 minutes.
Let the jars cool, then label (including the date) and you’re all done. Ideally let them sit at least two weeks. Unopened they will last for a year, but once opened you should use it up within a couple of months.
Tips
I diced the onions, apples, and zucchini all to a roughly half-inch dice. You don’t have to be fancy with your knife work here…it all gets cooked down into a soft, delicious goopy mass anyhow.
If your zucchini are big enough to be sort of squishy in the middle, scoop out the seeds so there’s just firm flesh left.
If at all possible, buy fresh whole spices (coriander, cumin, etc), toast them for a few minutes in a dry pan until fragrant, and grind them yourself. It takes only minutes and is so, so worth it. And look, you can even make your own garam masala!
Photos!
After about 15 minutes.An hour of simmering.Almost done!Boil and bubble. This is what water bath canning looks like. Pretty straightforward.
In my quest to preserve as much of my zucchini harvest as I can, I decided to try my hand at making chutney. The recipe calls for Garam Masala, which is a complex blend of spices that is insanely good when made fresh, particularly if you take the time to roast the whole spices and grind them yourself. Which is what I did.
For those of you who are unfamiliar with chutney, there are roughly a billion different types and recipes, ranging from mild herby yogurt chutneys through crazy pickley spicy chutneys. The zucchini-apple-ginger chutney I made this weekend is a rich, sweet, jammy, tangy, and heavily spiced (also hot-spicy) fruit and vegetable-based relish. It will be an amazing accompaniment for a zillion things — meats, curries, cheese, savoury pastries, etc etc. I expect we’ll have it first with roast pork or curried beef. And we’ll definitely bust it out for Thanksgiving and Christmas, as it will go insanely well with grill-roasted turkey.
Anyhoo…I’ll post the chutney recipe on Wednesday. This post is about Garam Masala.
Garam Masala recipe
This is really easy to throw together — it takes maybe 10 minutes all told, including 5 minutes to let the spices cool down.
Ingredients
1/3 cup coriander seeds
1/4 cup cumin seeds
1 tbsp green cardamom pods
1 tbsp whole black peppercorns
2 tsp whole cloves
1″ piece of cinnamon bark, broken into pieces
1 dried red chile
2 bay leaves
1/4 tsp ground nutmeg
1/8 tsp ground mace (optional)
Method
Put everything except the nutmeg and mace into a dry pan and place over low heat. Stir the spices until they’re toasted and very fragrant — this usually takes 3-4 minutes.
Transfer the now-toasted spices on to a plate to cool for a few minutes, then put everything (including the nutmeg and mace) into a spice grinder (mine is just a simple coffee grinder I repurposed). Grind to a fine powder.
Transfer spice blend to an airtight container (such as a mason jar). This blend will store for 6-8 months if it lasts that long!
Tips
I break cinnamon sticks by placing them on a cutting board, covering with a layer of dry dish towel, and whacking it with the back of a chef’s knife.
If you don’t already have mace on hand, don’t bother getting it for this recipe since you use so little — just augment with a bit more nutmeg.
I’m about an hour into cooking down the chutney, and our house smells ridiculously amazing right now. Oof. This is going to be so great.
It’s been a while since my last update, but life has been pretty busy. In addition to the ongoing chaos of renovations, I had to travel back to Ontario for a week to take care of some stuff, and since I’ve returned it’s been a whirlwind of busy-ness: yardwork & gardening & setting up the new (functional-but-not-quite-finished) kitchen & trying to get back into a work routine, etc etc.
While I was away, the garden went bonkers and I am now wading through a glut of zucchini and cucumbers. So this weekend I am working on preserving some of that excess, starting with my first round of garlic dill pickles.
Garlic Dill Pickles
The recipe is super simple: cucumbers are chunked up into thick slices & packed into pint jars with dill seed, peppercorns, hot pepper flakes, mustard seed, coriander seed, and garlic cloves, then topped with pickling brine and hot-water-bath processed for 10 minutes.
Pickling is shockingly easy, guys.
Growing up, I remember my Mom doing huge batches of canning and pickling — dozens of jars in dozens of batches, taking days at a time and filling up shelf after shelf in the basement. It was an epic process that would destroy the kitchen and make a gawdawful mess. I was never interested in it — it seemed like so much work and planning and mess and chaos.
It was a revelation when I discovered that this isn’t how it has to be. It turns out that it’s possible to do small batch canning — prepping and preserving just a few jars at time, easily done on a lazy weekend afternoon. This made canning feel sane and achievable, something I could do in my small city kitchen to make use of some of the amazingly cheap & just-picked produce from the farmer’s market at the end of our street in Toronto. It was easy and fun, and that summer I made some of the best pickles I’ve ever had.
Book recommendations!
My go-to small batch canning books are Food in Jars and Preserving by the Pint, both by Marisa McClellan. Lovely books with excellent recipes and great photography. I strongly recommend picking these up if you’re even remotely interested in doing your own pickling and preserving.
I have other books to recommend, but those will be for another day. Right now I’m going to start today’s pickling extravaganza, which, if all goes well, will include Zucchini Sriracha fridge pickles, Zucchini-Apple-Ginger chutney, and maybe some Sweet and Spicy Zucchini Relish. We’ll see how it goes.
In the very near future2, I am finally getting back into the studio to start making art again.
As part of that — and as part of finally taking a serious stab at making art for a living — I’m building a list of people (like you!) who are interested in helping support and promote independent artists (like me!)
Parchment Moon newsletter subscribers will have the opportunity to view and purchase my new prints, photographs & other artistic work a full week before I post about them on other social media.
My prints are often very limited edition (with usually no more than 10-15 original hand-pulled imprints), and can sell out quickly. These email updates will let you know when new work is available before anyone else.
I’ll also include notes and links to other artists’ work (mostly stuff that I desperately love), tidbits about the rich and fascinating histories of printmaking and photography, and other random notes and links about studio life, art, photography & creativity.
I promise no spam, just super interesting arty things and a huge amount of gratitude.
1 The “superfans list!” thing is a feeble attempt to come up with a better name for this than “newsletter”. Suggestions welcome – tweet ’em @dria. Hearts.
2 We’re 2-3 weeks away from being finished renovations enough that we can finally settle back into a work-life routine. I cannot tell you how much I’m looking forward to that.
It’s hot. Damn hot. If it doesn’t rain today or overnight, I’m going to have to bust out the hose tomorrow and give the gardens a drink. Humid as all git out, too, which means less puttering in the garden and more hiding in the basement studio (which is coming along to the point where I’m juuuuust about ready to go get my art stuff out of storage, woo!)
The gardens are still going utterly gangbusters, and we’ve started eating stuff out of them every day. So far it’s all just lettuce, radishes and herbs, but that’s mostly because we’re limited by our lack of kitchen and the fact that we can’t manage anything fancier than a salad in terms of prepwork. Once our kitchen is finished (~3 weeksish from now), we’ll be hip deep in kale, chard, zucchini, beet greens, peas and maybe the first snap beans. So, good timing all round, I suppose.
In terms of maintenance work, I do a tour of the gardens every day to keep an eye out for pests & diseases, as well as to yoink whatever weeds have sprouted. Takes maybe 10-15 minutes and is a pretty zen way to start the morning. So far we’ve had no disease issues, and no problems with pests other than the asian greens succumbing to flea beetles. It seems that we have a volunteer army of birds who really love eating all our slugs and seem otherwise content to snack on what we put in the feeders. So that’s handy. Birds! Who knew?
So, some update photos and notes!
(Sugar) Peas!
All three types of peas have blossoms, and the earliest has set pods that are growing and fattening up nicely. I am so crazy looking forward to eating these, you have no idea. I’m totally making minted fresh peas with butter, and you can’t stop me. Aw yiss.
Snap beans
The earliest of the snap beans have started to flower, which is awesome. There are also three kinds of these in the garden, and it looks like we weren’t too late with these after all. If all goes well, we’ll have plenty to eat fresh and some for spicy pickled beans (which are excellent in Bloody Caesars #protip).
Zucchini
My most recent count has us with 40 visible zucchini on the plants, and around five times that number of flowers working on more. We are going to be utterly awash in zucchini soon, which is hilarious and not unexpected, but still hilarious. We will eat as much of it as we can, and likely foist it upon friends and relatives in the near future. Pictured are Sunburst Zucchini (they turn into fat little UFO-shaped golden pods), and Golden Zucchini. We also have Rich Green and Magda plants.
Beets
The beets have started forming roots! Huzzah! That is the best part of the beet, although the greens are also insanely great (try ’em – chopped up and sauted with butter and garlic, or with bacon? Omg, srs, you need to eat some.) I am a little alarmed at just how many beets there are in the one bed, but from what I’ve read they will happily push each other out of the way and grow in ridiculous conditions. We’ll definitely start harvesting these for greens & baby beets when our kitchen is finished up.
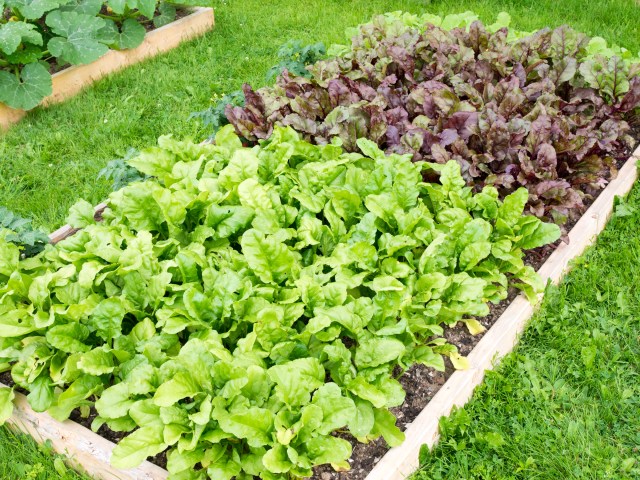
Spinach, Chard, Kale & Cucumbers
Not pictured: The bunching onions I seeded in a narrow strip of soil between the spinach and the chard. They haven’t sprouted yet.
I really have to get some trellises up for the cucumbers, because they’re putting out tendrils and want to climb things (which is great – keeping cucumbers out of the dirt is absolutely something you want to do if you can). So that will be some of my time tomorrow.
The spinach (closest to camera), chard, and kale are all getting huge. We can start eating those now and they should keep producing through until frost (or later). This is only a fraction of our kale and chard — maybe 1/4? We will have way more than enough greens to get us through ’til November, which is awesome and delicious.
Lettuces and Tomatoes
The tomatoes are doing their thing, which is mostly growing rapidly and starting to put out masses of flowers. It will be a while before we see anything off any of those other than the giant hybrid monstrosity that is rapidly taking over the deck.
We’re eating stuff out of the lettuce array every day, and need to step it up. For like $12 worth of seeds we’re going to have all of the salad greens we can eat for (seriously) the next 3-4 years. Plus the previously mentioned kale, spinach, chard, beet greens and all the rest. The only thing we’re missing is arugula and that’s because I screwed up and forgot to seed some. I should figure out somewhere to stick some now because that would do fine for the rest of the summer and autumn.
Potatoes and Winter Squash
This is where we’re playing the long game, since at best we won’t see harvests out of these until October. We have three types of potatoes planted out in these potato tower things Rob built, and they’re all going crazy now. It’s likely Rob will have to add the third layer of boards & more soil on the weekend. These will be harvest when all the foliage dies off, which won’t be happening for a while.
I planted four kinds of winter squash — Early Butternut, Sweet Mama, Sunshine, and Heart of Gold. The Early Butternut aren’t doing terribly well, but the rest have gone crazy and are huge and slightly terrifying at this point. They’re easily a foot tall now, and they seem to be fine with the ridiculously cramped non-raised bed thing I built for them. Last week I read an article suggesting that I didn’t actually start these too late, so may actually get a viable harvest thing year. Fingers crossed!
Hot Peppers
Not sure I’ve mentioned these before, but when we picked up plants for the herb garden, Rob found this sad little pot of three hot pepper plants in the discount bin and decided to adopt them. There was one Jalapeno plant, one Thai Chili (or Cayenne?) plant, and one Habanero plant. We stuck ’em in the middle of the herb garden, not expecting much, but holy crap. The Jalapeno plant has easily 15 peppers on it already, and just threw up a whole other shoot that has flowers all over it, and the Thai Chili plant is…festooned. Like maybe 100 peppers? It’s nuts. The Habanero is taking its sweet time, but has started to blossom — no visible fruit at this point, but we’re hopeful. Not bad for discount bin orphans.
BasilLemon BalmThymeSageOregano
Herbs
Not pictured: Dill & Cilantro & Spearmint. Yeah, the herbs are doing crazy well and we’re using them daily. Thyme has been featured in pasta and cider-steamed mussels, cilantro in fajitas and …something else I can’t think of right now, dill & chives in tunafish sammiches, basil in salads, etc. Next year I have plans for a whole separate and much larger meandering, organic, lovely herb garden with a little fence around it and a comfy place to sit with tea or wine and a book. I may be turning into an old lady.
That’s it! We love our garden and recommend growing your own stuff to everyone who has any space at all. It’s really just neat, and seriously easy to do once you get the basics sorted.