 |
 |
 |
 |
 |
 |
| Welcome Guest ( Log In | Register | Resend Validation Email ) |


Please direct yourself to the new forum and update your bookmarks: http://forum.ninjarobotyeti.com
|
|
 We're Back! Metanet's Forumer Forums temporarily open for business! -> N -> General Community -> NReality
|
| Pages: (2) [1] 2 ( Go to first unread post ) |
 
 |
| Nexx |
Posted: March 19, 2008 11:13 pm

|
 Still Worthy of a Better Title Than This  Group: Members Posts: 677 Member No.: 7378 Joined: June 13, 2007 |
[ALIGN=center]Nexx's Image Map Tutorial[/ALIGN]
First and foremost, you need NReality v6c2 to play maps with images! [SPOILER=Expand this to read a little more about NReality.]For those who haven�t heard of it, NReality is a sort of an expansion for N v1.4 while we all wait for v1.5 to be released. It adds new functionalities (privatecontest, image maps, playing maps straight off of NUMA, etc) and 10 new columns (2 columns of blue_tetris, 8 columns of Legacy maps (the Origins pack)), and provides a more cheat-free environment, all while maintaining everything from v1.4.[/SPOILER] Click here to go to the NReality thread, or click here to download v6c2 without further ado. So, if you�ve been around NUMA for the past few months, chances are you�ve stumbled across an image map or two. (If not, check out the Image Map Thread to learn how to play them and to see all the image maps made so far.) These image maps are a whole new style of mapping, so naturally there are a lot of new things to consider. In this tutorial I�ll break down how they work and how you can make some of your own. (Click on any section below to expand it) [SPOILER=How do image maps work?] First, NReality recognizes that a map uses images by the level data. The formatting is: $title#author#genre#tilesetdata|objectdata|backgroundimageURL|foregroundimageURL|# Note: You can have a foreground without a background or vice versa, just keep the |'s intact. NReality then proceeds to download the images at the given urls. (As a sidenote, there is no error or anything if there are no images at the given urls; the map will load normally) The background and foreground images are both 792x600 pixels large, which is the size of N levels (including the tiles that make up the border). As for how the images interact with the tileset and objects, you can think of the whole level as four layers: Foreground image - TOP LAYER Original foreground (tileset) & objects Background image Original background (light gray) - BOTTOM LAYER So foreground images cover all else: the light gray, the dark gray, all objects, everything. Background images only cover up the light gray, and everything else is rendered on top of them. The trick: foreground images have transparent sections (they are just saved in a format that supports transparency) so you can see the objects and whatnot. And that�s all there is to it.[/SPOILER] [SPOILER=What you need to put together an image map] Image maps may look sleek, but putting them together ain�t all puppies and sunshine. But before we dive into the making of one, there are two essentials: 1) A place to host images. There are many popular sites created specifically for this purpose, such as Image Shack, Photobucket, Flickr, Tinypic, etc. You might be able to get by with a website account (ex: Geocities) or other online storage place, but you�re much better off getting an account with an image-hosting site. 2) A graphics editor that supports transparency. Without this you�ll only be able to make backgrounds. If all you�ve got is MSPaint, it�s time to upgrade. My personal favorite is (of course) Adobe Photoshop, but Adobe Illustrator will also work, I�m pretty sure Paint Shop Pro will work, and I�ll bet there are many others out there that will work. Use whatever you�re comfortable with. Note: I�ll be doing the rest of this tutorial with Photoshop, so my apologies to those who don�t have it.  (Also, I use a PC, so I may say some things that only apply to PC users. I hope those with Macs won�t get too lost.)[/SPOILER] (Also, I use a PC, so I may say some things that only apply to PC users. I hope those with Macs won�t get too lost.)[/SPOILER][SPOILER=Putting together a very basic image map using Photoshop] I�ll keep this tutorial very basic from all perspectives, just to make sure that everyone can keep their bearings. If at any point things aren�t turning out as expected, post below and I�ll try to help you out. We�ll be doing the following transformation:  ==> ==>  Ugly, I know, but it gets the job done. Step 0: Make a map like the one above (on the left). The tileset must be the same, but put in whatever objects you like - I chose a rocket and some gold. Save the map data in a text file. Step 1: Take a screenshot of the map and load it into Photoshop. The thing is that we only want to edit the tileset; if there are objects in your image then they will be part of the background/foreground! To get rid of the objects, look for the | separator in the map data (in the editor � don�t touch your text file), and delete everything after it. Load up the map again, but this time in N v1.4 (you�ll see why later). Maximize the window (not necessary but it helps), press p, and then press Print Screen. Close N. Open Photoshop. Go to File > New. The given width and height should be your screen size (ex: 1024x768), and the given resolution should be 72 pixels/inch (normal screen resolution). If not, make it so. Hit OK. Go to Edit > Paste. Step 2: Crop! Enter the handy dandy Magic Wand tool (  ), which we�ll be using a lot of from here on out. For the magic wand tool, you pick a starting color, and it selects all pixels that are connected to it that are similar enough in color (which you can adjust in the �Tolerance� field). Select the magic wand tool, set the tolerance to 0, and uncheck the box for �Anti-aliased�. ), which we�ll be using a lot of from here on out. For the magic wand tool, you pick a starting color, and it selects all pixels that are connected to it that are similar enough in color (which you can adjust in the �Tolerance� field). Select the magic wand tool, set the tolerance to 0, and uncheck the box for �Anti-aliased�. Click somewhere on the dark gray area, and it should select the whole box minus some parts here and there. That�s okay. Go to Image > Crop. Your image should now look something like this (only much bigger):  Just to make sure you have the right size, go to Image > Image Size. Width should be 792 and Height should be 600. If so, press OK. From now on, you should save your work after every step. Just save it as a PSD. This file is there only for backup, and you can delete it later. Step 3: This is where things get complicated. At this point I would normally separate the background and foreground sections into different layers, but this time we�ll just make a foreground layer and then make the background from scratch. First, we have to select what will become the foreground. Using the magic wand tool, click anywhere on the light gray area. Go to Select > Inverse. You should now have all �E� tiles selected. We actually don�t want the upper right E tile selected, so (still using the magic want tool) hold ALT and click on it. (A small minus sign should appear to the left of the cursor as you hold alt) That tile should now be deselected. Go to Layer > New > Layer via Copy. Just so you don�t get confused, right click on Layer 2, go to Properties, and for Name, put �Foreground�. So you get more used to transparency, click the eye next to Layer 1 to make the layer invisible. The checkered area you now see represents transparent pixels. 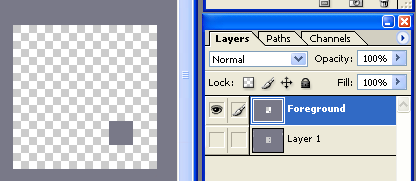 One last thing before we finish this step. You�ll notice that your foreground layer has your framerate in the bottom left. If you had taken the screenshot in NReality, you�d also see things on the sides, like HIGHSCORES, GRID, n.infunity.com, etc. You�ll want to get rid of these. (So you see, it�s not a big deal if you take a screenshot from NReality, but you�d have to cover up more stuff at this point) Select the eyedropper tool and click on a dark gray part of the image. Select the paint brush tool (Note: If you don�t see the paintbrush tool, click and hold on the pencil tool and it should pop up on the right), select an appropriate size brush (9 pixels should do it), and make sure Mode is Normal and Opacity is 100%.  Make sure the foreground layer is selected, and then draw over the framerate in the bottom left. Step 4: Creating the background from scratch. Go to Layer > New > Layer, and click OK. Rename this layer to �Background.� Drag your this layer underneath the layer Foreground. (the background layer should remain selected) Click on your foreground color (see below) and pick the color you want for your level background.  (Photoshop uses the terms "foreground color" and "background color", as shown above. To reduce confusion, we will only be using the foreground color, and I don't think I even use the term again beyond this point.) Click on the paint bucket tool. (Note: If you don�t see a paint bucket, click and hold on the gradient tool and it should pop up on the right) Make sure it says Foreground in the Fill field (at the top), and then click anywhere on the image. Select the Foreground layer, and use the magic wand tool to select the E tile in the middle. Make a new layer, choose a new color, and fill it in with that. Switch to the arrow tool and move the square up and to the right. You don�t have to match this up with a tile, so just guesstimate. Click on the background layer, then click on the empty box to the left of Layer 3. A little chain link should show up:  Go to Layer > Merge Linked. You�re done with the background! It should look something like this:  Step 5: Finishing the foreground. Select the Foreground layer. Magic wand the dark gray �E� tile, and use the paint bucket to fill it in with a color of your choosing. Make a new layer, fill the selection in again with a new color. Move the selection to the left (again, just guesstimate). Select the foreground, click the empty box next to Layer 2 to link it, and then go to Layer > Merge Linked. One last thing: the outer foreground color. If you want to leave it dark gray, just skip to the end of this paragraph, but otherwise pick a new color. Magic wand anywhere in the outer dark gray. Do the same �ol, same �ol: make a new layer, paint bucket your selection, click on the Foreground layer again, make the new layer linked, and then go to Layer > Merge Linked. Congratulations! You�re done with the image-making part! It should look something like this:  Step 6: Saving the files. First, a brief statement about file formats. You�re probably most familiar with JPG files, but unfortunately they don�t support transparency! We�re going to be working with PNG files because they do support transparency, and they also result in smaller filesizes for simple images like these. Let�s save the foreground first. (Make sure you�ve saved your work so far!) Delete the Layer 1 first, and then delete the Background layer (drag them to the little trash bin in the bottom right or right click and select �Delete Layer�). Go to File > Save as. Name it whatever you want, but putting �front� in the name is helpful. Make sure the format is PNG. Click OK. A little window will pop up about interlacing, just click OK. Now the background. You can reopen the PSD, but it�s more fun to just go to Edit > Step Backward. Now delete the Foreground layer. Go to Layer > Flatten Image (this is not necessary, but I do it anyway), then File > Save as. Again, it helps to have �back� in the name, and PNG should still be selected. Click OK twice. Close Photoshop! You�re almost there! Step 7: Uploading the files and editing the map data Upload the foreground and background images to your image hosting service. Open the text file of the original level, find the urls of the uploaded images, and at the end of the map data, add: �|backgroundURL|foregroundURL|� (without the quotes) For example, I added: �|http://img.photobucket.com/albums/v443/theBAMNman/forN/imt/sampleback.png (continued on next line) |http://img.photobucket.com/albums/v443/theBAMNman/forN/imt/samplefront.png|" And you�re done! Congratulations! Save the file, reopen it, and load the map in the editor. It should look something like the picture I showed you at the beginning. The map data for the above map is attached below if you want to check it out.[/SPOILER] [SPOILER=A few more things to know before you dive into making your own image map] - Remember, the image size is 792x600! (That includes the one-tile border) - For selecting more complicated shapes (i.e., anything but horizontal and vertical edges), you can either play with the tolerance and anti-aliased options of the magic wand tool, or you can try using Select > Color Range, which has all the settings right there for you (use the drop-down menu at the bottom of that window to see a preview of your selection). Below is an example of the different settings for the magic wand tool.  - If you want to put a repeated texture for your foreground or background, do this: Load up the texture file. Go to Select > All. Go to Edit > Define Pattern. Name it whatever you like. Go back to your map. I�m assuming you�ve got your foreground and background layers all set up. Magic wand/color range your foreground or background, and then click on the paint bucket tool. At the top, where it says Fill, drop down the menu and pick Pattern. Then pick your pattern from the drop down box to the right of that (it should be the last one).  Then just click anywhere within your selection and voila!  [/SPOILER] [/SPOILER]If you want to know anything else, just post below and I'll add it above! Also, feel free to post images of the image map you make from this tutorial! This post has been edited by Nexx on August 02, 2008 12:06 pm Attached File ( Number of downloads: 356 )  samplemap.txt
-------------------- |


|


| Nexx |
Posted: March 19, 2008 11:18 pm
|
|
Still Worthy of a Better Title Than This Group: Members Posts: 677 Member No.: 7378 Joined: June 13, 2007 |
This is my first tutorial, so feel free to criticize it harshly.
Also, when the actual level-making spoiler (the third one) expands, the text takes up much more horizontal space. Does anyone know how to fix this? This post has been edited by Nexx on March 19, 2008 11:26 pm -------------------- |
|
|
| Templex |
Posted: March 19, 2008 11:30 pm
|
|
to the sky Group: Metanembers Posts: 819 Member No.: 1202 Joined: August 07, 2005 |
The page is being stretched because of that super-long string with the image URLs and whatnot.
Good tutorial, covers all the bases. I would suggest replacing the Magic Wand step with Color Range, though. -------------------- |
|
|


| Unreality |
Posted: March 20, 2008 01:10 am
|
||
 Software Ngineer Group: Metanembers Posts: 996 Member No.: 2642 Joined: February 16, 2006 |
Wow, great tutorial!
 By the way shouldn't this topic post at custom map forum? -------------------- 1 x past 0th, 2 x past tied-0th NReality: 200 Episodes + Image Map Functionality + Speedhack blockage + Level Highscores Recovery: http://metanet.2.forumer.com/index.php?showtopic=19543 My multiplayer online flash game:http://www.infunity.com/
|
||

|
| Nexx |
Posted: March 20, 2008 01:27 am
|
|
Still Worthy of a Better Title Than This Group: Members Posts: 677 Member No.: 7378 Joined: June 13, 2007 |
EDIT: Yes, that would be better. Can someone please move it?
EDIT 2: @Templex: I added the Color Range function in the last section, so people know about it and can use it from here on out. Thanks for the tip! This post has been edited by Nexx on March 20, 2008 02:31 am -------------------- |
|
|

| _destiny^- |
Posted: March 20, 2008 09:37 pm
|
 UltraCool Group: Members Posts: 417 Member No.: 8187 Joined: October 22, 2007 |
to solve your extending writing thing, buy i bigger monitor (like me
 ) )lol sarcasm i don't actually have a clue -------------------- Never test the depth of water with both feet.
 My Bitesized Maps D-elemental My Races pm me for a collab |
|
|
| Condog |
Posted: March 21, 2008 03:23 am
|
 Lipogrammarian of the alveolar approximant. Group: Metanembers Posts: 1949 Member No.: 7977 Joined: September 14, 2007 |
Nice tutorial. Covers everthing you need to know. Well done.
 -------------------- -Not a bigger banjo fan than DW40. Seriously.
 ------------------  ------------------My Maps * My Bitesized Maps * The Gallery * Logik :: On the Hunt ------------------Mario Kart Wii Friend Code :: 0387 - 9134 - 6039 ------------------SSBB Friend Code :: 3781 - 0455 - 1348 ------------------PM me if you wanna play. |

|
| Sting::Ray |
Posted: March 26, 2008 01:18 am
|
 UltraCool Group: Members Posts: 284 Member No.: 9196 Joined: March 14, 2008 |
Thanks SO much for making this; it will be a very useful aid in creating my own image maps (coming soon!). Also, I have Photoshop, so it shouldn't even be very hard...
--------------------     [spoiler=My N v1.4 History:]Sometime in September 2007: I start playing N v1.4 Sometime in December 2007: I beat every column except 80-89; I get stuck on Episode 84 Sometime in December 2007 (later): I lose ALL my progress (.sol corrupted) Sometime in January 2008: Begin playing again Sometime in February 2008: Beat every column except 80-89; get to Episode 82 March 9th 2008: I get to 88:4 'Mother Thumping Impossible' March 12th 2008: I beat 'Mother Thumping Impossible' March 13th 2008: I beat N v1.4 and joined the forum! [/spoiler][spoiler=My NReality History:]March 24th 2008: I start playing NReality[/spoiler][spoiler=My Maps:]Wild Goose Chase Tunneling Through the Fire Hospital Hospital 2 {MNNM} Coordination {PlayerMod} Freefall {ACPT} Not a switch too soon {MNNM} Obese Crosshairs {MNNM} Uneven Terrain Nomen Abstractum [/spoiler] |
|
|
| Unreality |
Posted: March 27, 2008 12:28 pm
|
||
|
Software Ngineer Group: Metanembers Posts: 996 Member No.: 2642 Joined: February 16, 2006 |
This is a post copied from NReality main thread:
The awesomeness of NReality knows no bound. Now the foreground of NReality supports different blendmodes! This is a transparent update where you don't need to download anything to have this happened. The default NReality map has the inverted blendmode applied. Please take a look at the bottom left corner of the ninja, half of the body is inverted to white color, and half of the body is remained to be black  The blend mode can affect the ninja, as well as drones tiles gold mines and everything underneath the foreground image. There are 1 to 14 blend modes, description copied from flash help 1 "normal"  The movie clip appears in front of the background. Pixel values of the movie clip override those of the background. Where the movie clip is transparent, the background is visible. 2 "layer"  Forces the creation of a temporary buffer for precomposition for the movie clip. This is done automatically if there is more than one child object in a movie clip and a blendMode setting other than "normal" is selected for the child. 3 "multiply"  Multiplies the values of the movie clip constituent colors by those of the background color, and then normalizes by dividing by 0xFF, resulting in darker colors. This setting is commonly used for shadows and depth effects. For example, if a constituent color (such as red) of one pixel in the movie clip and the corresponding color of the pixel in the background both have the value 0x88, the multiplied result is 0x4840. Dividing by 0xFF yields a value of 0x48 for that constituent color, which is a darker shade than that of the movie clip or that of the background. 4 "screen"  Multiplies the complement (inverse) of the movie clip color by the complement of the background color, resulting in a bleaching effect. This setting is commonly used for highlights or to remove black areas of the movie clip. 5 "lighten"  Selects the lighter of the constituent colors of the movie clip and those of the background (the ones with the larger values). This setting is commonly used for superimposing type. For example, if the movie clip has a pixel with an RGB value of 0xFFCC33, and the background pixel has an RGB value of 0xDDF800, then the resulting RGB value for the displayed pixel is 0xFFF833 (because 0xFF > 0xDD, 0xCC < 0xF8, and 0x33 > 0x00 = 33). 6 "darken"  Selects the darker of the constituent colors of the movie clip and those of the background (the ones with the smaller values). This setting is commonly used for superimposing type. For example, if the movie clip has a pixel with an RGB value of 0xFFCC33, and the background pixel has an RGB value of 0xDDF800, the resulting RGB value for the displayed pixel is 0xDDCC00 (because 0xFF > 0xDD, 0xCC < 0xF8, and 0x33 > 0x00 = 33). 7 "difference"  Compares the constituent colors of the movie clip with those of its background, and subtracts the darker of the values of the two constituent colors from the lighter one. This setting is commonly used for more vibrant colors. For example, if the movie clip has a pixel with a RGB value of 0xFFCC33, and the background pixel has an RGB value of 0xDDF800, the resulting RGB value for the displayed pixel is 0x222C33 (because 0xFF - 0xDD = 0x22, 0xF8 - 0xCC = 0x2C, and 0x33 - 0x00 = 0x33). 8 "add"  Adds the values of the constituent colors of the movie clip to those of its background, applying a ceiling of 0xFF. This setting is commonly used for animating a lightening dissolve between two objects. For example, if the movie clip has a pixel with an RGB value of 0xAAA633, and the background pixel has an RGB value of 0xDD2200, the resulting RGB value for the displayed pixel is 0xFFC833 (because 0xAA + 0xDD > 0xFF, 0xA6 + 0x22 = 0xC8, and 0x33 + 0x00 = 0x33). 9 "subtract"  Subtracts the values of the constituent colors in the movie clip from those of the background, applying a floor of 0. This setting is commonly used for animating a darkening dissolve between two objects. For example, if the movie clip has a pixel with an RGB value of 0xAA2233, and the background pixel has an RGB value of 0xDDA600, the resulting RGB value for the displayed pixel is 0x338400 (because 0xDD - 0xAA = 0x33, 0xA6 - 0x22 = 0x84, and 0x00 - 0x33 < 0x00). 10 "invert"  Inverts the background. 11 "alpha"  Applies the alpha value of each pixel of the movie clip to the background. This requires the "layer" blendMode setting to be applied to a parent movie clip. For example, in the illustration, the parent movie clip, which is a white background, has blendMode = "layer". 12 "erase"  Erases the background based on the alpha value of the movie clip. This requires the "layer" blendMode to be applied to a parent movie clip. For example, in the illustration, the parent movie clip, which is a white background, has blendMode = "layer". 13 "overlay"  Adjusts the color of each bitmap based on the darkness of the background. If the background is lighter than 50% gray, the movie clip and background colors are screened, which results in a lighter color. If the background is darker than 50% gray, the colors are multiplied, which results in a darker color. This setting is commonly used for shading effects. 14 "hardlight"  Adjusts the color of each bitmap based on the darkness of the movie clip. If the movie clip is lighter than 50% gray, the movie clip and background colors are screened, which results in a lighter color. If the movie clip is darker than 50% gray, the colors are multiplied, which results in a darker color. This setting is commonly used for shading effects. To apply blendmode to the foreground image, just add a ?[blendmode] to the end of image url e.g. http://img480.imageshack.us/img480/4760/ichigo28bh.png?10 You can load the default NReality map 111791 and look at the map data for reference This post has been edited by Unreality on March 28, 2008 01:14 am -------------------- 1 x past 0th, 2 x past tied-0th NReality: 200 Episodes + Image Map Functionality + Speedhack blockage + Level Highscores Recovery: http://metanet.2.forumer.com/index.php?showtopic=19543 My multiplayer online flash game:http://www.infunity.com/
|
||
|
|
| Nexx |
Posted: March 27, 2008 08:37 pm
|
|
Still Worthy of a Better Title Than This Group: Members Posts: 677 Member No.: 7378 Joined: June 13, 2007 |
You. Are. F***ing. Kidding. Me.
That's.... You.... Wow. I just have no words to describe this awesomeness. Unreality, would you mind copying that post and putting it in the image-map thread? This post has been edited by Nexx on March 27, 2008 08:37 pm -------------------- |
|
|
| Evil Bob |
Posted: March 31, 2008 04:35 pm
|
 custom title in the shape of male reproductive organs Group: Metanembers Posts: 875 Member No.: 1448 Joined: September 24, 2005 |
Yeah . I am definitely using blend modes on some new maps. The tutorial is pretty good though my methods are much different than yours. Especial with the whole hand drawn map scene. I might share my method if anyone wishes ( I could do a step by step process of a map =D )
-------------------- Going Postal ( It's a demo and it's free )
|

|
| Templex |
Posted: April 01, 2008 10:02 pm
|
||
|
to the sky Group: Metanembers Posts: 819 Member No.: 1202 Joined: August 07, 2005 |
LIES! Do Alt+Space or Ctrl+Space or whatever it is on Windows and click on the image, or make a rectangle with the keys held to zoom into that area. -------------------- |
||
|
|
 )
)| Sithmaster |
Posted: April 05, 2008 01:57 am
|
||
 UltraCool Group: Members Posts: 319 Member No.: 7495 Joined: June 28, 2007 |
can this be done in GIMP, I tried, but I couldn't find a magic wand, only a tool for "selecting contiguous region." Is that the same thing, I'm having a lot of trouble with this? If this guide doesn't work for GIMP, can someone explain how to get this idea to work on GIMP?
-------------------- Chewbacca's PokePet   McAwesome the level up Pikachu! [spoiler]Blue_Tetris: Wait, wait wait. Does this mean I can break the rules to provoke a reaction and not get banned? ...awesome! The next few days are gonna be some fun. Someguy: Eagles may soar in the sky, but weasels never get sucked right into a jet engine Steven Colbert: I see patterns where they don't where they don't exist!!! Mosh: Fishing for fish only works if the fish are hungry. Don't ask the fish why they don't bite. Rather, consider why they aren't biting. Or simply chuck a grenade in the lake, pick up the dead fish, and call it a day. capt_weasle: Mare is actually reagan who is really Tsukatu, who is actually just God. And you can't say he isn't because that would mean he doesnt believe in himself. He just has a low self esteem. Poor guy. Palemoon:thanks, maestro. Now i can stop smearing paste on my face with a broom Animator:Eat those poor gingerbread men? For shame. Do you know how many widows are in a gingerbread family? Millions. They have been fighting a war with humanity ever since they were made just to survive and live, with no luck! Think of the children, man! Those poor gingerbread children who are orpahns now, because their moms and dads were eaten, AND THEY WILL SHARE THE SAME FATE TOO! It's saddening. Please, go out there and raise money to save this ever-endangered reality of sugar and bread. Please, for the sake of this kind... think of the oven. Player 1:You may very well be the first person on the planet to have his faced caved in by a fistful of turkey. Congratulations.  [/spoiler][spoiler] [/spoiler][spoiler]
|
||
|
|


| Templex |
Posted: April 05, 2008 04:40 am
|
||
|
to the sky Group: Metanembers Posts: 819 Member No.: 1202 Joined: August 07, 2005 |
Color to Alpha -------------------- |
||
|
|
| Nexx |
Posted: April 12, 2008 03:17 am
|
|
Still Worthy of a Better Title Than This Group: Members Posts: 677 Member No.: 7378 Joined: June 13, 2007 |
Okay, so I'm in PS and I'm using the paintbrush to draw lines (on an otherwise transparent layer). I have my lines, now how do I paint a solid color on one side of that line while leaving the other side transparent? I really don't want to use the polygonal lasso tool to trace the whole line over again (which is a loop) - that's my last resort. But everything else I try leaves a little border between the painted area and the paintbrush line. This is such a simple thing, there MUST be a simple solution!
This post has been edited by Nexx on April 12, 2008 03:18 am -------------------- |
|
|
| Ad |
Posted: April 12, 2008 01:46 pm
|
|
Evil Genius Group: Metanembers Posts: 1370 Member No.: 2487 Joined: January 31, 2006 |
...Niiiice.
*Gives imaginary Good Karma* -------------------- THE FORUMS ARE NOT BEING MOVED!
IT IS ALL LIESSSSSSS ...RIGHT, THEY MAY HAVE ACTUALLY MOVED NOW, BUT YOU CAN STILL FIDDLE WITH THE SIGANATURRSSSSSSS |
|
|
| Pikman |
Posted: April 13, 2008 01:12 am
|
 Still Worthy of a Better Title Than This Group: Members Posts: 703 Member No.: 9169 Joined: March 10, 2008 |
Even with this amazing tutorial, I still have a few questions.
1. What is the size of each grid square? I can't tell if you're counting the outside boundaries or not. 2. Would uploading an image for use as foreground into MappyWin32 v1.4, with the blank parts pink because that's what it recognizes as transparent, upload with the background pink or transparent? --------------------  Formerly kisler. I'm ready to collab with most people any time. |
|
|
| Nexx |
Posted: April 13, 2008 01:59 am
|
|
Still Worthy of a Better Title Than This Group: Members Posts: 677 Member No.: 7378 Joined: June 13, 2007 |
1. 792x600 includes the border. If you just want the playable area, then it's 744x552 (each grid square is 24x24).
2. I know nothing about the program you're talking about, but it seems to me that it would depend on whether or not the program could distinguish between translucent and non-translucent pink. But maybe not. In any case, give it a try. If it doesn't work, you can always try out blendmodes (this sounds complicated, but it isn't too bad). See, I just realized the other day that you CAN use Paint to make your images, you just have to figure out a blendmode that works for you. For example, if the colors you've putting over the foreground are all lighter than the dark gray default color, then set the pink area to black and choose the blendmode "lighten". If it's the other way around, set the pink to white and choose "darken". If it's a mix, you may have to mess around with it more (ex: hardlight), but you should be able to get it to work. I haven't actually tested this out yet, but it should be fine. -------------------- |
|
|
| Templex |
Posted: April 13, 2008 03:05 am
|
||
|
to the sky Group: Metanembers Posts: 819 Member No.: 1202 Joined: August 07, 2005 |
Magic wand that area and increase the selection size by 1 or 2 pixels (Select > Modify > Expand). Then fill it with whatever you want. -------------------- |
||
|
|
| Nexx |
Posted: April 13, 2008 05:49 am
|
|
Still Worthy of a Better Title Than This Group: Members Posts: 677 Member No.: 7378 Joined: June 13, 2007 |
Arg, duh!!!!
I was thinking that expanding/contracting would do the trick, but for whatever reason I was drawing a blank as to how exactly it would help. In retrospect, that's so obvious! This post has been edited by Nexx on September 24, 2008 06:59 am -------------------- |
|
|
| Pikman |
Posted: April 13, 2008 11:00 am
|
||
|
Still Worthy of a Better Title Than This Group: Members Posts: 703 Member No.: 9169 Joined: March 10, 2008 |
1. Thanks! 2. If the map has multiple layers, MappyWin32 will take pink (color 255,0,255) and make it transparent so you can see the layers behind. If you use black or white, the color will show up in the picture. I'm dealing with two layers, the background and the foreground, so I wonder if I make the foreground image in Paint and then slather pink over the open parts, then bring it into Mappy and export it as an image file, if it will retain transparency. The instruction manual gives me nothing on this matter, so that's why I'm asking. And that last part...what?? Last I checked, there's no blending in MS Paint. This post has been edited by kisler on April 13, 2008 11:01 am -------------------- Formerly kisler. I'm ready to collab with most people any time. |
||
|
|
| Nexx |
Posted: April 13, 2008 08:06 pm
|
|
Still Worthy of a Better Title Than This Group: Members Posts: 677 Member No.: 7378 Joined: June 13, 2007 |
Oh, sorry, blendmode is something you can use in NReality. Basically you design your foreground and background as you like, and then you set a particular blendmode in the mapdata and see how it looks. I'll try to get an example up either today or tomorrow so you can see.
-------------------- |
|
|
| UniverseZero |
 Posted: June 05, 2008 05:06 am Posted: June 05, 2008 05:06 am
|
 Member Group: Members Posts: 42 Member No.: 9667 Joined: May 26, 2008 |
Nexx,
What program can I get to use transparencey that I can get free online? --------------------  This is the old me. If you haven't seen the new me, then I suggest you crawl out from under that rock and come and find me. |
|
|
| PsychoSnail |
Posted: June 05, 2008 05:15 am
|
 SOOOO much worthier than a better title than this! Group: Members Posts: 879 Member No.: 8481 Joined: December 07, 2007 |
If you use Windows, you can get Paint.NET, or you can get The GIMP, which is compatible with Linux, Mac, and Windows. I'm sure there are others, but those are the only two I've used, and both work very well.
-------------------- |
|
|
 ]
]


| UniverseZero |
Posted: June 05, 2008 06:14 am
|
|
Member Group: Members Posts: 42 Member No.: 9667 Joined: May 26, 2008 |
OK...
I've got Gimp, how do I create transparency? -------------------- This is the old me. If you haven't seen the new me, then I suggest you crawl out from under that rock and come and find me. |
|
|
1 User(s) are reading this topic (1 Guests and 0 Anonymous Users)
0 Members:
