

This post is written by Laurel of Sing All You Want.
* * *
I may have a slight obsession with cowls and scarves. I have a closet rack full of them and yet, I still find myself pawing them in every store. For starters, I’m always cold and I love how a nice soft cowl warms me right up. And, then, I tend to dress in uniforms – you know, t-shirts and jeans, day after day – so I love how a pretty cowl or scarf suddenly turns my uniform into a fun outfit. They are my favorite accessory!

So, today, I’m sharing a tutorial for a crazy soft and dreamy lightweight cowl with a bright crochet edging. This cowl has been something that’s been floating around in my brain for so long, I’m thrilled to finally bring it to life.

Discovering this lovely reversible double gauze in Rachael’s shop pretty much sealed the deal – it’s so perfect! I loved the idea of a single layer lightweight cowl, but I wanted to add something special to make it pop.
The crochet-edging was inspired by this tutorial by The Purl Bee. I once crocheted a similar edging on a pillow, so I knew it would be a great way to add some bright interest to a simple cowl. Please, please don’t cross this project off your list simply because you’re not a crocheter. I am truly a novice myself so please know that this edging is totally doable!
I say grab a hook, some yarn, and give it a whirl. Are you ready to get started? Let’s go…

Notes
First, let’s talk fabric. This cowl is designed for lightweight woven fabrics, such as double gauze, cotton lawn, or voile. It is important that the fabric you choose look nice on both sides, because both sides will be visible when you wear it. Rachael’s shop has a number of fabulous options:
- Solid double gauze
- Teeny Dots double gauze (I used this in cobalt)
- Cotton Lawns
- Cotton Hemp
Now, let’s talk yarn. I chose this Stroll fingering weight sock yarn by Knit Picks (in Dandelion). It comes in tons of different colors is soft, affordable, and washable! There are also tonal, hand-painted, glimmer and tweed versions. You could certainly choose a different yarn, however, I would pick a yarn with a similar crochet gauge to the Stroll yarn (21-32 sc = 4″ on B-E size hooks).
Supplies

- 1/2 yard lightweight woven fabric (I used this in Cobalt)
- ~10 g fingering weight yarn (I used this in Dandelion) – I think I used about 35 yds/cowl
- Size B (2.25 mm) crochet hook
- coordinating thread
Sew the Cowl
IMPORTANT: Prewash your fabric and press well. I found the double gauze can be a bit stretchy and crinkly (in a lovely way) so it’s important to press well before cutting and sewing your cowl.
1) From your 1/2 yd of fabric cut a piece that is approximately 16″ x 42″ (or width of fabric with the selvages trimmed).
2) Choose one side of your fabric to be the “wrong side”. For the purposes of this tutorial, my wrong side is the white side. Fold the long edge of your fabric over 1/2″ towards the wrong side and press. Fold over again 1/2″ towards the wrong side, press, and pin in place. Hem this side by stitching very close (~1/8″) to the fold. Repeat on the other long side. Lightweight fabrics with a little bit of stretch can be a bit wavy along the edge, making it tricky to hem. That’s ok – it’s not essential that your hem be perfectly straight for this cowl – just do your best!

3) Now we will sew the short edges of the cowl together with a french seam. It’s easy, I promise! And the end result est parfait – that would be perfect. Align the short edges of your fabric with wrong sides facing. Pin and sew along the short edge with a 1/4″ seam allowance. Trim the seam allowance to approximately ~1/8″ being careful not to cut through the seam and press the seam to one side.

4) Turn the fabric wrong side out, fold at the seam, press well, and pin. Now, sew along the short edge with a 3/8″ seam allowance. You will be enclosing your seam from step 3).

Your cowl should now look like this. Congrats – you’ve sewn a french seam!

5) Press your french seam flat to one side. With the wrong side facing out, sew along the outer edge of the seam, very close to the edge (~1/8″) securing the seam (so that it is no longer like a flap).

Now, you’ve finished your cowl! You can stop here or continue and add a fun crochet edging.
Crochet Edging
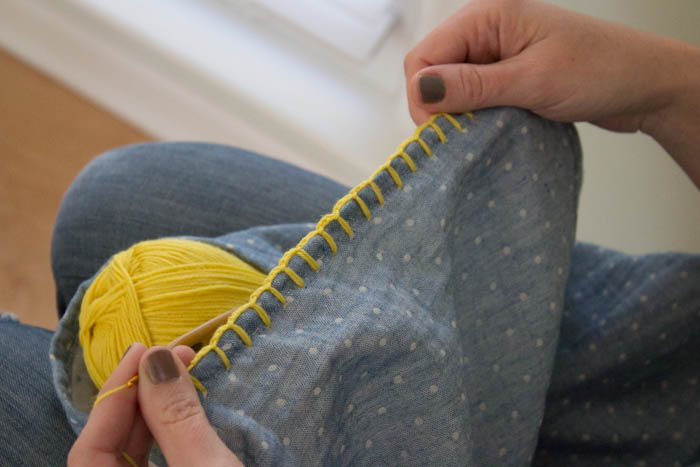
Grab your finished cowl, yarn, and crochet hook and let’s make that pretty edging. We will work with the cowl right side facing out. If you are new to crocheting, I suggest testing out the stitches on a scrap piece of fabric. Also, a general recommendation: if the crocheting is too tight, it will cause your hem to curl under the edging. So, try to keep your crochet somewhat loose and maintain a nice flat hem.

1) Leave a tail about 6″ long at the beginning of your work.

2) Insert the crochet hook into the fabric where the short edge and long edge seams meet, just below the seam line. Make sure you’re inserting the hook through the single layer of fabric and not into the hem.

Here’s a view from the wrong side.

3) Grab the yarn with your hook and pull a loop through the hole you just made.

Pull the yarn loop up enough that it is above the edge of the cowl. You may need to secure the tail end of the yarn on the back with your other hand (in this case, my left hand).

4) Now pull a loop through the loop you just made.

5) Chain 3 times. For a crochet newbie like me, this just means pull the yarn through the loop on your hook 3 times, creating a chain of stitches.

6) Insert your hook into the fabric below the hem approximately 1/2″ down from the first hole.

7) Again, pull a loop through the hole.

8) You should have two loops on your hook. Pull the loop you just made through the loop from the end of your chain stitches leaving one loop on your hook.

9) Chain 3 times.

10) Continue, repeating the pattern from Step 6). Your edging should look like this. The back will look a bit different with the yarn making a V-shape across the hem (shame on me for not getting a good picture of this!).
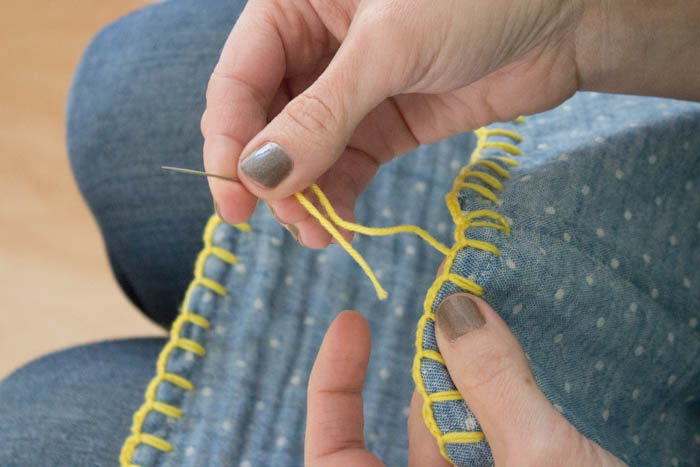
11) When you reach the end of the cowl, try to make your last stitch as close to the short edge hem as possible. Now chain enough times to reach the first strip – it took me about 5. Insert hook into the first strip, pull the yarn through, trim and tie off.

12) Last, weave in your ends. I put my yarn tail onto a large embroidery needle, wove the ends into and out of the hem edge several times, and then trimmed the yarn.
Repeat the edging on the other side of your cowl and you’re finished! Enjoy!


Laurel Krynock
Latest posts by Laurel Krynock (see all)
- sewing: patchwork flannel pillow tutorial - November 18, 2014
- selfish sewing week: bess top with knits - September 23, 2014
- sewing: Interweave Chambray Whole Lotta Bag - July 15, 2014
This is so cool! Love it!
How cute! That looks so cozy! :)
Thanks for sharing this tutorial – all those photos are really helpful!
Cute idea :o)