


A new low-cost sky tracker promises to simplify not only tracking the sky but also taking time-lapses panning along the horizon. It works but …
If you are an active nightscape photographer chances are your social media feeds have been punctuated with ads for this new low-cost tracker from MoveShootMove.com.
For $200, much less than popular trackers from Sky-Watcher and iOptron, the SiFo unit (as it is labelled) offers the ability track the sky, avoiding any star trails. That alone would make it a bargain, and useful for nightscape and deep-sky photographers.
But it also has a function for panning horizontally, moving incrementally between exposures, thus the Move-Shoot-Move designation. The result is a time-lapse movie that pans along the horizon, but with each frame with the ground sharp, as the camera moves only between exposures, not during them.

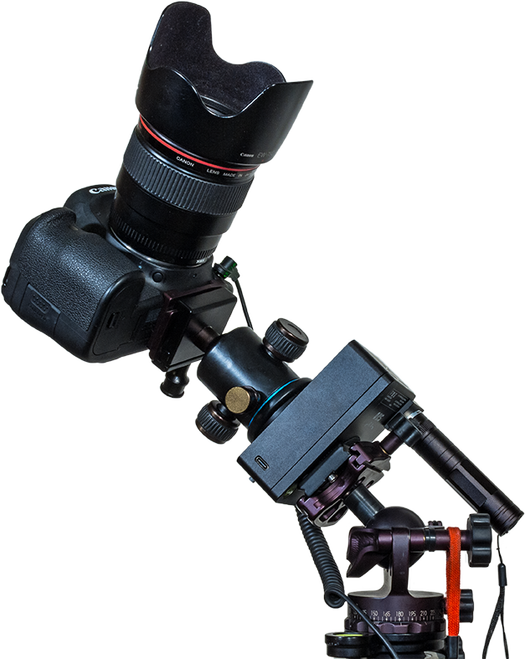
The $200 MSM can be polar aligned using the optional laser, shown here, or an optical polar scope to allow to follow the sky. The ball head is user supplied.
Again, for $200 this is an excellent feature lacking in trackers like the Sky-Watcher Star Adventurer or iOptron SkyTracker. The Sky-Watcher Star Adventurer Mini does, however, offer both tracking and “move-shoot-move” time-lapse functions, but at a cost of $300 to $400 U.S., depending on accessories.
All these functions are provided in a unit that is light (weighing 700 grams with a tripod plate and the laser) and compact (taking up less space in your camera bag than most lenses). By comparison, the Star Adventurer Mini weighs 900 grams with the polar scope, while the original larger Star Adventurer is 1.4 kg, double the MSM’s weight.
Note, that the MSM’s advertised weight of 445 grams does not include the laser or a tripod plate, two items you need to use it. So 700 grams is a more realistic figure, still light, but not lighter than the competition by as much as you might be led to believe.
Nevertheless, the MSM’s small size and weight make it attractive for travel, especially for flights to remote sites. Construction is solid and all-metal. This is not a cheap plastic toy.
But does it work? Yes, but with several important caveats that might be a concern for some buyers.
What I Tested
I purchased the Basic Kit B package for $220 U.S., which includes a small case, a laser pointer and bracket for polar alignment (and with a small charger for the laser’s single 3.7-volt battery), and with the camera sync cable needed for time-lapse shooting.
I also purchased the new “button” model, not the older version that used a knob to set various tracking rates.

Keep in mind that to use any tracker like the MSM you will need a solid tripod with a head good enough to hold the tracker and camera steady when tipped over when polar aligned, and another ball head on the tracker itself.
The ball head needed to go on top of the tracker is something you supply. The kit does come with two 3/8-inch stud bolts and a 3/8-to1/4-inch bushing adapter, for placing the tracker on tripods in the various mounting configurations I show below.
While it is labelled as ‘SiFo,” there is little indication what that means. It is the parent company name, but the website, emails, and credit card billing are labelled as MoveShootMove.com. I’ll just call it the MSM tracker.
I purchased the gear from the MSM website, and had my order fulfilled and shipped to me in Canada from China with no problems.
Tracking the Sky in Nightscapes
The attraction is its tracking function, allowing a camera to follow the sky and take exposures longer than any dictated by “500” or “NPF” Rules to avoid any star trailing.
Exposures can be a minute or more to record much more depth and detail in the Milky Way, though the ground will blur. But blending tracked sky exposures with untracked ground exposures gets around that, and with the MSM it’s easy to turn on and off the tracking motor, something not possible with the low-cost wind-up Mini Track from Omegon.

The MSM is shown in illustrations and instructions mounted by its side panel bolt hole. This works, but produced problems with the gears not meshing well and the MSM not tracking at all for initial exposures.
The illustrations and instructions (in a PDF well-hidden off the MSM Buy page) show the MSM mounted using the 1/4-20 bolt hole on the side of the unit opposite the LED-illuminated control panel. While this seems to be the preferred method, I found it produced serious mis-tracking problems.

A set of five consecutive 1-minute exposures taken with the MSM mounted by its side bolt hole showed the MSM’s habit of taking several minutes for the gears to mesh and to begin tracking. Tap or click to download full-res version.
With a Canon 6D MkII and 50mm f/1.4 lens (not a particularly heavy combination), the MSM’s gears would not engage and start tracking until after about 5 minutes. The first exposures were useless. This was also the case whenever I moved the camera to a new position to re-frame the scene or sky. Again, the first few minutes produced no or poor tracking until the gears finally engaged.
This would be a problem when taking tracked/untracked sets for nightscapes, as images need to be taken in quick succession. It’s also just plain annoying.

With patience and persistence you can get well-tracked nightscapes with the MSM. This is a single 1-minute exposure with a 50mm lens. Tap or click to download full-res version.
Mounting Options
The solution was to mount the MSM using the 3/8-inch bolt hole on the back plate of the tracker, using the 1/4-20 adapter ring to allow it to attach to my tripod head. This still allowed me to tip the unit up to polar align it.

Mounting the MSM using its back plate produced more reliable tracking results, though requires swapping mounting bolts and 3/8-1/4-inch adapter rings from the preferred method of mounting the MSM for time-lapse work.
Tracking was now much more consistent, with only the first exposure usually badly trailed. But subsequent exposures all tracked, but with varying degrees of accuracy as I show below.
When used as a tracker, you need to control the camera’s exposure time with an external intervalometer you supply, to allow setting exposures over 30 seconds long.
The MSM offers a N and S setting, the latter for use in the Southern Hemisphere. A 1/2-speed setting turns the tracker at half the normal sidereal rate, useful for nightscapes as a compromise speed to provide some tracking while minimizing ground blurring.
Polar Alignment
For any tracker to track, its rotation axis has to be aimed at the Celestial Pole, near Polaris in the Northern Hemisphere, and near Sigma Octantis in the Southern Hemisphere.
The MSM’s bright laser pointer is useful for aiming the tracker at the North Celestial Pole, located about a degree away from Polaris in the direction of Alkaid, the end star in the Handle of the Big Dipper or Plough.
I chose the laser pointer option for this, rather than the polar alignment scope. The laser attaches to the side of the MSM using a small screw-on metal bracket so that it points up along the axis of rotation, the polar axis.
The laser is labeled as a 1mw unit, but it is far brighter than any 1mw I’ve used. It looks more like a 10mw. This makes it nice and bright, allowing the beam to show up even when the sky is not dark. The battery is rechargeable and a small charger comes with the laser. Considering the laser is just a $15 option, it’s a bargain.
But be warned, use of any such green laser pointer will be illegal in some areas, especially close to airports, and outlawed entirely in some jurisdictions such as Australia, a fact the MSM website mentions.
The legal alternative is the optical polar alignment scope. I already have several of those, but my expectation that I could use one I had with the same bracket supplied with the laser were dashed by the fact that the bracket’s hole is too narrow to accept any of the other polar alignment scopes I have, which are all standard items. I you want a polar scope, buy theirs for $70.
However, if you can use it where you live, the laser works well enough, allowing you to aim the tracker at the Pole just by eye. For the wide lenses the tracker is intended to be used with, eyeball alignment proved good enough.
Just be very, very careful not to accidentally look down the beam. Seriously. It is far too easy to do by mistake, but doing so could damage your eye in moments.
Tracking the Sky in Deep-Sky Images
How well does the MSM actually track? In sets of exposures with 35mm, 50mm, and 135mm lenses, and with the tracker mounted on the back, I found that 25% to 50% of the images showed mis-tracking. Gear errors still produced slightly trailed stars. This gear error shows itself more as you shoot with longer focal lengths.

A set of 2-minute exposures with the MSM mounted by its back plate showed better tracking with quicker gear meshing, though still with some frames showing trailing. Tap or click to download full-res version.
The MSM is best for what it is advertised as — as a tracker for nightscapes with forgiving wide-angle lenses in the 14mm to 24mm range. With longer lenses, expect to throw away a good number of exposures as unusable. Take twice as many as you think you might need.

A set of 20 one-minute exposures with a 135mm lens showed more than half with unusable amounts of mis-tracking. But enough worked to be usable! Tap or click to download full-res version.
With a 135mm lens taking Milky Way closeups, more than half the shots were badly trailed. Really badly trailed. This is not from poor polar alignment, which produces a gradual drift of the frame, but from errors in the drive gears, and random errors at that, not periodic errors.
To be fair, this is often the case with other trackers as well. People always want to weight them down with heavy and demanding telephotos for deep-sky portraits, but that’s rarely a good idea with any tracker. They are best with wide lenses.
That said, I found the MSM’s error rate to be much worse than with other trackers. With the Star Adventurer models and a 135mm lens for example, I can expect only 20% to 25% of the images to be trailed, and even then rarely as badly as what the MSM exhibited.

The result of the above set was a stack of 8 of the best for a fine portrait of the Milky Way area in Sagitta, showing the Dumbbell Nebula and Coathanger asterism. Each sub-frame was 1 minute at f/2 and ISO 1600. Tap or click to download full-res version.
Yes, enough shots worked to be usable, but it took using a fast f/2 lens to keep exposure times down to a minute to provide that yield. Users of slow f/5.6 kit-zoom lenses will struggle trying to take deep-sky images with the MSM.
In short, this is a low-cost tracker and it shows. It does work, but not as well as the higher-cost competitors. But restrict it to wide-angle lenses and you’ll be fine.
NOTE ADDED AUGUST 24
Since I published the review, MSM has seen the test and admitted that the earlier units like mine (ordered in June) exhibited large amounts of tracking error. Their reply:
“Thank you so much for your review on MSM Rotator. And I want to share a piece of good news with you, regarding the tracking error issue. We think we’ve solved it.
We found that the problem lies in the motor we use. We’ve upgraded to one more powerful motor than previous version.”
I will test the new unit and publish revised results. But on the face of it, it sounds like units sold now will show much less tracking error than what I saw.
Panning the Ground
The other mode the MSM can be used in is as a time-lapse motion controller. Here you mount the MSM horizontally so the camera turns parallel to the horizon (or it can be mounted vertically for vertical panning, a mode I rarely use and did not test).
I performed all the time-lapse testing from my rural backyard on nights in mid-August 2019 with a waning Moon lighting the sky.
This is where the Move-Shoot-Move function comes in.
The supplied Sync cable goes from the camera’s flash hot shoe to the MSM’s camera jack. What happens is that when the camera finishes an exposure it sends a pulse to the MSM, which then quickly moves while the shutter is closed by the increment you set.
There is a choice of 4 speeds, marked in degrees-per-move: 0.05°, 0.2°, 0.5°, and 1.0°. For example, as the movie below shows, taking 360 frames at the 1° speed results in a complete 360° turn.

The control panel offers a choice of N and S rotation directions, a 1/2-speed rate for partially tracked nightscapes, and Move-Shoot-Move rates per move of 0.05°, 0.2°, 0.5° and a very fast 1° setting. The Sync cable plugs into the jack on the MSM. The other jack is for connecting to a motion control slider, a function I didn’t test.
The MSM does the moving, but all the shutter speed control and intervals must be set using a separate intervalometer, either one built into the camera, or an outboard hardware unit. The MSM does not control the camera shutter. In fact, the camera controls the MSM.
Intervals should be set to be about 2 seconds longer than the shutter speed, to allow the MSM to perform its move and settle.
This connection between the MSM and camera worked very well. It is unconventional, but simple and effective.

The preferred method of mounting the MSM for time-lapses is to do so “upside-down” with its rotating top plate at bottom attached to the tripod. Thus the whole MSM and camera turns, preventing the Sync cable from winding up during a turn.
Too Slow or Too Fast
The issue is the limited choice of move speeds. I found the 0.5° and 1° speeds much too fast for night use, except perhaps for special effects in urban cityscapes. Even in daytime use, when exposure times are very short, the results are dizzying, as I show below.
Even the 0.2°-per-move speed I feel is too fast for most nightscape work. Over the 300 exposures one typically takes for a time-lapse movie, that speed will turn the MSM (300 x 0.2°) = 60 degrees. That’s a lot of motion for 300 shots, which will usually be rendered out at 24 or 30 frames per second for a clip that lasts 10 to 12 seconds. The scene will turn a lot in that time.
On the other hand, the 0.05°-per-move setting is rather slow, producing a turn of (300 x 0.05°) = 15° during the 300 shots.
That works, but with all the motion controllers I’ve used — units that can run at whatever speed they need to get from the start point to the end point you set — I find a rate of about 0.1° per move is what works best for a movie that provides the right amount of motion. Not too slow. Not too fast. Just right.

When mounted as recommended for time-lapses, the control panel does end up upside-down.
Following the Sky in a Time-Lapse
The additional complication is trying to get the MSM to also turn at the right rate to follow the sky — for example, to keep the galaxy core in frame during the time-lapse clip. I think doing so produces one of the most effective time-lapse sequences.
But to do that with any device requires turning at a rate of 15° per hour, the rate the sky moves from east to west.
Because the MSM provides only set fixed speeds, the only way you have of controlling how much it moves over a given amount of time, such as an hour, is to vary the shutter speed.
I found that to get the MSM to follow the Milky Way in a time-lapse using the 0.05° rate and shooting 300 frames required shooting at a shutter speed of 12 seconds. No more, no less.

When mounted “upside-down” for a time-lapse the top surface provides the N-S direction arrows (N moves clockwise) and a small, handy bubble level.
Do the Math
Where does that number come from?
At its rate of 0.05°/move, the MSM will turn 15° over 300 shots. The sky moves 15° in one hour, or 3600 seconds. So to fit 300 shots into 3600 seconds means each shot has to be no longer than (3600/300) = 12 seconds long.
The result works, as I show in the sampler movie.
But 12 seconds is a rather short shutter speed on a dark, moonless night with the Milky Way.
For properly exposed images you would need to shoot at very fast apertures (f/1.4 to f/2) and/or high and noisy ISO speeds. Neither are optimal. But they are forced upon you by the MSM’s restricted rates.
Using the faster 0.2° rate yields a turn of 60° over 300 shots. That’s four hours of sky motion. So each exposure now has to be 48 seconds long for the camera to follow the sky, four times longer because the drive rate is now four times faster.
A shutter speed of 48 seconds is a little too long in my opinion. Stars in each frame will trail. Plus a turn of 60° over 300 shots is quite a lot, producing a movie that turns too quickly.

The other option is to mount the MSM so the control panel is right-side-up and the top turn-table (the part that turns and that the camera is attached to) is on top. Now only the camera turns; the MSM does not. This works but the Sync cable can wrap around and bind in long turns. For short turns of 30° to 60° it is fine.
By far the best speed for motion control time-lapses would have been 0.1° per move. That would allow 24-second exposures to follow the sky, allowing a stop less in aperture or ISO speed.
MSM — ditch the 1° rate.
Though MSM claims the unit was designed by astrophotographers, it’s hard to imagine any time-lapse experts thinking the speeds they settled on were the best.
Yes, having only a limited number of pre-wired speeds does make the MSM much easier to program than devices like the Star Adventurer Mini or SYRP Genie Mini that use wireless apps to set their functions. No question, the MSM is better suited to beginners who don’t want to fuss with lots of parameters.
But … If only the MSM had a better 0.1° speed, it would be ideal for beginners wanting to dabble in motion-control time-lapse.
As it is, getting a decent result requires some math and juggling of camera settings to make up for the MSM’s limited and, in my opinion, wrong choices of speeds.
Time-Lapse Movie Examples
This compilation shows examples of daytime time-lapses taken at the fastest and dizzying 0.5° and 1.0° speeds, and night time-lapses taken at the slower speeds. The final clip is taken at 0.05°/move and with 12-second exposures, a combination that allowed the camera to nicely follow the Milky Way, albeit at a slow pace. Taking more than the 300 frames used here would have produced a clip that turned at the same rate, but lasted longer.
Battery Life
The MSM is powered off an internal rechargeable battery, which can be charged from any 5-volt charger you have from a mobile phone.
The MSM uses a USB-C jack for the power cable, but a USB-A to USB-C cord is supplied, handy as you might not have one if you don’t have other USB-C devices.
The battery lasted for half a dozen or more 300-shot time-lapses, enough to get you through at least 2 or 3 nights of shooting. However, my testing was done on warm summer nights. In winter battery life will be less.
While the built-in battery is handy, in the field should you find battery level low (the N and S switches blink as a warning) you can’t just swap in fresh batteries. Just remember to charge up before heading out. Alternatively, it can be charged from an external 5V battery pack such as used to prolong cell phone life.

Other Caveats
The MSM does not offer, nor does it promise, any form of automated panorama shooting. This is where the device turns by, say, 15° to 45° between shots, to shoot the segments for a still-image panorama. More sophisticated motion controllers from SYRP and Edelkrone offer that function, including the ability to mate two devices for automated multi-tier panoramas.
Nor does the MSM offer the more advanced option of ramping speeds up and down at the start and end of a time-lapse. It moves at a constant rate throughout.
While some of the shortcomings could perhaps be fixed with a firmware update, there is no indication anywhere that its internal firmware can be updated through the USB-C port.
Conclusions
The MSM tracker is low-cost, well-built, and compact for easy packing and travel. It performs its advertised functions well enough to allow users to get results, either tracked images of the Milky Way and constellations, or simple motion-control time-lapses.
But it is best used with wide-angle lenses for tracked Milky Way nightscapes, and for simple time-lapses, provided you do to the math to get it to turn by the amount you want, working around the too-slow or too-fast speeds. A 0.1° per move rate would have been much better.
If you really value its compactness and your budget is tight, the MSM will serve you well enough. Otherwise, consider a Star Adventurer Mini for its far greater versatility and lower tracking errors.
— Alan Dyer / August 22, 2019 / © 2019 AmazingSky.com
