3d Printing
This lab uses a process based on a research project headed by Professor Nicholas Fang and developed at the Nano-CEMMS center at the University of Illinois. Dr. Fang's research group is using a UV sensitive monomer to do a form of three-dimensional printing called microstereo lithography. Using a video projector with a UV output, they are able to create incredibly thin polymer layers (on the order of 400 nm) and build objects layer by layer. This activity uses the same principle but at a much larger scale. This activity demonstrates the basic challenges of nanoscale engineering and manufacturing.
A regular video projector provides enough UV light to initiate a photochemical reaction by cleaving a molecule to form free radicals when white light is emitted. The free radicals will polymerize a monomer through an addition polymerization reaction. It will polymerize the solution, becoming solid, only where the white light is projected. It will remain an unreacted liquid elsewhere.
Successive layers are made by lowering the polymerized shape into a beaker of the solution. A thin layer of fresh solution flows over the top and light is again projected to solidify portions of the fresh layer. This is repeated, creating a 3 dimensional object layer by layer.
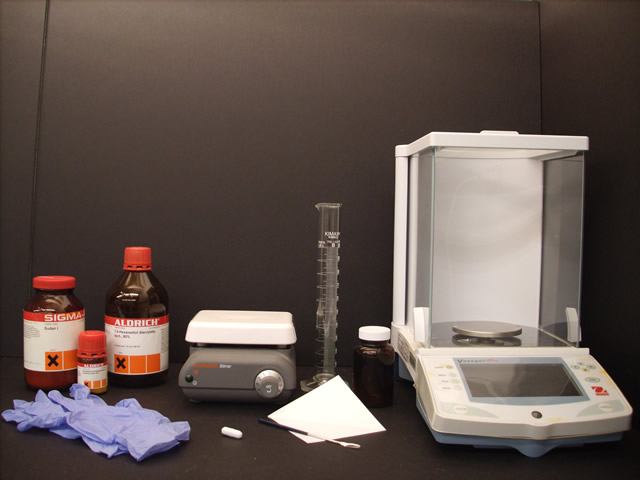
Materials
|
Click on either image above to |
Experimental Procedure
- Prepare polymer
-
Mass .006 g of Sudan I, Mass 2.00 g of phenylbis(2,4,6-trimethylbenzoyl)-phosphine oxide, measure 98 mL of Polyethylene Glycol Dicrylate
-
Mix all three components in 100 mL amber bottle. Add stirbar, put on stir plate gently mixing, allow to mix for a minimum of three days to allow all chemicals to dissolve
-
- Set up the printer
-
Staging device moves on a threaded rod. Be sure threaded rod is moved to the top to allow full range of movement when printing.
- Stage has a locking mechanism, unlock stage to pull it up or down. Place beaker on stage
-
Place projector, magnifying glass, mirror, and stage.
-
- Prepare to print
-
Use red text to focus the image from the projector onto the stage. The red text will not polymerize the polymer.
-
If needed, use projector focus to fine-adjust the focus. Often this step is not necessary because focus is achieved in the step above.
-
Fill the beaker with the polymer solution so that a very thin layer is covering the stage.
-
Using a red image of the object to locate position, move stage so the image slices will be project on the stage
-
- Print object
-
Project the image for 10 seconds, alternating with a couple seconds of black screen. When the screen is blank, make a quarter turn on the knob to lower the image and allow fresh polymer to flow over the top. (Note, the second portion of this video is a time lapse, condensing several minutes into a few seconds.)
-
- Remove and clean object
-
Move staging device out.
- Unlock stage a raise it out of the polymer.
-
Drain excess polymer and remove beaker.
-
Rinse solid object with water to remove excess polymer.
-
Remove object from stage and allow to dry.
- Expose object to uv (such as from the sun) to cause object to become more rigid as any unreacted polymer will solidify.
Downloadable Materials:
-
Activity Guide
Instructors guide containing all relevant information to conduct the lab
-
Presentation
Presentation for teacher to introduce the activity to students
Printing Library:
Click on any of these images to download the MS PowerPoint file necessary to create the object pictured using the process described above.
 Basketball Hoop |
 Chess Bishop |
 Chess Board |
 DNA |
 Jefferson Memorial |
|
 Chess King |
 Chess Knight |
 4-block Lego |
 8-block Lego |
 Lincolin Memorial |
 Nano-CEMMS Printer |
 Chess Pawns |
 Piano |
 Chess Rooks |
 Ship |
 Small Rooks |
Safety:
Goggles and aprons should be worn as in all chemistry laboratory activities.
Acknowledgements:
Thanks to Kangway Chang and Ian McInerney for all their assistance
Thanks to Chas Conway for the wonderful pictures
Developers
Joe Muskin and Matt Ragusa
